Looking for your next weekend project? This guide brings together 94 home decor DIY ideas for every room and every budget — from quick accent updates to full furniture makeovers.
94 Home Decor Projects: The Complete DIY Guide
Below is the most comprehensive collection of home decor DIY projects you'll find anywhere — 94 hands-on ideas, grouped by room and type so you can find exactly what fits your space, skill level, and budget. Each project includes a realistic difficulty rating, time and cost estimate, and a practical tip to help you get it right the first time.
💡 How to use this guide: difficulty, time, and cost are realistic estimates for a first-timer working on a typical budget. Prices are approximate and were current as of July 2026. Start with a Beginner project if you're new to DIY, and work your way up.
Wall & Art Projects
1. DIY Gallery Wall
Curate a statement wall with mixed frames and prints in a weekend

A gallery wall transforms a blank expanse into a personal, curated display that tells your story through a mix of framed prints, family photos, and artwork. The magic lies in layering different frame styles, sizes, and mat colors while keeping a cohesive color palette—think all black frames with white mats, or a mix of wood and metal tones. This approach feels intentional and collected, not chaotic, and works especially well in entryways, above sofas, or in hallway hallways where you want visual interest without overwhelming the space.
Start by laying everything on the floor in a grid or salon-style layout before drilling a single hole. Measure your wall space, sketch a rough arrangement, and use kraft paper templates taped to the wall to finalize placement. Mix frame widths and depths for visual rhythm, balance larger pieces with smaller ones, and stick to a 2-3 color scheme for cohesion. Budget-friendly sources include thrift stores, Target, IKEA, and Etsy prints. Pro tip: buy frames in bulk during sales, and use affordable poster prints to fill space while saving splurge-worthy vintage finds for focal points.
2. Peel-and-Stick Wallpaper Accent Wall
Transform one wall with removable wallpaper in under two hours for $30-$80

Peel-and-stick wallpaper transforms a single wall into a statement piece without commitment or damage. Whether you choose bold geometric patterns, moody florals, or textured finishes, one accent wall instantly anchors a room and adds personality. The removable nature makes it perfect for renters and indecisive decorators alike—no paint, no paste, no landlord drama. The impact-to-effort ratio is unbeatable for quick bedroom or living room refreshes.
Start by measuring your wall and ordering wallpaper with a few extra inches for trimming. Clean the wall thoroughly, then apply the adhesive side slowly, smoothing out bubbles as you go using a squeegee or credit card. Budget-friendly options from retailers like Peel and Stick or Spoonflower offer designer-quality patterns without premium pricing. Keep leftover scraps for touch-ups or small projects down the road.
3. Wooden Slat Accent Wall
Modern wood slat wall brings warmth and texture in one weekend

A wooden slat accent wall adds instant architectural interest and cozy warmth to any room. Thin vertical wood strips create a clean, contemporary vibe while breaking up flat drywall monotony. The texture catches light beautifully, making spaces feel more intentional and layered without overwhelming the room. This project works especially well behind a bed, sofa, or as a statement wall opposite an entryway.
Start by measuring your wall and purchasing prefinished shiplap or wooden slats (pine, oak, or affordable plywood strips work great). Use a level, studs finder, and nail gun to secure slats vertically from floor to ceiling, spacing them consistently. Paint slats before installation for cleaner results, or stain them for a richer look. Budget hack: opt for unpainted pine slats and finish them yourself, or choose pre-stained options to skip the painting step entirely.
4. Framed Fabric or Scarf Art
Transform scarves into gallery-worthy wall art for under $50

Stretching fabric or a vintage scarf over a wooden frame creates instant, large-scale art that feels curated and expensive. This technique works because it adds texture, color, and visual interest to flat walls without requiring any artistic skill. A bold patterned scarf becomes a statement piece, while neutral fabrics add subtle sophistication. The dimensional quality of stretched fabric catches light beautifully and works in any décor style from bohemian to modern minimalist.
Start with a wooden frame (thrift stores and craft retailers stock affordable options) and a scarf or fabric piece slightly larger than the frame opening. Lay the frame flat, center your fabric over it, and use a staple gun to secure the back, pulling gently to keep tension even. Fold corners like you're wrapping a gift for a polished finish. Budget tip: hunt thrift stores for vintage scarves and frames separately, then mix and match for a fraction of gallery prices.
5. Abstract Canvas Painting
Create modern abstract art on canvas for under $35 this weekend

Abstract canvas painting strips away the pressure of realism and lets color, texture, and intuition lead. A limited palette of just three to four colors creates a cohesive, intentional look that feels curated rather than chaotic. This approach works beautifully as statement art above a sofa or accent wall, adding personality without committing to a specific room style.
Start with a primed canvas, squeeze out three complementary colors onto a palette, and use brushes or even palette knives to layer shapes and strokes. Let colors blend naturally where they overlap, and don't overthink placement—the best abstract pieces feel spontaneous. Save money by buying student-grade acrylics in bulk and using discount canvases from art supply sales; splurge slightly on quality brushes for smoother application.
6. Floating Picture Ledges
Create a gallery wall with floating ledges for under $100

Floating picture ledges are slim, wall-mounted shelves designed to display framed prints, photos, and small décor without the commitment of permanent hanging. They create a curated, layered gallery effect that feels intentional and modern while allowing easy swaps and rearranges. This approach works especially well in rentals or for anyone hesitant about drilling into walls, and it softens hard wall space with personality and dimension.
Measure and mark stud locations, then install floating ledge brackets using appropriate anchors for drywall or studs. Arrange frames at varying heights and lean them at slight angles for visual interest, mixing frame sizes and matting styles. Budget tip: find frames at thrift stores or discount retailers, use white and natural wood tones for cohesion, and consider printing personal photos at home to customize affordably.
7. Washi Tape Wall Pattern
Create a bold geometric accent wall with washi tape in one afternoon

Washi tape transforms a plain wall into a graphic focal point without paint, holes, or permanent commitment. Create geometric shapes, a faux headboard outline, or staggered stripes that add visual interest and modern style. The removable adhesive works on clean walls and peels away cleanly, making it perfect for renters or anyone craving a quick refresh.
Start by sketching your design lightly in pencil or using a level and painter's tape as guides. Unroll washi tape slowly, pressing firmly as you go to avoid bubbles and ensure edges stay crisp. Mix different patterns and widths for visual depth, or keep it monochromatic for minimalist appeal. Buy tape in bulk on Amazon or at craft stores to maximize budget while experimenting with multiple colors and designs.
8. Pressed Botanical Frames
Create botanical wall art with pressed flowers and glass in one afternoon

Pressed botanical frames bring natural texture and organic beauty to any wall without fuss. By layering dried flowers, leaves, and grasses between glass panes or in shallow shadow boxes, you create delicate, gallery-worthy art that feels collected and intentional. The translucent quality lets light pass through, making botanicals glow while maintaining an airy, botanical-garden aesthetic that complements modern, farmhouse, and eclectic decor equally well.
Start by pressing fresh botanicals between paper towels and heavy books for one to two weeks. Once dry, arrange them on kraft paper or cardstock inside a simple frame or between two panes of glass held together with wood trim. Budget-friendly options include thrifted frames from flea markets, dollar-store glass panes taped together, or printable backing paper instead of custom matting. Group three to five frames in a gallery wall for maximum impact.
9. DIY Macrame Wall Hanging
Bohemian knotted wall art for under $30 in an afternoon

Macramé wall hangings bring instant texture and warmth to any space with their knotted cotton cord design. This bohemian-inspired craft creates an organic, handmade focal point that works beautifully above sofas, beds, or entryways. The layered knots catch light and shadow, adding depth and visual interest without overwhelming minimalist or eclectic rooms alike.
Start by choosing a wooden dowel or branch as your hanging rod, then cut cotton cord into lengths and tie the basic square knot and half-hitch patterns along the dowel. Most beginners master the core knots within minutes by following online video tutorials. Budget-friendly alternatives include using jute twine instead of cotton, sourcing driftwood instead of dowels, and shopping craft store clearance sections for cord.
10. Oversized Statement Mirror Frame
Frame a plain mirror with chunky wood for instant focal-point drama

An oversized statement mirror with a chunky handmade frame transforms a basic mirror into a showstopping focal point that anchors any room. The thick wood or rope frame adds dimension, warmth, and personality while the mirror itself reflects light and makes spaces feel larger. This project works because it's budget-friendly, visually bold, and instantly reads as intentional design—even in small rooms where it becomes the undeniable centerpiece.
Start by measuring your existing mirror, then build a simple frame from 2x4 lumber, 1x6 boards, or wrapped rope attached to a plywood backing. Miter the corners for a polished look, or overlap them for rustic charm. Secure the mirror to the plywood with construction adhesive and mirror clips. Sand, stain, or paint to match your decor. Budget hacks: source reclaimed wood from Habitat ReStores, skip the mirror and frame a plain acrylic sheet, or wrap rope around existing trim for zero demolition.
11. Shadow Box Display
Create a personalized shadow box display for under $50 this weekend

A shadow box is a deep-set frame that transforms flat wall space into a curated gallery for meaningful objects—think travel souvenirs, family heirlooms, pressed flowers, or vintage finds. The recessed depth creates visual interest and protects delicate keepsakes from dust while letting them shine as conversation starters. This project works brilliantly in bedrooms, entryways, and above desks, adding personality without taking up floor space.
Start by choosing a readymade shadow box frame (typically 1-3 inches deep) from a craft or hardware store, or repurpose an existing frame with backing board. Arrange keepsakes inside before permanently adhering them with museum-quality adhesive, foam dots, or small nails. Budget tip: hunt thrift stores for vintage frames to upcycle. Use kraft paper or fabric scraps as backing instead of buying mat board. Keep objects lightweight and grouped in odd numbers for visual balance.
Lighting Projects
12. Rope-Wrapped Pendant Light
Transform a basic pendant light with rope wrapping for $15-30

Wrapping a plain pendant light cord or shade in natural rope instantly elevates a boring fixture into a textured, coastal-inspired focal point. The layered rope creates warmth and visual interest while maintaining a minimalist aesthetic that works with farmhouse, modern, or eclectic decor. It's a genius way to refresh thrifted or builder-grade lighting without replacement costs. (See also: ENERGY STAR bulb guidance.)
Start by measuring your cord or shade, then wrap jute or cotton rope around it in tight, overlapping spirals using a hot-glue gun or strong adhesive. Work in small sections to keep tension even and prevent slipping. Budget hack: grab rope from a hardware store's clearance bin, or source affordable natural cordage online. Another savings trick—wrap only the visible cord section rather than the entire fixture for faster completion.
13. Mason Jar Sconces
Rustic wall sconces with mason jars and fairy lights under $40

Mason jar sconces bring farmhouse charm and soft ambient light to any wall. These wall-mounted jars paired with warm fairy lights or candles create an instant cozy vibe without the fussy elegance of traditional fixtures. They work beautifully in bedrooms, bathrooms, or entryways where you want layered, forgiving light that feels personal and handmade.
Mount mason jars using simple metal brackets or wire holders screwed directly into wall studs or anchors. Tuck battery-powered fairy lights inside each jar for cord-free convenience, or nestle pillar candles for a warmer glow. Pick matte black or vintage zinc brackets to match your décor, and consider painting jar lids to coordinate with your color scheme.
14. DIY Paper Lantern Cluster
Create a glowing focal point with layered paper lanterns under $40

Paper lantern clusters bring warmth and visual interest to any space by layering inexpensive globe lanterns at different heights. The staggered arrangement creates depth and draws the eye upward, making ceilings feel taller while casting soft, diffused light that feels instantly more designed than a single fixture. This approach works especially well above tables, in corners, or along hallways where you want to add dimension without overwhelming the room.
Start by purchasing 3-5 paper lanterns in coordinating colors or sizes from a craft or party store. Use fishing line or thin wire to hang them from an existing ceiling fixture, command hooks, or a tension rod at varying heights so they don't touch. Nestle them close enough to feel intentional but loose enough to cast individual shadows. Swap basic bulbs for warm LED lights to keep the look cozy and save energy.
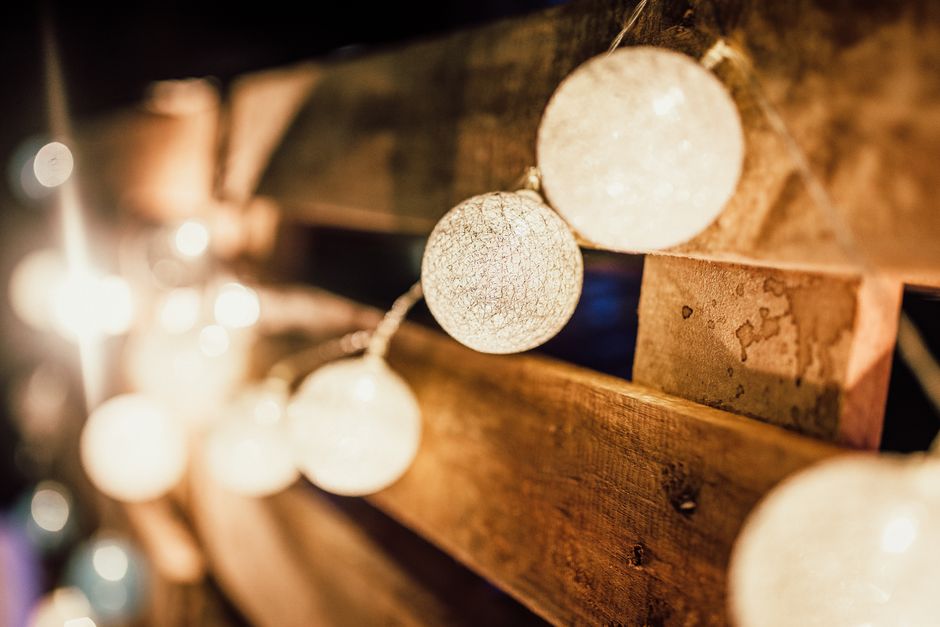
15. Fairy Light Canopy
Create a dreamy overhead glow for under $40 this evening

A fairy light canopy transforms any bedroom corner into a soft, enchanted retreat. Warm string lights draped overhead cast a gentle ambient glow that's perfect for winding down, reading, or creating Instagram-worthy bedroom vibes. The effect is layered and romantic without feeling overwrought, and it requires almost no installation skills or damage to walls and ceilings.
Start by measuring your space and purchasing weatherproof or indoor fairy lights—warm white LED strings are most forgiving. Use removable adhesive hooks or small nails to anchor lights to walls or a bed frame, draping them in swoops for maximum visual impact. Swap expensive fabric backdrops for simple string lights alone, invest in battery-powered versions to avoid cord clutter, and consider solar lights for daytime-free ambiance.
16. Concrete Base Table Lamp
Cast a sleek concrete lamp base for under $40 this weekend

A concrete lamp base delivers industrial-minimalist style that anchors any room with sculptural weight. The process involves casting concrete into a mold, creating a monolithic look that pairs beautifully with linen shades, brass hardware, or Edison bulbs. Concrete's raw aesthetic works especially well in contemporary, Scandinavian, or brutalist spaces, grounding a lamp visually while keeping materials honest and budget-friendly.
Mix concrete per package directions, pour into a DIY mold (PVC pipe, plastic containers, or silicone molds work great), and let cure fully before removing. Drill a hole through the center for the lamp kit, which you'll thread through afterward. Budget tip: buy concrete mix in bulk at hardware stores, reuse molds for multiple lamps, and source lamp kits online for half the price of finished fixtures.
17. Woven Basket Pendant Shade
Transform a woven basket into warm ambient lighting for under $30

A woven basket pendant shade creates soft, filtered light with organic warmth that instantly elevates any space. The basket's natural rattan or seagrass weave diffuses bulb glow into ambient layers, casting beautiful shadows while the closed top directs light downward. This hack works because baskets are already sculptural and structurally sound—no custom crafting needed.
Source a shallow woven basket (thrift stores or budget home retailers), drill a hole in the center of the bottom, and thread pendant hardware through with a simple socket kit from any hardware store. Attach your basket to existing wiring or use a plug-in swag version. Skip expensive rattan shades by repurposing what you already have, or hunt clearance baskets for cents on the dollar.
18. LED Strip Backlighting
Add professional ambient glow behind TV or headboard under $40

LED strip backlighting creates a soft, cinematic glow that makes walls appear to float while reducing harsh screen glare. The hidden strips cast warm or cool light onto surfaces behind furniture, adding depth and a designer-quality feel without rewiring or permanent installation. This simple upgrade instantly elevates any room's ambiance and draws attention to focal points like wall-mounted TVs or statement headboards.
Measure the distance behind your TV or headboard, then cut adhesive-backed LED strips to length and apply directly to the wall or furniture frame. Plug into a nearby outlet or use battery-powered strips for flexibility. Budget-friendly option: choose non-smart strips over app-controlled versions. Pro tip: position strips 2-3 inches from the wall surface so light diffuses naturally without creating hot spots.
19. Painted Lampshade Refresh
Transform a dated lampshade with paint or fabric in one afternoon

A painted or fabric-wrapped lampshade instantly modernizes lighting without replacing the entire fixture. This project works because it targets a highly visible object that anchors a room's aesthetic—swapping a dingy beige shade for a patterned fabric or fresh coat of paint creates drama and personality. Whether opting for matte acrylic paint or self-adhesive fabric, the transformation feels high-impact for minimal investment.
Start by removing the shade and cleaning it thoroughly. For paint, use lamp-safe acrylic and apply thin coats with a foam brush; for fabric, measure the shade, cut your material to size, and secure it with spray adhesive or fabric glue. Budget-friendly alternatives include wrapping with decorative paper, using peel-and-stick wallpaper scraps, or even tea-staining fabric for a vintage effect. Always ensure paint is fully dry before reinstalling near the bulb.
20. Bottle Bud Vase Lights
Instant ambient glow with cork LED lights and slim bottles

Bottle bud vases with cork LED lights deliver soft, warm ambient glow that feels both modern and organic. Slim glass bottles paired with battery-operated cork-shaped lights create a gallery-worthy display that works solo or clustered on shelves, nightstands, or windowsills. The gentle illumination flatters any room while taking up minimal floor or table space, making it perfect for renters and small spaces alike.
Simply fill each slim bottle with water and a few stems or greenery, then pop a cork LED light into the bottle's opening. The light sits snug and creates a cozy glow from within. Hunt for cork lights at craft stores or online retailers; repurpose glass bottles you already own, or find slim vases at thrift shops. Mix bottle heights and greenery types for visual interest, and swap in seasonal stems to refresh the look seasonally.
Storage & Organization
21. Floating Wall Shelves
Install invisible shelves for a floating look under $100 in one afternoon

Floating shelves create a modern, uncluttered aesthetic that works in virtually any room—they're especially striking in bedrooms and offices where minimalist style matters. The bracket-free design tricks the eye into thinking shelves hover on their own, making them perfect for displaying books, small plants, and decorative objects without visual clutter. They maximize wall space in tight quarters and offer flexible styling without the heavy footprint of traditional shelving.
The installation relies on heavy-duty floating shelf brackets hidden inside the shelf cavity and securely anchored to wall studs with lag bolts. Use a stud finder to locate framing, mark your level line, drill pilot holes, and slide your pre-drilled shelf onto the mounted brackets. Budget-friendly alternatives include ready-made floating shelf kits (often under $40 per shelf) or repurposing reclaimed wood paired with basic brackets for a custom look.
22. Under-Bed Rolling Drawers
Hidden storage magic: repurposed drawers under your bed for under $50

Under-bed rolling drawers transform dead space into functional storage by tucking repurposed dresser drawers or wooden crates beneath your bed frame on heavy-duty casters. This solution keeps seasonal clothing, extra linens, or off-season items completely hidden while remaining easily accessible—no bending or reaching into deep corners required. The rolling element eliminates friction and makes grabbing what you need painless, while the contained look keeps bedroom visual clutter at zero.
Source old wooden drawers from thrift stores, Facebook Marketplace, or estate sales—they're plentiful and cheap. Measure your bed's clearance height, then mount four swivel casters (locking ones prevent drift) to the drawer's underside using wood screws and a drill. Line drawers with kraft paper or fabric for a polished finish, label the sides, and slide into place. Budget hack: use casters from broken office chairs, or purchase basic ball-bearing wheels for under $15 per set.
23. Pegboard Organizer Wall
Build a customizable wall organizer for under $50 this weekend

A pegboard organizer transforms clutter into intentional, accessible storage while adding visual interest to bare walls. This modular system works in garages, craft studios, and kitchens because hooks, baskets, and shelves adjust instantly as needs change. The uniform grid pattern creates order without looking rigid, and pegboards come in natural wood, painted, or metal finishes to match any aesthetic from industrial to farmhouse.
Mount a pegboard to wall studs using a level and lag bolts for durability, then customize with affordable hooks, baskets, and shelves from hardware stores. Paint the pegboard first if desired, or leave it natural. Start with essential hooks and gradually add storage pieces as you identify what works best. Thrifted baskets and mismatched hooks add character while keeping costs low.
24. Ladder Blanket Rack
Display cozy throws on a rustic ladder rack under $100 in an afternoon

A leaning wooden ladder transforms any corner into functional, textured storage that feels warm and intentional. This rustic-modern piece lets throws and towels breathe while adding vertical interest without occupying floor space. The casual lean looks effortlessly styled—perfect for showcasing layered textures and adding depth to minimal spaces.
Source a wooden ladder from a hardware store, thrift shop, or online retailer, then prop it against a wall at a gentle angle. Secure the top rung loosely to studs if leaning feels wobbly, or simply drape throws across each rung. For budget options, hunt vintage ladders at estate sales or repurpose old ones. Paint or stain yours to match your palette, or leave it natural for authentic farmhouse charm.
25. Crate Storage Cubbies
Build rustic storage cubbies from stacked crates in one afternoon

Wooden crate storage cubbies are a no-fuss way to add rustic charm and function to any room. By stacking affordable crates and securing them together, you create a modular shelving unit that looks handcrafted and feels organic—perfect for displaying books, plants, woven baskets, or kids' toys. The natural wood texture pairs beautifully with farmhouse, bohemian, or minimalist decor, and the open-cube design keeps spaces feeling airy rather than heavy.
Start by sourcing identical wooden crates from craft stores, home centers, or secondhand markets. Arrange them in your desired pattern (staggered, pyramid, or grid) on the floor, then use a drill with wood screws or L-brackets to fasten them together from the back or inside. Secure the entire unit to the wall with brackets to prevent tipping. Budget-friendly options include sourcing vintage crates from flea markets, painting them white or a soft color to unify mismatched finds, or leaving them raw for authentic texture.
26. Entryway Key and Mail Station
Build a functional entry drop zone with hooks and trays under $50
A wall-mounted key and mail station transforms a chaotic entryway into an organized landing pad. This simple combination of hooks, a wooden tray, and floating shelving creates a cohesive drop zone where coats hang, keys live, and mail gets sorted immediately. It works because it catches items right at the threshold before they scatter through the home, plus it looks intentional and polished rather than cluttered.
Mount a small wooden shelf or tray at shoulder height using sturdy wall anchors or studs, then add three to five hooks below or beside it. Use a galvanized tray for mail, a small basket for bills, and hooks for keys and bags. Paint the tray or shelf in a neutral tone to match your entryway. Source affordable hooks and trays from hardware stores or thrift shops to keep costs low.
27. Hanging Rope Shelf
Suspended wood shelf with rope for boho charm under $50

A hanging rope shelf merges industrial and bohemian vibes by suspending a wooden plank from sturdy rope anchored to ceiling studs. The effect is airy and sculptural, drawing the eye upward while adding functional storage that feels intentional rather than cluttered. Rope's natural texture softens hard lines and works with nearly any decor palette, making it a flexible focal point.
Start by selecting a piece of reclaimed or stained wood (a cutting board or thin plank works great) and 1/2-inch braided rope from any hardware store. Drill four holes near each plank's corners, thread rope through, tie hefty knots underneath, then secure to ceiling joists using heavy-duty eye bolts and toggle anchors for drywall. Keep rope lengths even, trim excess, and add a coat of polyurethane for durability.
28. Fabric Storage Bins
Soft fabric storage bins for any shelf in under two hours, under fifty dollars

Fabric storage bins are the no-fuss solution to clutter that actually looks intentional. Built from quilted cotton, linen, or canvas over simple cardboard forms, they slide seamlessly into shelves and under beds while keeping blankets, toys, and seasonal items contained and visible. The soft edges and matte finish read as curated and calm, instantly elevating any shelf from chaotic to collected.
Start with a cardboard box or pre-made bin form, then wrap it in your chosen fabric using fabric glue or a basic whip stitch around the seams. Reinforce the bottom and corners with hot glue for durability. Skip pricey storage sets by hunting fabric scraps at thrift stores or using bed sheets; sturdy quilting cotton from a big-box fabric store costs under $3 per yard and stretches far. Add handles with ribbon or twill tape for easy pulling.
29. Toe-Kick Hidden Drawer
Steal hidden storage from under cabinets in under four hours

A toe-kick hidden drawer transforms wasted dead space beneath cabinetry into slim, sneaky storage perfect for flat items like cutting boards, baking sheets, or linens. By building a shallow drawer that fits within the standard 4-inch toe-kick recess, you gain functional storage without altering your kitchen's footprint or visual aesthetic. The drawer slides smoothly on tracks and stays completely concealed when closed, keeping clutter out of sight while maximizing every inch.
Start by measuring your cabinet's toe-kick height and depth, then build a simple plywood box to fit those dimensions. Install soft-close drawer slides on the cabinet frame, attach your box, and add a front face that matches your cabinetry finish. Save money by sourcing plywood scraps from a local lumber yard, using budget-friendly hardware, or painting rather than staining. Seal all edges with caulk for a polished look.
30. Corner Nook Shelving
Transform a wasted corner into storage with angled shelves under $150

Angled corner shelving transforms dead space into functional display by installing shelves at a slight diagonal—typically 15 to 20 degrees—that make the corner feel intentional rather than like an afterthought. This approach works brilliantly because the angle creates visual interest, prevents items from sliding off, and makes a tight corner feel more open. It's perfect for books, plants, or decorative objects that deserve real estate in a room.
Start by measuring your corner's dimensions and deciding on three to four shelf levels. Mount a French cleat system diagonally using a stud finder to locate support, or use heavy-duty toggle bolts for drywall. Cut your shelves from 1x10 or 1x12 boards and apply wood stain or paint. Budget-friendly option: use reclaimed wood or particle board with wallpaper or contact paper. Pro tip: paint the corner wall a complementary color to make the shelves pop even more.
Furniture Makeovers
31. Painted Dresser Refresh
Transform a thrifted dresser with chalk paint and hardware for under $60

Chalk paint transforms tired thrifted dressers into statement pieces with minimal prep work. This velvety, matte finish adheres beautifully to existing finishes without sanding, making it perfect for quick makeovers. Pair it with updated hardware—sleek pulls or vintage-inspired knobs—and suddenly an old dresser becomes a curated focal point that anchors the room with personality and character.
Start by cleaning the dresser thoroughly, then apply two coats of chalk paint with a brush or roller, allowing drying time between coats. Swap the hardware last for maximum impact. Budget-friendly hacks: shop thrift stores for dressers under $30, buy chalk paint during sales, and score affordable hardware at home centers or online. A small dresser typically needs just one quart of paint.
32. Reupholstered Dining Chairs
Transform tired dining chairs with fresh fabric in one weekend

Reupholstering dining chair seats instantly refreshes a tired set and costs a fraction of replacement furniture. By swapping out worn fabric for a pattern or color that matches your current decor, you create a polished, intentional look that anchors the whole dining space. It's the kind of small change that makes guests notice without realizing what shifted.
Start by removing seat cushions or prying out old staples if seats are attached. Measure your cushion, add two inches for wrapping, and cut new fabric. Stretch fabric taut over the seat, pull toward the underside, and staple every few inches, working opposite corners to keep tension even. Save money by choosing durable medium-weight cotton or linen blends over pricey designer fabrics, shopping sales at fabric stores, or checking remnant bins for larger pieces.
33. Two-Tone Cabinet Update
Transform tired cabinets with contrasting paint in one weekend

Two-tone cabinet painting uses contrasting colors on the frame and doors to instantly refresh dated cabinetry without replacing it. This technique creates visual depth and modern appeal—think white frames with navy or black doors, or soft sage bodies with cream accents. It works because the color blocking makes cabinets feel intentional and custom-built rather than old, transforming the entire room's aesthetic.
Start by removing cabinet doors and hardware, then clean everything thoroughly with TSP or a degreaser. Lightly sand the surfaces, prime, and apply two coats of your frame color first, then two coats on the doors with your contrasting shade. Reattach everything once dry. Money-saving moves: buy quality paint in smaller quantities, use the same primer for both colors, and save old doors for a test area.
34. Pallet Coffee Table
Build a rustic pallet coffee table for under $50 in one weekend

A pallet coffee table transforms free or cheap reclaimed wood into a statement piece that anchors any living room with rustic charm. Stacked pallets create natural texture and warmth while the industrial-meets-cozy vibe works in farmhouse, industrial, and eclectic spaces. The low profile and sturdy construction make it both functional and forgiving for first-time builders.
Source two matching pallets from local businesses, hardware stores, or online marketplaces—many give them away free. Sand surfaces smooth, apply wood stain or leave natural, then secure pallets together with wood screws and add furniture pads underneath. Budget tip: skip expensive stain and use free leftover paint from previous projects, or embrace the raw wood look entirely.
35. Cane Webbing Cabinet Doors
Transform flat cabinet doors with woven cane panels under $100 this weekend

Cane webbing instantly elevates plain cabinet doors with a light, textured aesthetic that reads as effortlessly expensive. The woven panels create visual interest and depth while maintaining an airy feel—perfect for breaking up heavy cabinetry or adding a Scandinavian-meets-coastal vibe to any room. This project works beautifully on IKEA basics and vintage pieces alike.
Measure your door panels and purchase pre-made cane webbing sheets or rolls online. Cut grooves into the door frame using a router or have a hardware store do it, then press the cane into place with wood glue. Skip the router entirely by adhering cane directly to the door face with contact cement for a faster budget option. Finish with stain or paint to match your existing cabinetry.
36. Waterfall Wood Bench
Build a modern mitered-edge entry bench this weekend for under $120

A waterfall wood bench features continuous wood grain flowing down from the seat to the legs, creating a sleek, high-end look with zero visible fasteners. The mitered edges—where wood pieces meet at 45-degree angles—give it a furniture-store polish that elevates any entryway. This style works because it feels intentional and modern while remaining functional and sturdy for storing shoes or seating.
Start with a 1x12 or 1x10 board for the seat and two boards for the mitered leg frame. Cut 45-degree angles at corners, glue and screw from behind (hidden), then sand smooth. Stain or paint to match your décor. Budget-friendly swap: use pine instead of hardwood, apply wood filler to hide screw holes, and finish with gel stain for professional results without premium lumber costs.
37. Nightstand Hairpin Legs
Transform any nightstand into mid-century modern magic in under an hour

Hairpin legs instantly elevate a dated nightstand into a sleek mid-century modern statement piece. This simple swap trades chunky wooden legs for tapered metal ones, creating an airy, elevated look that makes even thrifted pieces feel intentional and designer-worthy. The exposed base maximizes floor visibility, making small bedrooms feel larger while adding a touch of retro-cool sophistication.
Remove the existing legs by unbolting them from the underside, then screw on hairpin legs with the included hardware—most sets come pre-drilled and ready to install. Measure your original leg placement carefully before drilling new holes. Budget tip: order legs online from hardware sites like Etsy or Amazon where sets run $25 to $60, far cheaper than designer alternatives. Thrifted nightstands paired with new hairpin legs cost a fraction of buying mid-century furniture new.
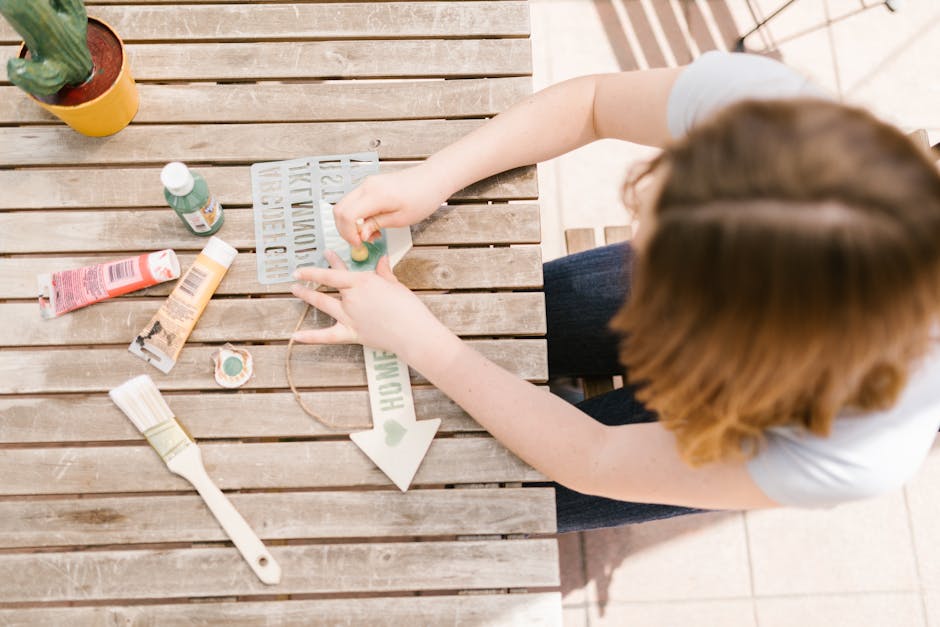
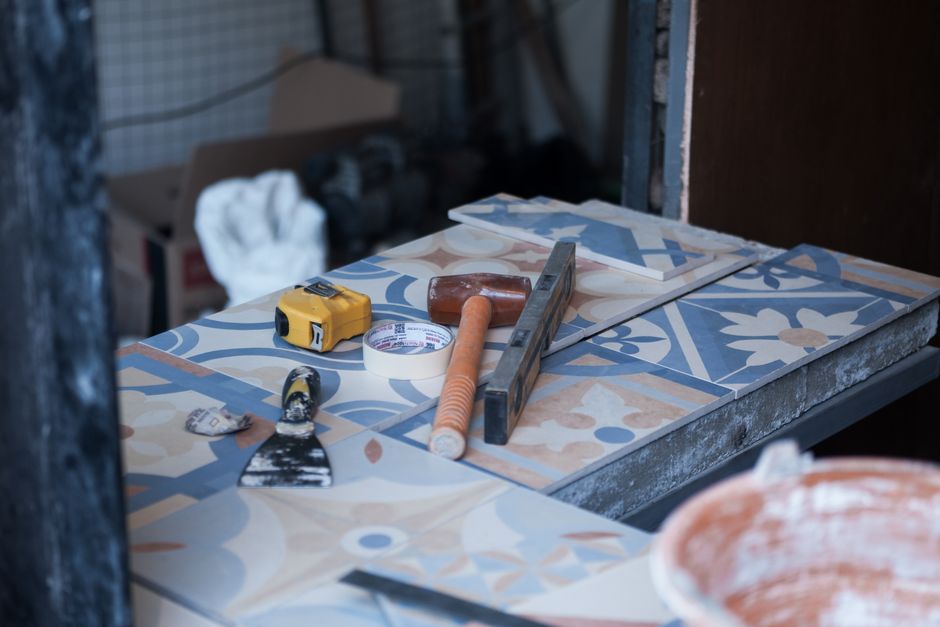
38. Stenciled Table Top
Transform a tired table with bold stenciled patterns in one afternoon

A stenciled tabletop instantly adds personality and visual interest to any worn or plain surface. Whether you choose geometric patterns, botanical motifs, or abstract designs, stenciling creates a custom, hand-painted look that feels intentional and stylish. This technique works beautifully on wood, laminate, or even metal tables, and the finished result looks far more expensive than the effort required.
Start by cleaning and lightly sanding your table surface, then apply primer if needed for better paint adhesion. Position your stencil with painter's tape, dab acrylic or craft paint through with a sponge or stencil brush using minimal water, and lift carefully. Seal with polyurethane for durability. Save money by printing your own stencil designs or purchasing affordable reusable stencils from craft stores, and use leftover paint from other projects.
39. Ottoman from a Storage Crate
Transform a wooden crate into padded seating and storage under $50

A storage crate ottoman gives you dual functionality—a comfortable seat that hides blankets, toys, or magazines underneath. The look is casual and modern, perfect for apartments or family rooms needing flexible seating. A padded top softens the industrial crate aesthetic while the open sides or slat design keep the piece feeling light and accessible.
Start by sourcing a sturdy wooden crate (check hardware stores or online retailers). Cut plywood to fit the top, add a layer of high-density foam using spray adhesive, then wrap everything in upholstery fabric stapled to the underside. Add casters to the bottom for mobility. Budget tip: Use leftover fabric scraps or canvas from other projects, skip the pricey upholstery shops, and source your crate secondhand.
40. Bar Cart from a Rolling Trolley
Transform a rolling trolley into a stylish bar cart in one afternoon

A rolling trolley becomes an instant bar cart with minimal effort—just swap out the contents and styling. This compact drinks station works beautifully in living rooms, dens, or even tight dining areas, bringing hotel-lobby sophistication to your home while keeping bottles and glassware corralled in one mobile spot. The trolley's vertical tiered design displays bottles like art while keeping everything accessible for cocktail hour or casual entertaining.
Start by sourcing a basic rolling trolley (thrift stores and online retailers have plenty under $40). Stock the top tier with cocktail glasses or wine flutes, the middle with spirits and mixers, and the bottom with bar tools and napkins. Layer in decorative elements like a small plant, candles, or a pretty tray to break up the utilitarian feel. Budget tip: skip the designer glassware and find elegant basics at discount retailers. Another win: a simple coat of spray paint in black, brass, or white instantly elevates a worn trolley.
Textiles & Soft Decor
41. No-Sew Throw Pillow Covers
Custom throw pillow covers in an afternoon, no sewing machine required

No-sew envelope pillow covers transform basic fabric into polished home accents without a single stitch. The overlapping envelope closure creates a tailored, designer look while staying budget-friendly and swappable for seasonal updates. Fabric glue or fusible tape does all the heavy lifting, making this project perfect for renters or anyone intimidated by sewing machines.
Start by cutting two fabric rectangles slightly larger than your pillow insert and lay them wrong-side up. Apply fabric glue or iron-on fusible tape along the edges, fold and press to seal the sides, then insert your pillow through the envelope opening. Save money by sourcing fabric from budget retailers like Target or Walmart, hunting thrift stores for quality cloth, or repurposing old sheets and linens.
42. DIY Tassel Throw Blanket
Transform a plain throw blanket with custom tassels in under two hours

A tassel-trimmed throw instantly elevates a basic blanket from utilitarian to curated. Tassels add movement, texture, and a handmade charm that reads expensive but costs far less. This project works because it requires zero sewing skills and transforms even a thrift-store find into a designer-looking accent piece that anchors a cozy seating area.
Purchase pre-made tassel trim from a fabric store or online, then hand-sew or fabric-glue it along the blanket's edges for a polished finish. For budget-conscious decorators, buy a bulk tassel pack and space them unevenly along one or two edges rather than all four sides. Alternatively, use iron-on adhesive tape instead of thread for a no-sew option that holds up through gentle washing.
43. Drop-Cloth Curtains
Breezy linen-look drapes from budget canvas drop cloths under $40

Canvas drop cloths—the kind painters use—transform into surprisingly chic, relaxed curtains that rival pricey linen. Their natural cream tone, soft texture, and generous width create an effortlessly lived-in vibe that reads far more expensive than the $10-15 per cloth price tag. They filter light beautifully while maintaining privacy, perfect for a Scandinavian or cottagecore aesthetic without the designer markup.
Measure your window width and height, then simply drape and pin cloths to a standard curtain rod using clip rings or basic curtain tape. Hem the bottom edge with a sewing machine or fabric glue for a polished finish, or leave it raw for intentional texture. Skip the dry cleaning and toss them in the washer quarterly—they'll soften beautifully with age and laundering.
44. Braided Rag Rug
Turn old fabric scraps into a cozy round rug for under $20

A braided rag rug transforms worn-out clothes, linens, and fabric scraps into a charming, textured floor piece that adds warmth and personality to any room. The circular weave creates a cozy focal point while keeping waste out of landfills—perfect for rustic, cottage, or eclectic interiors. The handmade quality brings authentic, lived-in appeal that store-bought rugs simply can't match.
Start by cutting old t-shirts, jeans, and bedding into consistent strips about an inch wide, then coil and braid them together using a simple over-under pattern, spiraling outward into a flat circle. Secure each layer with needle and thread or fabric glue as you go. Hunt thrift stores or your own closet for fabric scraps, and mix colors strategically for visual interest without buying a single yard of new material.
45. Painted Canvas Floor Cloth
Create a durable painted floor cloth for under $40 this weekend

A painted canvas floor cloth is a budget-friendly alternative to traditional rugs that brings personality to high-traffic spaces while staying completely washable and durable. Heavy-duty canvas gets primed, painted with porch-and-floor paint, and sealed with polyurethane, creating a hard-wearing surface that resists spills and daily wear. The result feels custom and artisan without the designer price tag, and it works beautifully in kitchens, mudrooms, or entryways where you need function and style.
Start by stretching canvas across plywood and stapling the edges, then apply primer and two coats of exterior-grade paint in your chosen pattern or solid color. Seal everything with water-based polyurethane for protection and easy cleanup. Budget tip: buy unprimed canvas remnants online, grab paint samples instead of full cans, and skip the plywood base by using adhesive-backed canvas directly on the floor for a thinner, simpler option.
46. Embroidered Linen Napkins
Add handmade charm to your table with embroidered borders in one afternoon

Embroidered linen napkins transform everyday table settings into heirloom-quality pieces with just needle, thread, and simple stitches. A classic border in contrasting thread adds sophistication and handcrafted warmth that store-bought napkins can't match. The repetitive, meditative stitching creates visual interest without requiring artistic skill, and the finished napkins elevate casual weeknight dinners and special occasions alike.
Start with plain linen napkins and mark a light pencil line about half an inch from the edge. Use a simple running stitch or backstitch in embroidery floss, working around all four sides. For budget-friendly options, check thrift stores for vintage linen napkins to upcycle, buy unbleached cotton napkins instead of pure linen, or use coordinating thread colors you already own. A basic embroidery hoop keeps fabric taut and makes stitching more comfortable.
47. Tie-Dye or Shibori Cushions
Create coastal boho cushion covers with indigo dye in one afternoon

 Budget Apartment Renovation: DIY Hacks That Actually Work
Indigo-dyed cushion covers bring that effortless coastal-boho aesthetic to any space without breaking the bank. Whether you choose tie-dye's organic swirls or shibori's geometric precision, the deep blue tones create an instantly calming, curated look. The beauty lies in imperfection—each cushion becomes a one-of-a-kind piece that adds depth and personality to sofas, chairs, or beds.
Start with plain cotton or linen covers and white rubber bands or string for tie-dye, or folding techniques for shibori patterns. Mix indigo dye powder with warm water, submerge your prepped covers, and let them set for 30–60 minutes. Rinse thoroughly until water runs clear, then air dry. Budget hack: buy plain pillow covers in bulk, and consider natural indigo powders from craft suppliers as a pricier but eco-friendly option.
48. Layered Bed Runner
Add instant sophistication to your bed with a contrasting runner under $50

A bed runner is a narrow fabric strip layered across the foot of your mattress, sitting on top of your duvet or comforter. This classic hotel-style detail instantly elevates any bed, adding visual interest through color contrast or texture play. It works because it draws the eye downward, creates a polished focal point, and costs far less than redecorating your entire bedding scheme.
Choose a contrasting fabric like linen, velvet, or a patterned textile and drape it across the foot third of your bed. No sewing required—simply fold raw edges under if needed or leave them as-is for a relaxed look. Layer it on top of your existing comforter for maximum impact. Budget tip: thrift stores and fabric remnant bins offer affordable options; alternatively, repurpose a scarf or lightweight blanket you already own.
Plants & Greenery
49. Hanging Planter Macrame
Create bohemian plant hangers with basic knots in an afternoon for $15

Macramé plant hangers are knotted cord holders that suspend pots while adding instant boho texture to any space. The geometric knots create visual interest and work beautifully with trailing plants like pothos or string of pearls, softening hard corners and drawing the eye upward. They're perfect for renters since they require no wall damage and instantly elevate a room's warmth without clutter. (See also: houseplant care basics.)
Start with 4 to 8 lengths of cotton rope or cord, fold them in half, and tie a gathering knot at the top to create a loop. Working downward, tie simple square knots in staggered rows, spacing them evenly as you go. Finish by gathering all strands together at the bottom where your pot will rest. Rope from hardware stores costs pennies per project, and even simpler single-spiral designs work beautifully for first-timers.
50. Propagation Station Wall
Living wall art from glass tubes and plant cuttings under $50

A propagation station wall transforms rooted cuttings into sculptural, living decor by mounting glass tubes or test tubes on a frame or shelf. The result feels botanical and modern—think gallery meets greenhouse—while letting you watch roots develop in real time. It works because it combines function (actively growing new plants) with visual interest (the delicate stems and root systems become the art), making it perfect for plant lovers who want living decor that actually does something.
Mount glass tubes to a wooden frame or floating shelf using wire, twine, or small brackets, then fill each tube with water and a rooted cutting. Start with easy propagators like pothos, coleus, or Swedish ivy. Budget-friendly swaps include repurposing glass jars, using copper wire instead of pricey brackets, or building a simple driftwood frame instead of buying one.
51. Vertical Herb Garden
Fresh herbs on your kitchen wall for under $50 this weekend

A vertical herb garden transforms a blank kitchen wall into a living, functional focal point that doubles as a fresh ingredient station. Mount shallow planters or a tiered wall pocket system to create a cascading green display that maximizes limited counter space while keeping basil, parsley, and mint within arm's reach of the stove. This setup brings natural texture and softness to hard kitchen surfaces while making meal prep more convenient and sustainable.
Start by choosing a sunny wall near a window or under grow lights if natural light is limited. Use a level to mark mounting points, then secure lightweight planters with rust-resistant screws and wall anchors appropriate for your wall type. Fill with quality potting soil, add herb seedlings or seeds, and water consistently. Budget-conscious growers can upcycle wooden crates, tin cans with drainage holes, or old spice jars mounted on floating shelves instead of buying specialized planters.
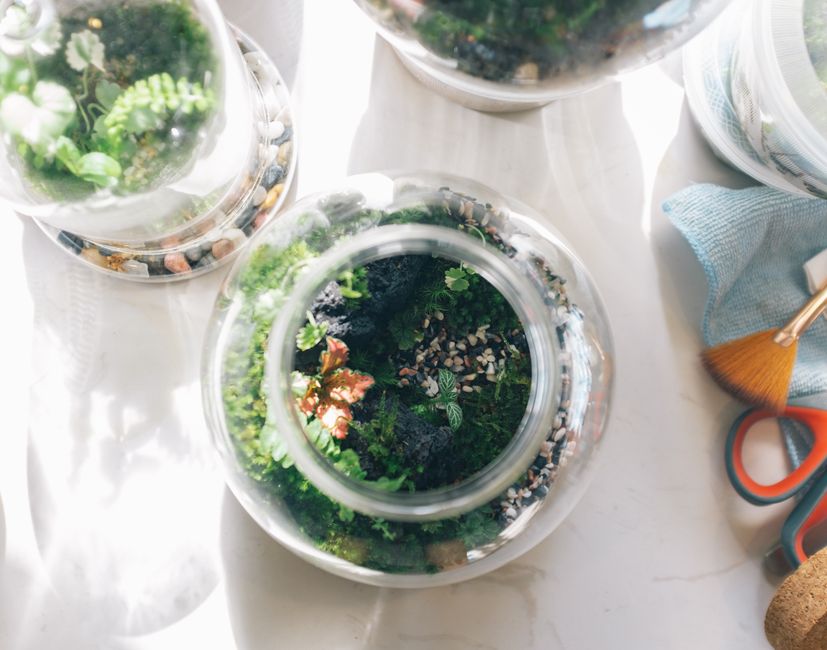
52. Terrarium Centerpiece
Build a living glass garden centerpiece in two hours, under fifty dollars
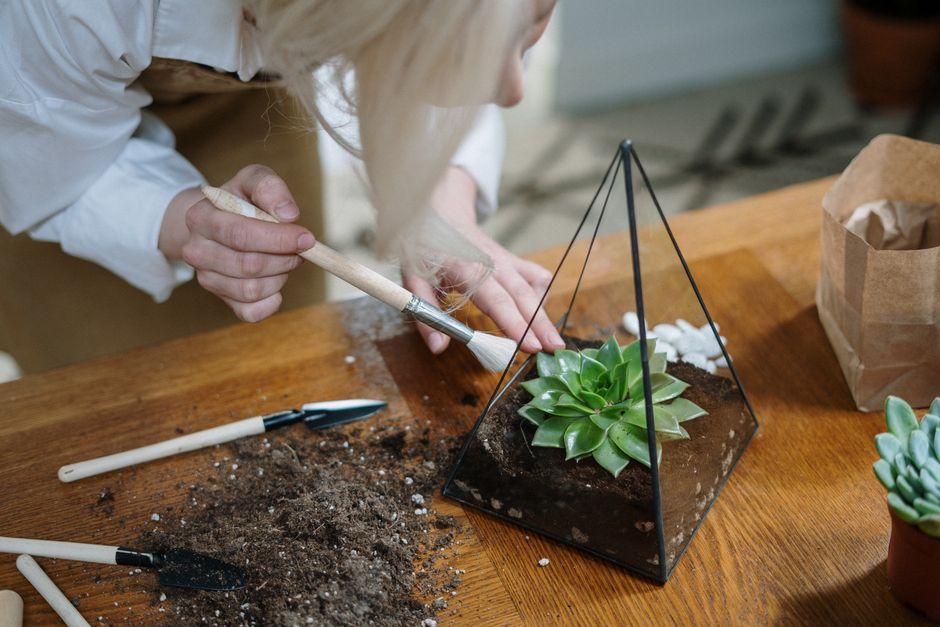
A closed terrarium is a self-sustaining miniature ecosystem sealed inside glass that brings life and organic beauty to any tabletop. The condensation cycle creates a mesmerizing daily show, while layered sand, soil, and moss support tiny plants that thrive in humid stillness. This project transforms a simple glass container into living décor that softens hard surfaces and adds texture without demanding green-thumb expertise.
Start by layering drainage materials—pebbles, activated charcoal, and potting soil—inside a clear glass jar or cloche, then add moss and small plants like fittonia or pothos. Water lightly, seal the lid, and place near indirect light. Budget-friendly sources include dollar-store jars, garden-center clearance plants, and backyard moss. Skip expensive terrariums kits by sourcing materials separately and repurposing containers from your home.
53. Painted Terracotta Pots
Transform plain terracotta pots with bold color blocks in under an hour

Painted terracotta pots are the quickest way to add personality to any plant collection. A simple color-block or dip-dye technique transforms basic nursery pots into statement pieces that coordinate with any decor style. The porous clay absorbs acrylic paint beautifully, creating a matte finish that feels intentional and curated rather than mass-produced.
Start by cleaning dry pots with a damp cloth, then mask off sections with painter's tape for clean lines or skip tape for organic, hand-painted edges. Apply two coats of acrylic paint, letting each dry fully between coats. For budget savings, grab paint from discount stores or mix leftover colors from other projects. Seal with a clear matte acrylic sealer if pots will live outdoors.
54. Moss Wall Art
Create a living-looking green focal point for under $100 this weekend
Preserved moss wall art brings organic texture and calming color to any space without the maintenance of live plants. These panels create a soft, sculptural green focal point that works in modern, botanical, or eclectic interiors. Moss stays lush indefinitely, requires no water or sunlight, and adds acoustic benefits while purifying the air psychologically if not literally.
Start by purchasing preserved moss (online or at craft stores) and a simple wooden or metal frame. Lay moss evenly across a backing board using low-temp hot glue or moss-specific adhesive, pressing gently to secure. Layer different moss colors and textures for depth. Budget-conscious approach: hunt thrift stores for vintage frames, mix moss varieties in one panel, or create a smaller 12-by-12-inch piece instead of large formats.
55. Repurposed Ladder Plant Stand
Transform a wooden ladder into a tiered plant display for under $40
A repurposed wooden ladder becomes an instant vertical plant display that brings greenery and dimension to any corner. Leaning at a gentle angle, the ladder's natural steps create a staggered, tiered effect that's both practical and visually striking. This approach maximizes floor space while drawing the eye upward, making rooms feel taller and airier. The rustic or modern aesthetic works with nearly any decor style.
Start by sourcing a sturdy wooden ladder from a thrift store, estate sale, or hardware store—paint or stain it if desired. Secure the ladder against a wall or use a diagonal brace for stability, then simply place potted plants on each rung, mixing pot sizes and trailing greenery for visual interest. Budget hacks: choose affordable nursery plants, use matching thrifted pots, or DIY terra-cotta planters with acrylic paint.
56. Hanging Kokedama
Bring Japanese botanical elegance indoors with moss balls
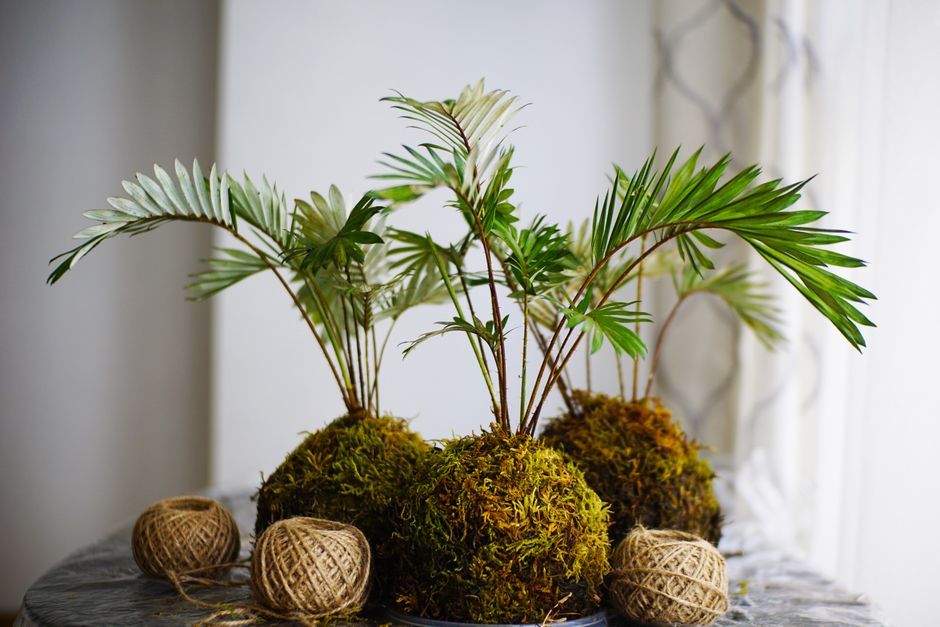
Kokedama—moss-wrapped plant balls suspended from string—create a striking sculptural accent that floats greenery into empty space without taking up shelf or floor real estate. These Japanese-inspired hanging planters work beautifully as living art installations in corners, near windows, or clustered at varying heights. The moss ball catches light differently from traditional pots, adding soft texture and an organic, gallery-like quality to any room while keeping the plant root system intact and healthy.
Start by selecting a small plant with a healthy root ball, gently wrapping it in moist sphagnum moss, then securing the moss jacket tightly with fishing line or dark thread. Wrap decorative jute or cotton string around the ball for hanging, leaving a loop at the top. Mist the moss weekly to keep it damp. Budget hack: source affordable plants from grocery store floral sections, buy moss in bulk online, and repurpose kitchen twine for wrapping.
Seasonal & Holiday
57. DIY Fall Wreath
Build a seasonal wreath with dried botanicals for under $30

A DIY fall wreath made from dried florals and foliage on a grapevine base brings warmth and seasonal charm to any entryway without breaking the bank. The natural, textured look feels collected and artful while complementing both traditional and modern décor. Grapevine bases are lightweight, forgiving to work with, and already provide visual interest, so even sparse arrangements look intentional and organic.
Start by gathering your dried botanicals—pampas grass, wheat, eucalyptus, and colored leaves work beautifully—along with a grapevine wreath base (available at craft stores). Use floral wire or hot glue to anchor stems into the vines, building density gradually and rotating the wreath often to ensure even coverage. Budget-friendly trick: forage for free dried materials like branches and seedpods, or buy a single bag of mixed dried flowers and stretch it across the base by layering strategically.
58. Dried Orange Garland
Create a fragrant winter garland with dried oranges in one afternoon
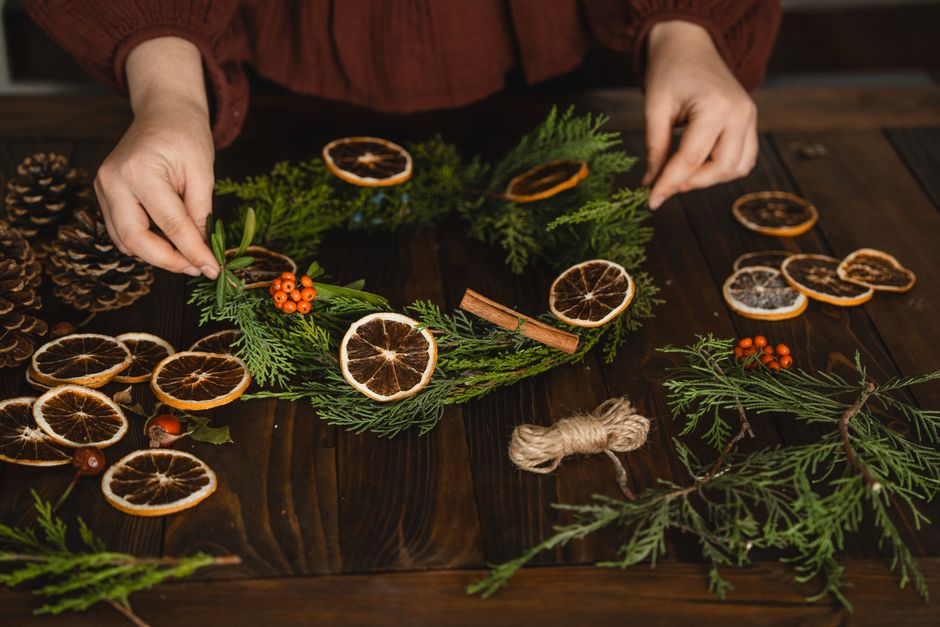
Dried orange garlands bring warm, natural color and subtle citrus scent to any space without requiring fresh flowers or elaborate arrangements. Sliced citrus rounds strung together create an earthy, rustic look that reads both festive and sophisticated, perfect for winter décor or year-round botanical styling. The warm amber tones complement virtually any interior palette while the dried texture adds organic texture that feels intentional and crafted.
Slice fresh oranges into quarter-inch rounds, pat them dry, and arrange on baking sheets lined with parchment. Bake at 200°F for two to three hours, flipping halfway through, until completely dried and slightly curled. Once cool, thread through a needle with twine or raffia, spacing slices evenly. Budget tip: buy oranges on sale or use slightly imperfect fruit. Add dried cranberries, cinnamon sticks, or bay leaves between oranges for visual interest without extra cost.
59. Pinecone Table Centerpiece
Rustic pinecone centerpiece for seasonal tables, under $15

A pinecone centerpiece brings natural texture and woodland charm to any table without looking fussy or overdone. Layered in a shallow wooden bowl or vintage tray with greenery, candles, or berry accents, it creates instant seasonal warmth that works from fall through winter. The earthy, organic feel suits farmhouse and traditional decor while adding visual interest that lasts weeks without maintenance or wilting.
Gather pinecones from outdoors or purchase them affordably at craft stores, then arrange them in a low bowl or tray with moss, faux berries, or branches. Add votives or pillar candles between the cones for soft evening glow. Budget-conscious alternatives include bleaching cones white for a frosted look, adding dollar-store faux leaves, or filling gaps with crumpled kraft paper to stretch materials further.
60. Fabric Pumpkin Trio
Craft plump fabric pumpkins for fall décor under $30 in an afternoon

Stuffed fabric pumpkins offer a soft, modern take on traditional fall décor—no carving or mess required. These puffy sculptures work year-round on shelves or tucked into corners, and their rounded silhouettes add instant coziness to any room. The beauty lies in their sculptural shape: gathered fabric and strategic stitching create that authentic pumpkin ribbing without any carving tools.
Start by cutting circles from orange, cream, or patterned fabric and sewing them into balls using basic hand stitches or a machine. Stuff each with polyester fiberfill until plump, then cinch the opening closed. Add a stem using a twig, dowel, or fabric scrap—hot glue works fast here. Mix fabric types and textures for visual interest. Check craft stores for seasonal fabric bundles to stretch your budget further, and scout thrift stores for vintage orange-toned quilting squares.
61. Eucalyptus Mantel Garland
Refresh your fireplace mantel with cascading greenery under $50
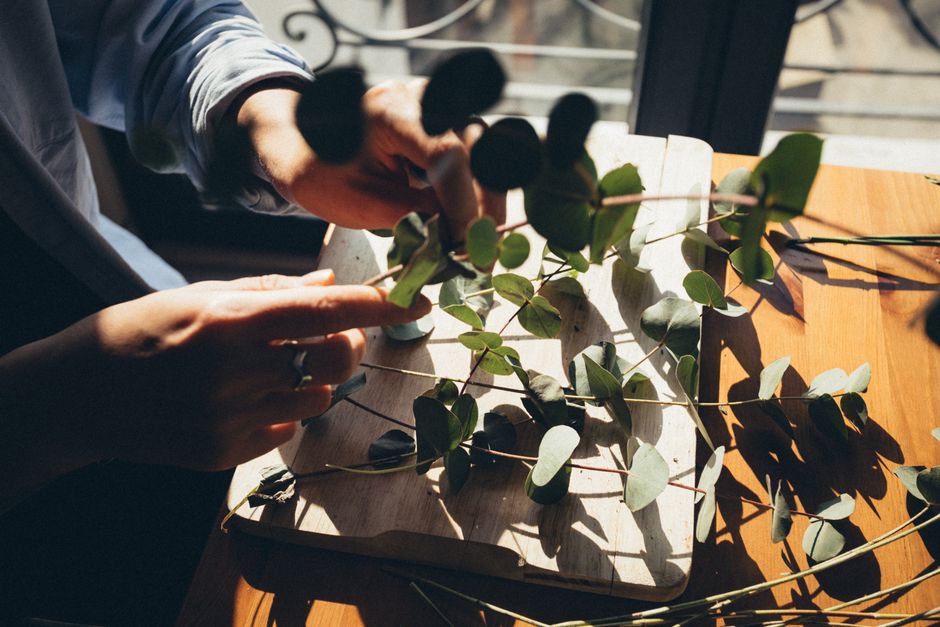
A eucalyptus garland draped across your mantel instantly softens hard architectural lines and brings organic texture to the room. The silvery-green leaves photograph beautifully, add a spa-like scent if using fresh stems, and work with nearly any décor style—from modern minimalist to farmhouse. This project requires no special tools and transforms a blank mantel into a focal point in minutes.
Layer fresh or faux eucalyptus stems loosely across your mantel, allowing natural curves and varying heights. Secure with floral wire if needed, then tuck in trailing ivy, dried grasses, or candles for depth. For budget savings, buy bulk greenery from a wholesaler like Costco or Sam's Club, or go faux for a permanent solution that never wilts. Fresh eucalyptus lasts 2-3 weeks with misting.
62. Advent or Countdown Calendar
Build a reusable wall calendar to countdown in style for under $40
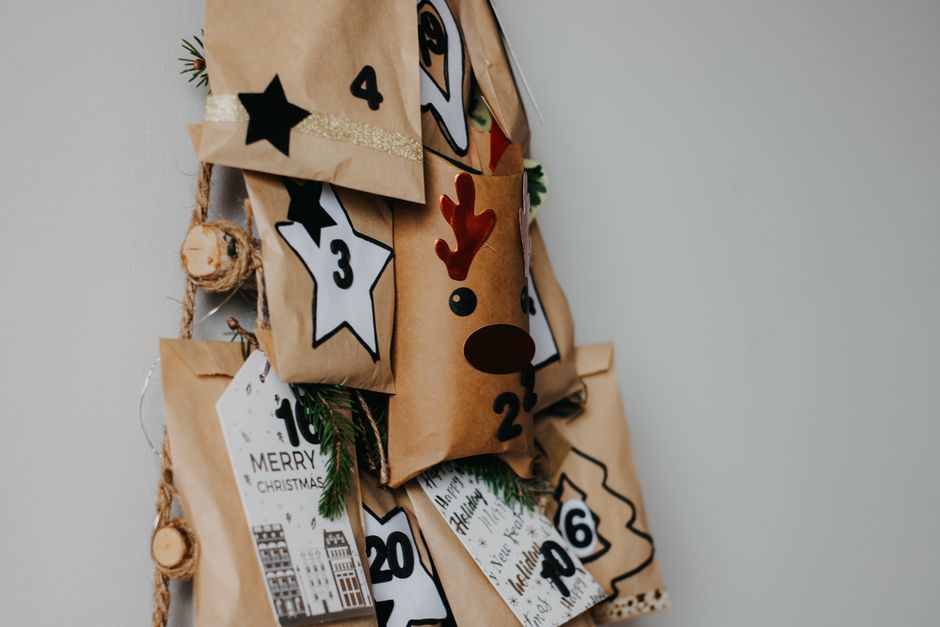
A reusable advent or countdown calendar transforms waiting into visual anticipation. Whether hung on a wall or displayed as a freestanding box, it creates a festive focal point that works year-round for holidays, special events, or milestone countdowns. The modular design means you swap out numbered pockets or windows each season, making it far more sustainable and budget-friendly than single-use paper versions.
Start by choosing your base: fabric wall hanging, wooden box with cubbies, or cardboard tube tower. Create numbered pouches, pockets, or slots using kraft paper envelopes, fabric scraps, or small boxes glued to a backing board. Fill with treats, small toys, or folded paper messages. Pro budget move: repurpose a shoe organizer or egg carton as your structure. This project requires basic gluing, measuring, and decorating—no special tools needed.
63. Spring Branch Display
Bring blooming branches indoors for instant spring charm under $30

A spring branch display transforms any room with the fresh, organic beauty of flowering or budding branches arranged in a tall vase. These natural focal points instantly elevate décor while requiring zero maintenance once arranged. The height and movement of branches add architectural interest and bring outdoor energy inside, creating an effortlessly elegant look that feels high-end but costs surprisingly little.
Start by gathering branches from your yard, a local park, or a grocery store florist section—forsythia, cherry blossoms, and pussy willows work beautifully. Trim stems at a 45-degree angle, remove lower leaves, and arrange in a tall vase filled with fresh water. Budget-friendly hack: use branches from your yard paired with a simple clear glass vase, or shop grocery store floral sections where stems cost half the price of specialty florists.
64. Summer Shell and Sand Jars
Beachy memory jars with shells and sand for under $25 in one afternoon

Summer shell and sand jars capture beach memories in layered glass vessels that double as instant coastal decor. Fill clear jars with alternating bands of colored sand, shells, sea glass, and driftwood to create a breezy, beachy look that brings vacation vibes year-round. The tactile, organic composition works beautifully on shelves, nightstands, or windowsills and serves as a conversation starter about favorite seaside moments.
Layer colored sand first, alternating shades to create visual interest, then tuck in shells, sea glass, and small rocks as you go. Seal lids if you want a dust-free display. Shop dollar stores and craft suppliers for affordable sand and clear jars; beach finds are free. Use sand you collected yourself or buy pre-dyed sand in bulk online for the best value.
Kitchen & Dining
65. Open Shelving Conversion
Trade cabinets for breezy open shelves in one weekend
Open shelving instantly lightens a kitchen by removing heavy cabinet doors and replacing them with floating or bracketed shelves. This conversion creates visual breathing room, makes frequently used dishes accessible, and lets you display attractive dishware, cookbooks, and décor as part of your kitchen's design. It works especially well in smaller kitchens or above countertops where natural light bounces off displayed items rather than getting swallowed by cabinetry.
Start by removing cabinet doors and hardware carefully, then patch the holes with wood filler and sand smooth. Install floating shelves or brackets at the same height as your removed cabinets, ensuring they're level and properly anchored into studs. Budget-friendly options include affordable brackets from home centers and reclaimed wood shelves. Keep styling minimal and edit your display items regularly to avoid a cluttered look.
66. DIY Butcher Block Counter Riser
Create a rustic kitchen shelf for spices and oils under $75 this weekend
A butcher block counter riser is a simple raised wooden shelf that sits directly on your kitchen counter, instantly adding vertical storage and visual warmth. It creates a charming, curated look that draws the eye upward while keeping everyday essentials like oils, spices, and small jars within arm's reach. The natural wood grain pairs beautifully with modern or farmhouse kitchens and helps declutter counter space by stacking items vertically.
Start by purchasing a 12-18 inch butcher block slab and four wooden legs or supports from a home center, then secure them with wood screws and a drill. Apply a food-safe finish like mineral oil or beeswax to protect the wood. Budget-friendly alternatives include using reclaimed wood pallets, stacked books as risers, or leftover cutting board scraps. The key is ensuring stability by checking that all legs sit evenly on your counter.
67. Magnetic Knife Strip
Reclaim counter space with a sleek magnetic knife strip under $30
A magnetic knife strip is a minimalist storage solution that mounts directly to the wall, instantly freeing precious counter real estate. This stainless-steel or wood-backed strip holds knives securely via magnetic force, creating a modern, restaurant-style look that doubles as functional wall art. It works brilliantly in galley kitchens, tiny apartments, or anywhere clutter feels cramped—plus it keeps blades sharp longer than block storage since they don't clang together.
Mount the strip 3 to 4 feet high using a stud finder and wall anchors rated for your knife weight. Mark the holes lightly with pencil, then drill and secure with included hardware. Start with your most-used knives and arrange by size or frequency; lighter paring knives stick just as well as chef's knives. Budget-friendly option: hunt vintage wood strips at thrift stores, or DIY one by gluing industrial-strength magnets into a wooden board.
68. Painted Backsplash Stencil
Faux-tile backsplash with stencils, professional look under $50
A stenciled backsplash mimics the charm of real tile using paint and a reusable stencil on drywall or existing painted surfaces. This budget-friendly approach delivers high-impact visual interest—geometric patterns, subway tiles, or Moroccan designs—without the mess, cost, or permanence of actual tile installation. It's perfect for rental-friendly updates or testing a bold look before committing.
Start by prepping your wall with primer and semi-gloss paint in your base color. Secure the stencil with painter's tape, apply two thin coats of contrasting paint with a foam roller or stencil brush, and let dry completely between coats. Budget tip: buy a dollar-store stencil and copy it by spray-painting onto cardboard for a custom repeat pattern. Another money-saver: use leftover paint from other rooms, or grab sample pots from the hardware store for minimal cost.
69. Mounted Wine Glass Rack
Add elegant stemware storage under cabinets for under $40
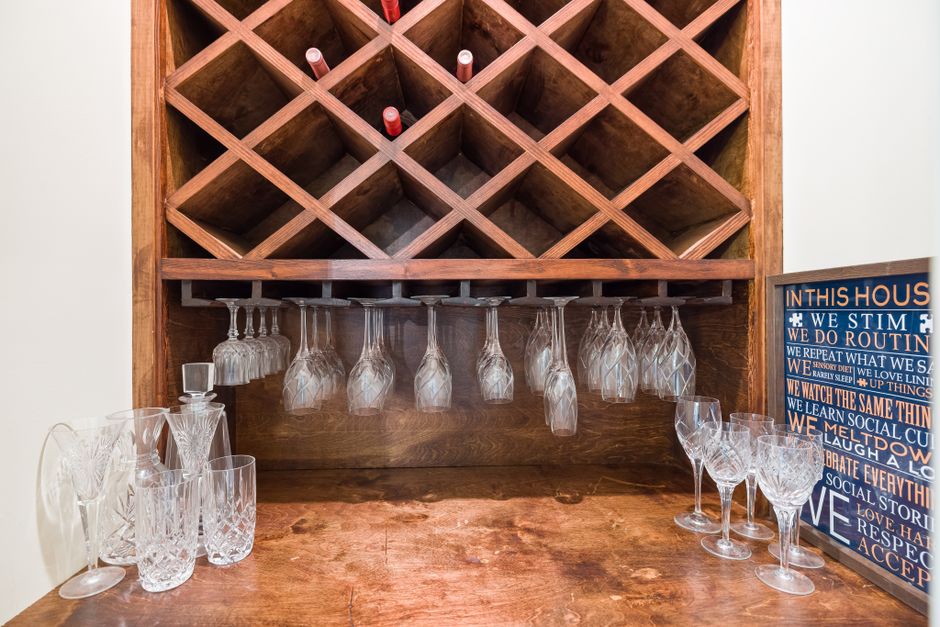
An under-cabinet wine glass rack transforms wasted space into functional, elegant storage that keeps stemware accessible and displays your favorite glasses beautifully. Mounted horizontally beneath upper cabinets, the simple wooden or metal frame holds stems securely while creating a polished, designer-kitchen vibe without eating up counter or cabinet real estate. This project works especially well in kitchens with 18+ inches of clearance between counter and cabinet.
Mount the pre-made rack using a stud finder and wood screws, or use heavy-duty wall anchors if hitting studs isn't possible. Measure twice before drilling, and keep the rack 12-15 inches above the counter for comfortable access. Save money by choosing a basic wooden rack instead of fancy wine-bar versions, or repurpose a dowel rod and L-brackets from the hardware store for a DIY-from-scratch approach.
70. Chalkboard Pantry Labels
Hand-lettered pantry labels that organize and add charm for under $20

Chalkboard labels transform a jumble of mismatched containers into a curated, intentional-looking pantry while keeping dry goods clearly organized. Using chalkboard paint or adhesive chalkboard tape on jars and bins lets you hand-letter ingredient names in whatever style suits your kitchen aesthetic—whether that's elegant script, clean sans-serif, or loose, playful lettering. The beauty is that you can update labels anytime without waste, and the matte finish reads as thoughtfully curated rather than purely utilitarian.
Start by wiping down your jars and bins, then apply chalkboard paint with a small brush or stick chalkboard labels with adhesive backing. Once dry, use white or colored chalk markers to letter your pantry staples: flour, sugar, pasta, coffee, oats. For a polished look, keep lettering consistent in size and style, and leave some breathing room around the text. Budget-conscious shoppers can use paint-sample-size chalkboard paint from hardware stores, and dollar-store markers work just as well as premium chalk pens.
71. Rolling Kitchen Island
Mobile kitchen storage with butcher-block style for under $150

A rolling kitchen island transforms tight kitchens into flexible workspaces by combining a sturdy butcher-block or wood-topped cart with heavy-duty casters. This movable prep surface slides seamlessly between counters for extra workspace during cooking, then tucks into corners or against walls for storage when not in use. The warmth of wood countertops instantly elevates basic utility carts into furniture-quality pieces that feel intentional and stylish rather than institutional.
Start with a basic utility cart or shelving unit from a home improvement store, then top it with a butcher-block slab or quality wood shelf for a custom look. Swap out standard wheels for industrial-grade locking casters that hide the budget-friendly base. Add a towel bar to one side, a few baskets for produce, and open shelving becomes a design statement. Look for sales on plain carts in late summer or check secondhand marketplaces for vintage bases to refinish.
72. Tiered Fruit and Produce Stand
Build a vertical produce tower for under $50 this weekend
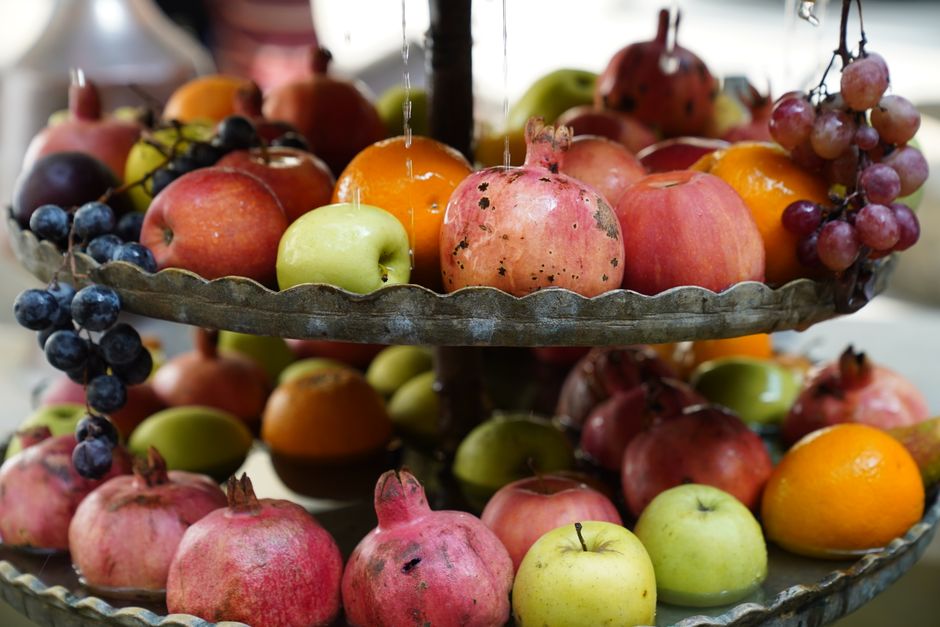
A tiered fruit and produce stand transforms dead counter space into an attractive vertical display that keeps fresh items visible and within reach. This stacked basket tower adds dimension to kitchens while maximizing storage in a compact footprint. The open design lets air circulate around produce for longer freshness, and the elevated tiers create a farmer's-market-style aesthetic that works with modern, farmhouse, or eclectic décor.
Source three wire or woven baskets in graduated sizes, then stack them on a wooden dowel or metal stand secured through the center. Alternatively, use a tiered plant stand from a thrift store as your base. Layer baskets with rubber bumpers between each tier to prevent scratching and ensure stability. Budget tip: check dollar stores and thrift shops for affordable baskets, or repurpose old decorative containers you already own.
Bathroom Projects
73. Floating Vanity Shelf
Create sleek bathroom storage above the sink for under $100 this weekend

A floating vanity shelf mounted directly above the sink transforms that awkward wall space into functional, elegant storage. This slim shelf creates visual lightness while keeping daily essentials—soap, plants, or decorative items—within arm's reach. The clean lines give even a cramped bathroom an airy, designer-ready feel without sacrificing practicality.
Find a sturdy wood board (walnut or white oak reads expensive for less), locate the wall studs behind your sink with a stud finder, and install heavy-duty floating shelf brackets into those studs. Finish with paint or stain to match your bathroom aesthetic. Budget option: use pre-stained pine and basic L-brackets. Splurge-worthy upgrade: go with thicker hardwood and brass hardware for added warmth.
74. Mason Jar Bathroom Organizer
Organize bathroom clutter with mounted mason jars under $30
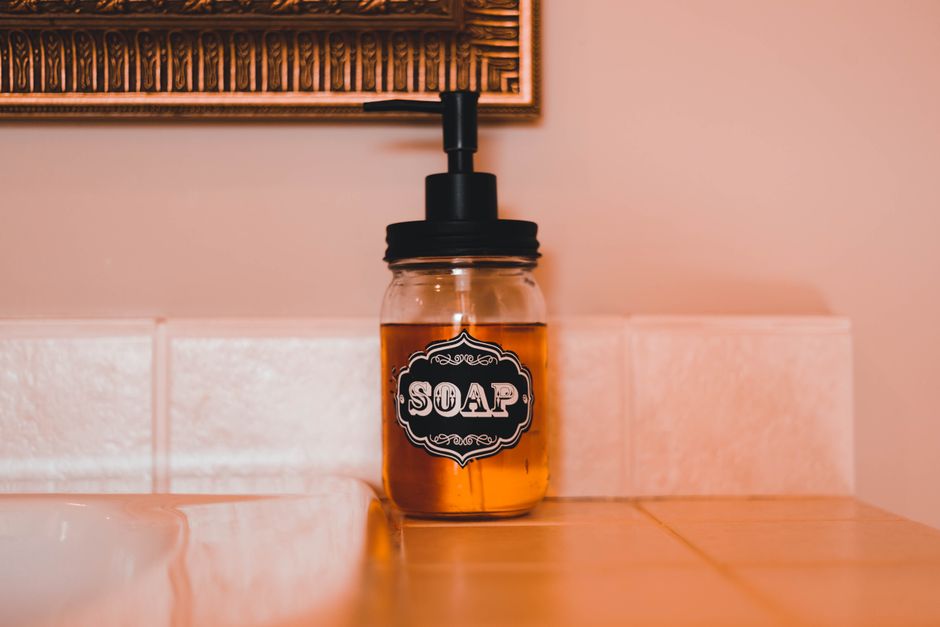
Mason jars mounted to bathroom walls create charming, accessible storage that keeps brushes, cotton balls, and skincare tools within arm's reach. The open design adds rustic or industrial flair while making daily essentials instantly visible—no rummaging through drawers. Clear glass lets you see what's inside at a glance, and the compact vertical footprint works wonders in tight bathrooms or above sinks.
Measure your wall space and grab 3-5 mason jars plus basic wall-mount brackets from any hardware store. Use a stud finder, drill pilot holes, and secure brackets with screws before sliding jars into place. Label jars with paint markers if desired. Budget tip: hunt secondhand shops for mismatched vintage jars, skip pricey specialty brackets by using simple L-brackets, and DIY labels from kraft paper.
75. Teak or Bamboo Bath Mat
Spa-style slatted mat adds warmth and drainage under $40

A slatted teak or bamboo bath mat brings resort-spa aesthetics directly into any bathroom while solving the practical problem of water pooling. The horizontal slats allow water to drain through instead of sitting on top, keeping feet dry and the mat fresher longer. Natural wood tones warm up cool tile and add organic texture that reads instantly luxe without requiring renovation.
Simply unbox, position on the bathroom floor or shower threshold, and it's ready to use—no tools or installation needed. To stretch the budget, look for bamboo versions (more affordable than teak) at big-box retailers or online marketplaces. Roll it occasionally to air-dry the underside and extend its lifespan. Choose one sized to fit your space snugly so it doesn't shift underfoot.
76. Framed-Out Builder Mirror
Transform a builder mirror with custom trim for $40-80 in one afternoon

A plain builder mirror feels institutional and cold, but wrapping it with simple trim instantly elevates the whole room. Whether you choose crisp white molding for a farmhouse vibe, natural wood for warmth, or painted black for modern edge, a framed-out mirror becomes a polished focal point that anchors the space. The transformation is dramatic because the frame adds depth, shadow lines, and intentional design that reads as custom and high-end.
Start by measuring your mirror and selecting paintable or stained trim from the hardware store—crown molding, picture frame molding, or simple 1x2 boards all work. Cut the four pieces at 45-degree angles for clean corners, attach them with construction adhesive and finishing nails, then caulk the seams and paint. Budget tip: opt for primed MDF molding instead of hardwood to save half the cost, use adhesive to minimize visible nail holes, and grab extra caulk for seamless corners.
77. Ladder Towel Rack
Leaning towel display adds rustic warmth under $40 in one afternoon

A ladder towel rack is a leaning wooden frame that holds rolled towels on its rungs, bringing farmhouse charm and functional storage to any bathroom or bedroom corner. The tilted silhouette softens hard angles while the open design keeps rolled towels visible and accessible, creating an airy alternative to traditional towel bars. It works because it combines storage with décor in one sculptural piece that anchors a room without taking up floor space.
Source a wooden ladder online or repurpose an old one from a thrift store, then sand and stain or paint it to match your palette. Simply lean it against the wall at a gentle angle and roll towels onto each rung. Budget hack: use a plain pine ladder ($15–25) and skip finishing for a raw, industrial look, or grab reclaimed wood and create a custom frame using 2x4s and dowels if you want a truly personalized piece.
78. Apothecary Jar Set
Create a spa-like vanity setup with matching glass jars in an hour

An apothecary jar set brings curated, high-end hotel aesthetics to any bathroom or vanity without the designer price tag. These matching glass containers, typically in clear or frosted finishes, instantly elevate everyday items like cotton balls, bath salts, and dried botanicals into stylish décor. The uniform look creates a collected, intentional vibe that makes a space feel more luxurious and organized.
Source three to five matching glass jars in similar heights or graduating sizes from thrift stores, Target, or Amazon, then fill them with coordinating items like Epsom salts, wooden stirrers, or rolled washcloths. Group them on a tray or wooden shelf for extra polish. Label each jar with adhesive vinyl or kraft labels for a finished touch. Budget-friendly swap: use recycled pasta jars or apothecary-style containers from discount home stores instead of specialty boutique versions.
79. Peel-and-Stick Floor Tile
Transform tired floors with peel-and-stick tiles for under $150 in one day
Peel-and-stick vinyl floor tiles are a game-changing rental-friendly alternative to permanent flooring. They mimic the look of ceramic, wood, or stone with minimal commitment—no adhesive mess, no professional installation needed. The self-adhesive backing bonds directly to clean subfloors, creating a polished, updated aesthetic that completely transforms a dated kitchen or bathroom in a single afternoon. Because they're removable, renters can take the upgrade with them or leave a refreshed space behind.
Start by thoroughly cleaning and drying your floor, then snap a chalk line down the center of the room to establish a grid. Peel tiles one at a time, press firmly from center outward to avoid air bubbles, and trim edges with a utility knife. Budget-conscious shoppers can mix affordable solid-color tiles with patterned ones to create visual interest, or buy slightly fewer tiles and use a complementary paint color on the subfloor as an accent border.
Outdoor & Patio
80. Pallet Vertical Garden
Turn a wooden pallet into a living wall of herbs for under $40

A pallet vertical garden transforms a humble wooden pallet into a space-saving living wall perfect for growing herbs, succulents, or trailing flowers. By arranging plants in the pallet's natural gaps or pockets, you create instant dimension and greenery without eating up floor space. The rustic wood adds warmth to outdoor areas or kitchen walls, while the vertical setup makes watering and harvesting genuinely convenient. (See also: seasonal gardening tips.)
Start with a reclaimed or new pallet, line the back with landscape fabric to contain soil, then fill small pockets or containers nestled between the slats with potting mix and your chosen plants. Budget-conscious? Source pallets free from local businesses, use starter herbs from a nursery rather than mature plants, and repurpose fabric scraps or old towels as liners. Water from the top and let it drip through, or mist lightly to keep soil moist without oversaturating.
81. String Light Patio Canopy
Create a warm overhead glow with string lights in 2-3 hours under $75
A string light canopy transforms an outdoor space into an inviting retreat with minimal effort. By stringing cafe-style or Edison bulbs in a grid overhead, you instantly add warmth, ambiance, and a sense of enclosure without the cost of a permanent structure. The soft glow flatters the landscape, extends your outdoor season, and works whether you're hosting or just unwinding alone.
Start by measuring your space and mapping out anchor points on walls, posts, or trees using painter's tape. Install eye bolts or hooks at corners, then run horizontal lines of string lights in a grid pattern, securing with carabiners or S-hooks for easy adjustment. Shop Amazon or hardware stores for affordable solar or plug-in string light sets, and consider weatherproof outdoor-rated bulbs to save on replacements.
82. Cinder Block Bench
Build a sturdy modular bench for under $100 in one afternoon

A cinder block bench is an industrial-meets-cozy seating solution that works in tight spaces and adapts to any room. Stack standard concrete blocks, add a cushion on top, and you've got a stylish perch that doubles as storage—no tools or skills required. The minimalist aesthetic reads modern and intentional, while the modular design means you can expand or reconfigure whenever you want.
Gather three to four 8-by-8-by-16-inch cinder blocks (about $3 each at any home center), arrange them in a rectangle, and top with a 2-to-3-inch foam cushion wrapped in fabric. Skip the adhesive for flexibility. Search for affordable upholstery remnants or use a fitted sheet as a quick cover. Thrift stores often have vintage cushions ready to upcycle, cutting costs in half.
83. Painted Doormat
Personalized welcome mat with stencils in under two hours
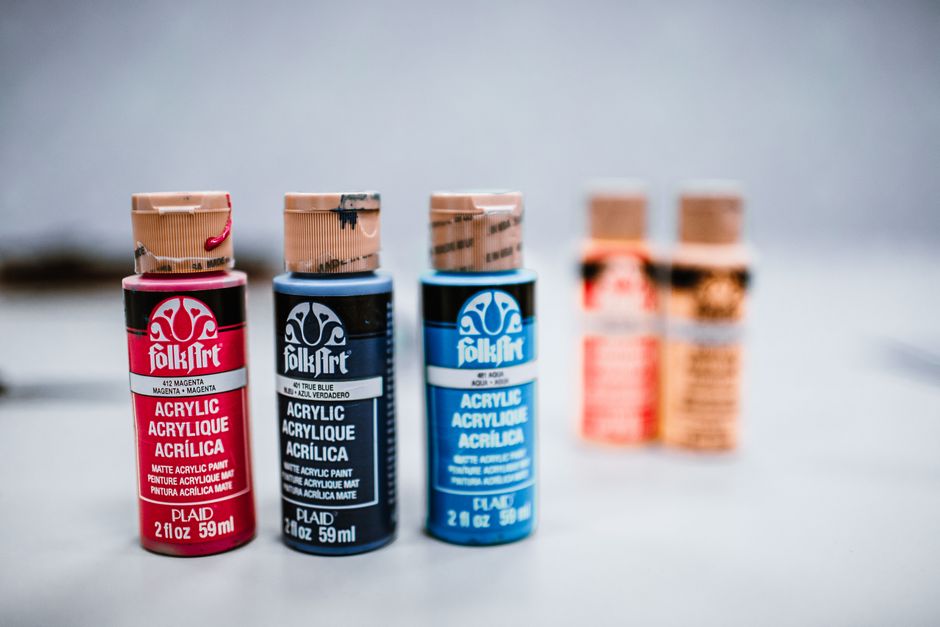
A stenciled doormat transforms a plain coir or rubber mat into a custom greeting that sets the tone at your threshold. Whether you opt for a cheerful "Welcome," a family name, or a witty saying, hand-painted designs add personality and warmth that store-bought mats simply can't match. The textured surface of most doormats actually works beautifully with stencils, holding paint and creating a naturally weathered, charming finish.
Start with a clean, dry mat and basic acrylic craft paint—exterior-grade if possible—plus a foam stencil brush and letter or pattern stencils from any craft store. Tape your stencil securely, dab paint on with a nearly-dry brush for crisp edges, and let each color dry before removing the stencil. Seal the finished mat with clear acrylic sealer for durability against foot traffic and weather.
84. Fire Pit Seating Nook
Create a cozy fire pit circle with logs and gravel under $150

A gravel-and-log fire pit nook transforms an empty yard corner into an inviting gathering space that feels intentional and rustic. This layout uses a circular foundation of landscape fabric and pea gravel to define the zone, surrounded by sturdy logs or timber benches positioned for comfortable seating. The informal arrangement encourages conversation while the contained gravel keeps flames contained and simplifies cleanup compared to bare earth or grass.
Start by marking a 10-12 foot circle with spray paint, then lay landscape fabric to suppress weeds and prevent gravel migration. Spread 2-3 inches of pea gravel evenly, then arrange logs (8-12 inches diameter work best) around the perimeter as seats. Budget tip: source free or low-cost logs from tree removal services or craigslist. Choose gravel over mulch for better fire safety, and consider renting a wheelbarrow rather than buying.
85. Hanging Outdoor Curtains
Create instant patio shade and privacy with budget drop-cloth panels

Canvas drop-cloth curtains transform a bare patio into a sophisticated outdoor room that blocks sun, wind, and neighboring eyes. Hung from a simple rod or cable system, these neutral panels soften hard edges and create dramatic definition without the premium price tag of designer outdoor fabrics. The semi-sheer quality filters light beautifully while maintaining airflow, and canvas naturally weathers to an attractive patina over time.
Mount a sturdy outdoor curtain rod between posts, pergola beams, or brackets secured to your house. Hem drop cloths by folding edges and hand-stitching or using fabric glue rated for outdoor use—no sewing machine needed. Clip-on curtain rings speed up installation and let you slide panels open for flexible shade control. Buy drop cloths in bulk at hardware stores for the best per-panel pricing, and consider mixing natural canvas with white for visual interest.
86. Vertical Succulent Frame
Create a living plant wall accent for under $40 in two hours

A vertical succulent frame transforms any wall into a lush, low-maintenance art installation that brings life and texture to tight spaces. By arranging drought-tolerant plants in a shallow wooden frame or shadow box, you create a sculptural focal point that reads like living décor—perfect for renters and plant newbies alike. Succulents thrive in minimal water and light, making this project forgiving and long-lasting without fussy upkeep.
Start with a 12-by-16-inch wooden frame, some cactus soil, and a handful of colorful succulents from a local nursery or big-box store. Line the frame with landscape fabric, fill with soil, nestle in your plants, and let them settle for a few days before hanging. Budget hack: buy small cuttings instead of full plants, or propagate free clippings from friends' collections. Mount horizontally or vertically depending on your space and plant variety.
87. Repurposed Tire Planter
Transform old tires into a colorful tiered planter under $30
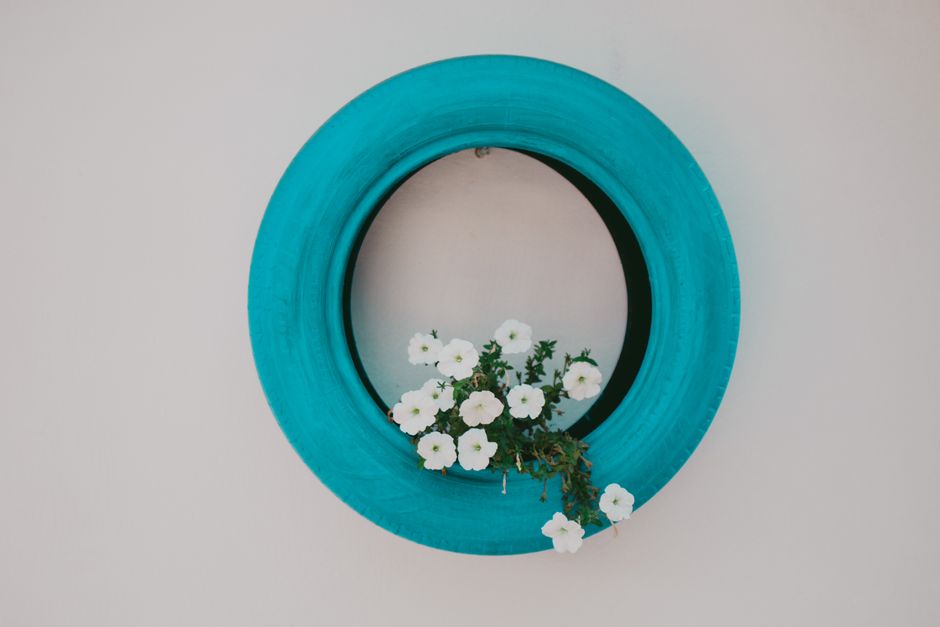
Stacked painted tires create an eye-catching, budget-friendly planter that works as both functional garden art and a conversation starter. This tiered approach maximizes planting space in small yards while giving tired rubber a second life. The geometric shape suits modern and cottage gardens alike, and the bold paint finish instantly elevates outdoor curb appeal without breaking the bank.
Stack 2–4 tires on top of each other, securing with landscape fabric or wire if needed, then fill each tier with potting soil and seasonal flowers. Spray paint in weather-resistant outdoor paint—bold solids or geometric patterns work best. Money-saving moves: hunt free tires from local shops, use leftover paint, and plant trailing flowers that tumble over the edges for maximum visual impact.
Small Accents & Finishing Touches
88. Scented Soy Candles
Hand-pour custom scented candles in vintage vessels under $40
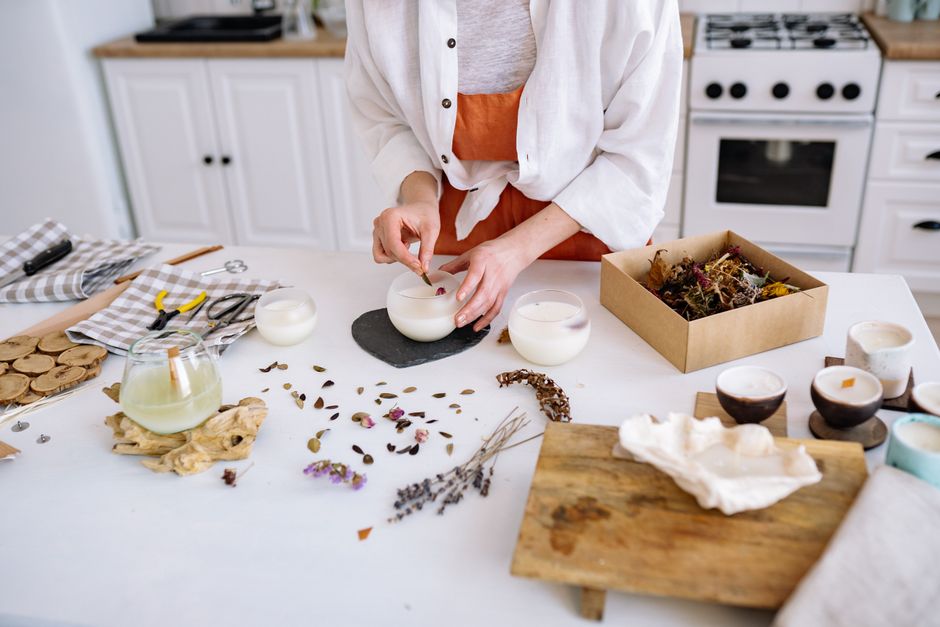
Hand-poured soy candles are a thoughtful way to fill a room with fragrance while upcycling glassware you already own. Soy wax burns cleaner and longer than paraffin, and pouring into mismatched jars—vintage teacups, old votives, or mason jars—creates an eclectic, collected look that feels more intentional than store-bought. The soft glow and custom scent blend make these perfect for creating a cozy atmosphere or as personalized gifts.
Melt soy wax flakes in a double boiler, add essential oils or fragrance concentrate when cooled slightly, secure a wick to the bottom of your vessel with a glue dot, then slowly pour. Buy wax and wicks in bulk online to keep costs low, and raid thrift stores for vessels. Let candles cure for 24 hours before burning for the best scent throw.
89. Decorative Tray Styling
Corral clutter into a polished vignette for under $30 this weekend

A styled decorative tray instantly pulls a room together by grouping everyday objects into one intentional, magazine-worthy focal point. Whether it sits on a coffee table, console, or nightstand, a tray creates visual order and makes small spaces feel curated rather than cluttered. The beauty lies in layering heights, textures, and a cohesive color story—think a candle, book, small plant, and catch-all dish arranged with intention.
Start by selecting a tray that complements your décor, then gather three to five complementary objects you already own. Vary heights by stacking items or propping books upright, and anchor the arrangement with one larger piece. Budget-friendly tricks: thrift a vintage tray for $5-$10, repurpose items from around your home, or swap out accessories seasonally to refresh the look without spending more.
90. Book Stack Risers
Elevate shelf styling with hidden book risers under $15
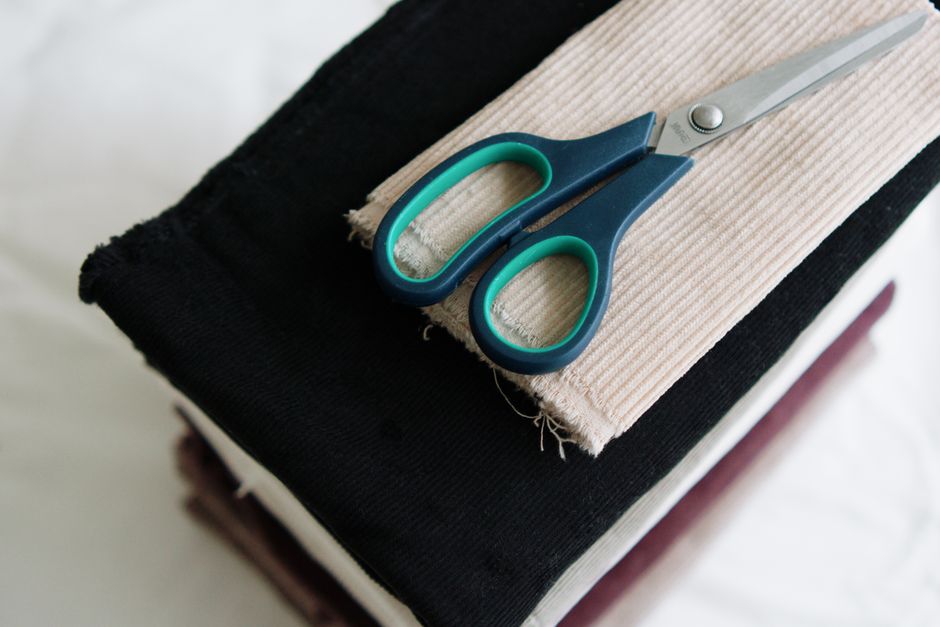
Book stack risers are weighted platforms made from stacked hardcovers or paperbacks that sit beneath decor to create natural height variation on shelves. They instantly add dimension and visual interest by lifting small objects, plants, or frames to different levels, making flat shelving look intentional and curated. This technique mimics how stylists layer displays and works especially well in corners or on open shelving where asymmetry feels modern.
Gather 3-5 hardcover books of varying thicknesses and stack them where you want height, then place your chosen decor on top. Stabilize shaky stacks with museum putty underneath. For a polished look, orient spines outward or tuck stacks behind larger pieces. Use books you already own, thrift stores for $1-2 each, or dollar-store remainders to keep costs minimal.
91. DIY Coasters
Personalized resin coasters that protect surfaces in under two hours

Resin coasters combine practical protection with custom style, letting you embed photos, pressed flowers, or metallic accents in crystal-clear epoxy. The result feels polished and high-end while the process is forgiving enough for first-timers. They're also thoughtful handmade gifts that cost pennies to produce once you have basic supplies on hand.
Mix two-part epoxy resin according to package directions, pour into silicone molds, and add your embellishments before it sets. For budget savings, skip specialty resin and use basic craft-grade epoxy from any hardware store, or swap resin entirely for cork or ceramic tile coasters decorated with paint markers and sealed with polyurethane. Let cure fully (usually 24 hours) before demolding and using.
92. Woven Basket Wall
Create instant texture with woven baskets for under $75 this weekend
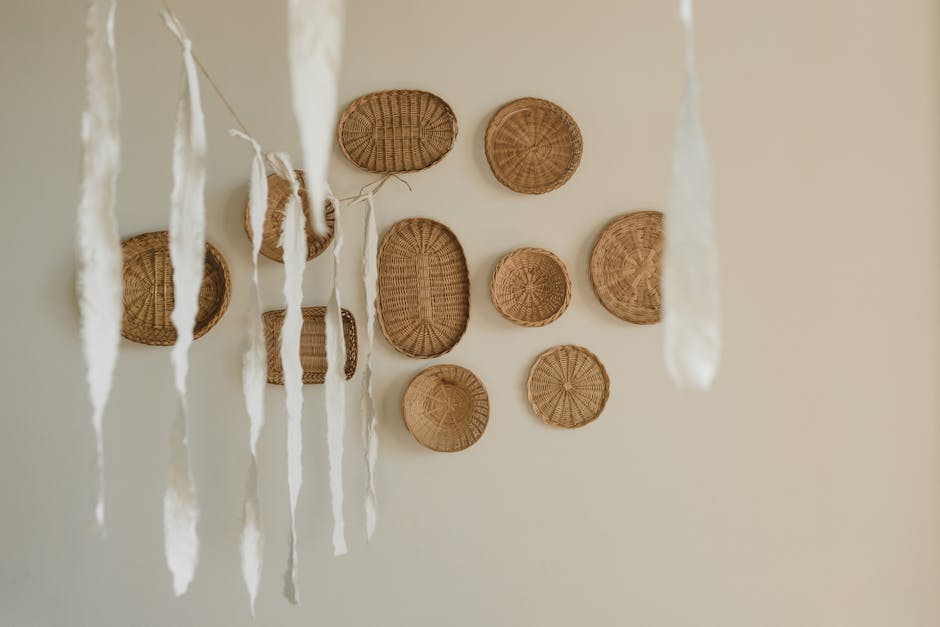
A woven basket wall transforms a bare stretch into a warm, layered focal point that reads as intentional gallery-style design. This clustered arrangement of flat baskets in varying sizes and weaves adds organic texture, visual depth, and that coveted collected-over-time feel without requiring any real skill. It works because baskets bring softness to hard walls while staying neutral enough to complement any palette.
Start by gathering 5-8 baskets in different sizes from thrift stores, Target, or HomeGoods—flat-backed wicker, seagrass, or woven styles work best. Arrange them on the floor first to test your layout, then hang using simple picture hangers or adhesive strips rated for the basket weight. Pro money-saving move: skip matching sets and mix finishes, or spray-paint thrifted finds a cohesive neutral for under $15 total.
93. Faux Ceramic Vase Finish
Transform plain glass vases into artisan ceramic pieces for under $30
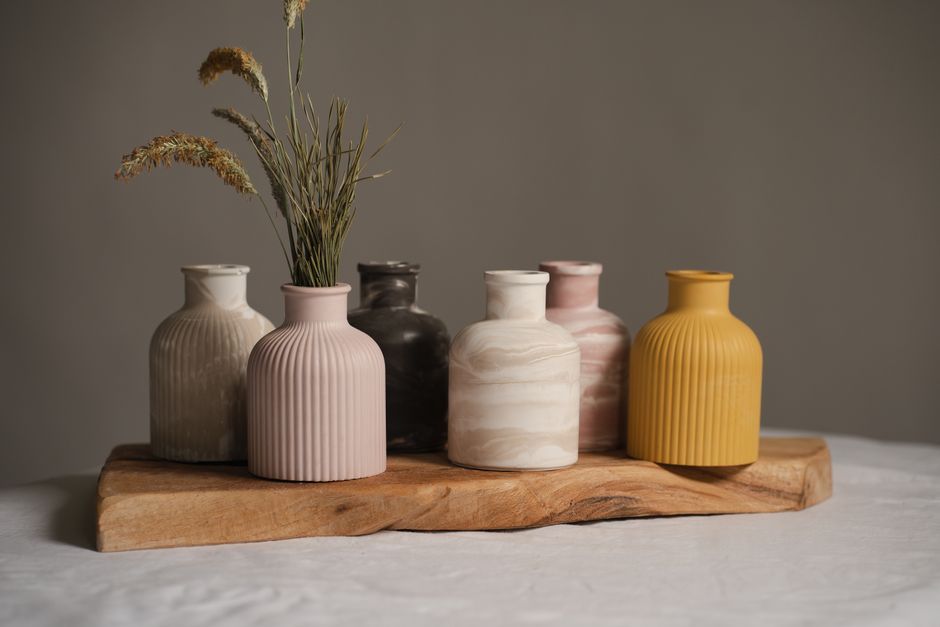
This paint technique mimics the matte, natural texture of handmade ceramic or stoneware, turning basic glass vases into gallery-worthy decor pieces. Using acrylic paint, sealant, and simple layering methods, the finish captures authentic clay's subtle color variations and slightly uneven surface. It works because matte finishes naturally read as more expensive and artisanal than glossy glass, and the tactile appearance elevates even thrift-store finds into curated statement pieces.
Start by cleaning the vase thoroughly, then apply two coats of matte acrylic paint in a warm neutral like terracotta, cream, or soft gray. Once dry, dry-brush a second tone over the base coat using minimal water for a weathered effect, then seal everything with matte polyurethane. Budget tip: buy acrylic paint in student-grade sets and mix your own custom shades. Skip expensive specialty finishes—plain matte sealer does the job beautifully.
94. Air-Dry Clay Trinket Dishes
Handmade catch-all dishes for your nightstand in one afternoon
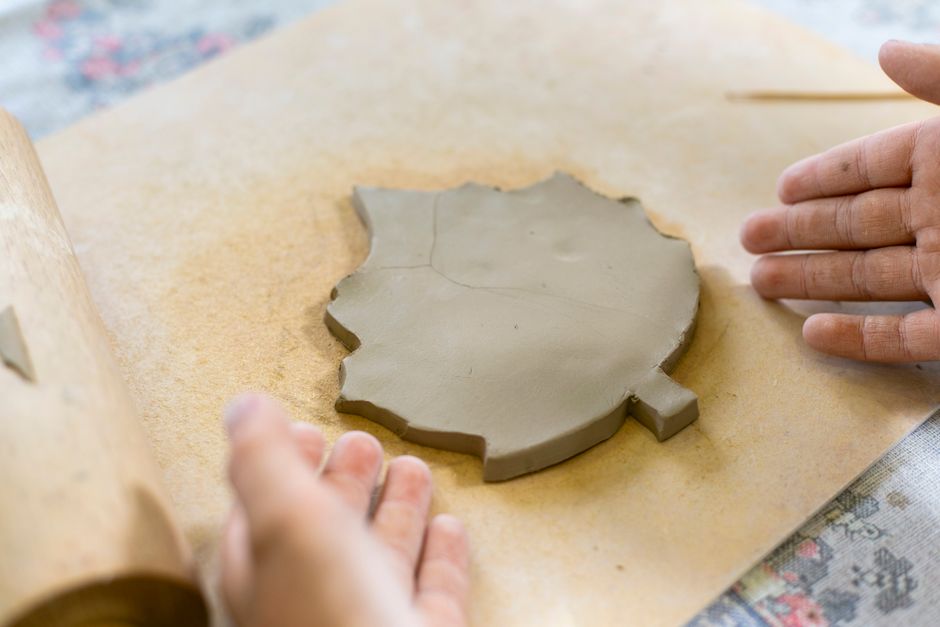
Air-dry clay trinket dishes are the perfect blend of functional and artsy—small, custom catch-alls that corral keys, coins, jewelry, and loose change without fussy molds or kilns. Each piece becomes a one-of-a-kind vessel shaped by hand, with organic edges and a handmade charm that store-bought options can't match. They work beautifully on nightstands, bathroom counters, or entryway tables, adding warmth and personality to any space.
Start with a ball of air-dry clay and pinch or thumb it into a shallow bowl shape, then smooth the rim and let it cure (usually 24 hours). For a polished finish, lightly sand the dried piece with fine-grit sandpaper, then seal with a clear gloss or matte varnish. Budget hack: one package of air-dry clay ($5-$8) makes multiple dishes, and skip pricey glazes by using acrylic paint and spray sealer from the craft store.