Floating shelves have really taken off as a go-to home decor trend in living rooms all across America. Here's why they're so popular: these sleek, wall-mounted shelves create an illusion of more space while giving you functional storage and display areas for all those things you love. Looking to add some modern elegance to your living room? Or maybe you just need more storage without making the place feel cramped? Well, DIY floating shelves are your answer—and the best part is you can install them yourself in just a few hours.
What really makes floating shelves shine is how adaptable they are. Want to keep things minimal and clean-looking? Go for it. Prefer to show off family photos and treasured mementos? Absolutely. Got a book collection you're proud of? Perfect display space. The secret sauce is that the brackets hide behind the shelf itself, so you get that polished, high-end designer look without the high-end price tag.
We're going to walk you through the whole process in this guide. You'll learn about design ideas, exactly what materials you'll need, step-by-step installation instructions, and styling tips to make your shelves look like a professional did the work.
Why Floating Shelves Are Perfect for Living Rooms
Let's talk about why floating shelves beat out traditional shelving units. For starters, they don't eat up any floor space, which is huge if you're working with a smaller living room. They also give you a chance to add some visual interest to walls that would otherwise feel boring. And here's the kicker—you can customize them however you want. Pick your material, choose your color, decide on dimensions—it all comes down to what matches your existing style.
Finding what you need is surprisingly easy, too. Places like The The Home Depot have tons of options for brackets and materials. And if you need some inspiration, home design sites like HGTV and Better Homes & Gardens & Gardens are constantly sharing floating shelf styling ideas that'll help you picture your finished project.
What You'll Need for Your Floating Shelf Project
Tools Required
- Stud finder (absolutely essential for locating wall studs)
- Level (at least 24 inches long for accuracy)
- Power drill with drill bits
- Circular saw or hand saw (if cutting custom shelves)
- Measuring tape (25-foot recommended)
- Pencil for marking
- Screwdriver set
- Safety glasses
- Work gloves
Materials Needed
- Floating shelf brackets (heavy-duty, rated for your shelf's weight)
- Wood boards for shelves (pine, oak, walnut, or engineered wood)
- Wood stain or paint (optional)
- Wood sealant or polyurethane (for protection)
- Anchors and screws (appropriate for your wall type)
- Wood filler (to hide screw holes if desired)
- Sandpaper (120, 180, and 220 grit)
Step-by-Step Installation Guide
Step 1: Plan Your Layout and Design
Start by figuring out how you want your floating shelves to look. What height feels right? Most designers suggest hanging shelves around eye level—roughly 57-60 inches from the floor—which works great for display shelves. Sketch out your plan and write down the dimensions and spacing if you're putting up multiple shelves.
Also think about what you're actually going to put on each shelf. Books are heavy and need stronger brackets with proper spacing, while lighter decorative items give you more flexibility in placement. A good rule of thumb? Aim for shelves that are 24 to 36 inches wide—that tends to look balanced in most living rooms.
Step 2: Locate Wall Studs
Don't skip this step—it's honestly the most important one for safety and how long your shelves last. Use your stud finder to figure out where the studs are behind your wall where you want to mount the shelves. Mark those spots with a pencil. Here's the deal: floating shelves absolutely need to be anchored into studs to hold weight properly. Drywall anchors alone just won't cut it—they can't handle the load safely.
Once you've found your studs, figure out exactly where your bracket holes should go. Most floating shelf brackets need at least two mounting points, and ideally they should both hit studs.
Step 3: Prepare Your Shelf Board
Already have pre-made shelves? Skip ahead. But if you're building from scratch, measure and cut your wood to the length you want. Now sand everything—start with 120-grit sandpaper and work your way up to 220-grit for a really smooth surface.
Once that's done, apply your wood stain or paint. Follow the instructions on the can and let it dry completely. If you want extra protection, add a polyurethane sealant—it'll shield your wood from dust and spills.
Step 4: Mark Bracket Positions
Hold your shelf up against the wall at the height you've chosen, and use your level to make sure it's perfectly straight. Have someone help you keep it there while you mark where the bracket holes go with a pencil. Or, if you prefer, measure down from a reference line to mark the bracket spots.
One more thing: if your shelf is wider than 24 inches, think about using three brackets instead of two. You'll get better support and your shelf will stay rock solid.
Step 5: Install Brackets
Drill pilot holes at the spots you marked—this stops the wood from splitting and keeps your screws going in straight. Install the brackets exactly how the manufacturer says to. Use screws that are right for your wall type—wood screws work best for mounting into studs.
Before you tighten everything completely, check that your brackets are level and lined up correctly.
Step 6: Mount the Shelf
Carefully set your shelf onto the brackets you just installed. Depending on which bracket system you bought, you might need to screw the shelf down from underneath, or it might just rest on top. Read your bracket instructions carefully and follow them exactly.
Once it's on there, check again that your shelf is level in every direction. Make any tweaks you need to before locking everything down.
Step 7: Hide Hardware and Finishing Touches
Use wood filler to cover up any visible screw holes. Let it dry, give it a light sand, and touch it up with stain or paint if needed. Some people like the industrial look of visible hardware, while others prefer the clean, seamless vibe. It's totally up to your style.
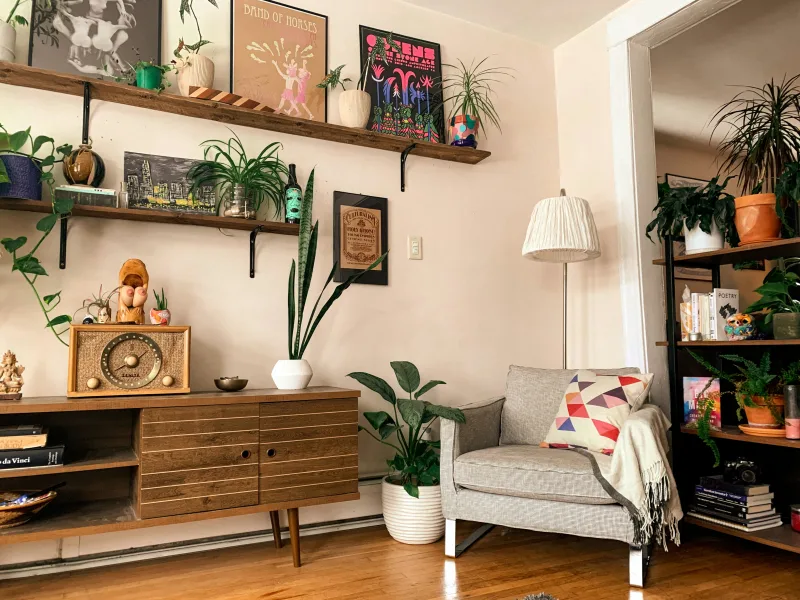
Creative DIY Floating Shelves Living Room Ideas
Minimalist Modern Design
Want a sleek, contemporary vibe? Paint your shelves white and keep them mostly bare—just add a few thoughtfully chosen pieces. This looks especially great in modern or Scandinavian-style living rooms. Spread out your items to really show off those clean lines.
Industrial Aesthetic
Try pairing wooden shelves with metal brackets that you actually show off. A darker wood stain next to black or gunmetal brackets creates a really cool contrast. Style them with vintage books, metal containers, and some green plants to complete the industrial feel.
Rustic Farmhouse Style
 Boho DIY Room Makeover: Full Revamp Under $200
Floating shelves fit right in with farmhouse décor. Use reclaimed wood or a distressed wood finish with wrought-iron brackets. Decorate with mason jars, galvanized metal pieces, and woven baskets for that authentic farmhouse look.
Gallery Wall Combination
Mix floating shelves with framed art and family photos to create a dynamic gallery wall. You get display space plus visual interest without having to do major renovations.
Bookshelf Concept
Install a bunch of shelves at different heights and you've basically got a custom bookshelf wall. It's perfect if your living room doubles as a home library. Mix in some books with decorative objects to keep things visually interesting.
Pro Tips for Professional-Looking Results
Don't cheap out on brackets. Quality, heavy-duty brackets rated well above what you think you'll need make all the difference. They keep your shelves from sagging over time and actually look good. Cheap brackets will let you down and look it, too.
Get your leveling right. Grab a good level tool and take your time during installation. Shelves that aren't level jump out at you—in the wrong way. You'll notice it every single time.
Think about weight distribution. Don't pile all your heavy stuff on one side. Spread it out evenly so the shelf doesn't tilt or stress the brackets.
Handle cables smartly. Planning to add some accent lighting? Route the cables behind or inside the shelves for a polished look.
Give things breathing room. Don't cram your shelves full. That empty space is part of the design—it keeps things from looking cluttered and chaotic.
Add shelf liners. Felt pads or shelf liners protect your shelf and the things sitting on it, plus they just look more finished.
Vary your shelf heights. If you're putting up multiple shelves, skip the evenly-spaced look. Mix it up with different heights to make things more interesting and accommodate various-sized items.
Common Mistakes to Avoid
Improper Stud Location
The number one mistake? People either don't find studs properly or they use weak drywall anchors instead. Get yourself a quality stud finder and double-check by knocking on the wall—studs give a solid sound, empty spaces sound hollow.
Incorrect Shelf Height
Hanging shelves too high or too low compared to your furniture looks awkward. Think about where you actually sit and what you can comfortably see when you're deciding where to place them.
Skipping the Level Tool
Even a little bit off-level looks unprofessional. Always use your level during installation and double-check it before you're done.
Exceeding Weight Limits
Check what your brackets are rated for and stick to it. Overloading them causes sagging or worse—failure.
Poor Finishing Work
If you rush through sanding, staining, or painting, imperfections will show. Take the time to properly prep and finish your boards—it makes a huge difference.
Inadequate Planning
Don't install shelves on a whim. Figure out where your furniture will go, where outlets are, what's already on your walls. Plan the whole thing out before you pick up a drill.
Cost Breakdown for DIY Floating Shelves
← Scroll to see full table →
| Item | Estimated Cost | Notes |
| Floating Shelf Brackets (pair) | $25-$75 | Prices vary by weight capacity and finish |
| Wood Board (per shelf) | $30-$100 | Depends on wood type and dimensions |
| Wood Stain or Paint | $8-$20 | Usually covers multiple shelves |
| Polyurethane Sealant | $10-$15 | Optional but recommended |
| Screws, Anchors, Hardware | $5-$15 | Usually inexpensive |
| Sandpaper, Filler, Supplies | $10-$20 | One-time purchase for multiple shelves |
| Total Per Shelf | $88-$245 | Single shelf with all materials |
| Three-Shelf System | $200-$550 | More economical per unit for multiple shelves |
If you hired someone to install similar shelves? You're looking at $300-$800 per shelf. So doing it yourself? That's seriously smart financially, especially if you're on a budget.
Frequently Asked Questions
How much weight can floating shelves hold?
It all comes down to your brackets. Heavy-duty ones can hold 25-50 pounds or even more, while standard brackets might max out at 15-25 pounds. Always read what the manufacturer says and don't exceed it. Spread your weight out evenly across the shelf. And remember—those weight ratings assume you've installed everything correctly into studs.
Can I install floating shelves in an apartment without damaging
📷 Photo by Kate Darmody on Unsplash


