Smart Studio Apartment Makeover 2026: Transform Your Tiny Space Into a Modern Sanctuary
Look, I get it. Studio apartments are challenging. You're working with limited square footage, awkward layouts, and probably zero storage. But here's the thing — a smart 2026 studio makeover isn't about cramming in tons of stuff or pretending you have more space than you do. It's about working with what you've got and being intentional about every single design choice you make.
The studio makeover I'm about to walk you through is honestly one of my favorite projects because it forces you to be creative. We're talking multifunctional furniture, clever storage solutions, and smart technology that actually makes your life easier — not just looks cool on Instagram. By the end of this guide, you'll have a space that feels intentional, functional, and way more valuable than when you started.
Whether you're renting or you own, these changes will make a real difference in how you live day-to-day. And the best part? You don't need a huge budget to pull this off.
What You'll Need
Before you start swinging a hammer or moving furniture around, let's talk materials and what this is actually going to cost you. I've broken this down by category so you can pick and choose based on your priorities.
Furniture & Multifunctional Pieces
- Wall-mounted desk (from The The Home Depot): $150-350
- Murphy bed or loft bed frame: $400-800
- Storage ottoman/bench: $100-250
- Floating shelving unit (set of 3-4): $80-200
- Compact dining table with storage: $200-400
Smart Technology & Lighting
- Smart LED light strips: $30-70
- Voice-controlled smart light bulbs (4-pack): $40-80
- Smart power strips: $25-50 (per strip)
- Motion-sensor closet lights: $15-35
- Smart thermostat (optional): $100-250
Storage & Organization
- Under-bed storage containers (set of 2): $40-80
- Wall-mounted pegboard system: $50-120
- Closet organizer kit: $60-150
- Vertical file organizers: $25-60
- Magnetic spice jars & wall organizers: $30-75
Paint & Wall Treatments
- Premium interior paint (2 gallons): $60-100
- Peel-and-stick wallpaper (accent wall): $30-80
- Paint primer: $20-35
- Painting supplies (brushes, rollers, tape): $25-50
Finishing Touches
- Area rug (5x7 or smaller): $80-200
- Curtains or blackout shades: $40-120
- Decorative mirrors: $50-150
- Plants & planters: $40-100
- Bedding & throw pillows: $100-200
Step-by-Step Guide
Step 1: Plan Your Layout (This Happens First!)
Honestly, this step saves you from making expensive mistakes down the road. Measure your space — every corner, every wall. Note window placements, electrical outlets, and where natural light comes in. Take photos from multiple angles. Then sketch out your plan on paper or use a free app like RoomSketcher. I can't stress this enough: planning prevents regret. Decide where your sleeping area will be, where you'll work, where guests might sit. It sounds simple, but most people skip this and wonder why their furniture doesn't work.
Step 2: Prep Your Walls & Paint
Fresh paint is your biggest bang for the buck — seriously. Choose a light, neutral base color (whites, soft grays, warm beiges) for most of your walls. This makes the space feel bigger and gives you flexibility for decor later. Then pick an accent wall — maybe that wall behind your bed or the one you see first when you walk in. A deeper color or peel-and-stick wallpaper adds personality without overwhelming the space. Prep properly: clean, patch holes, prime if needed. Your future self will thank you for not rushing this part.
Step 3: Install Smart Lighting Strategically
Lighting is everything in a studio. You want layered lighting — overhead, task, and ambient. Install smart LED bulbs in your main fixture so you can adjust brightness and color temperature with your phone. Add under-cabinet strips in your kitchen area using peel-and-stick LED tape from The Home Depot. Put motion-sensor lights in your closet so you're not fumbling around in the dark. Hang warm-toned string lights or tape lights around your sleeping area for cozy evenings. Smart lighting isn't just convenient — it makes your space feel intentional and modern.
Step 4: Choose & Install Multifunctional Furniture
This is where your layout planning pays off. Mount a wall-mounted desk that folds up when you're not working — you just gained square footage. Install floating shelves above your desk for vertical storage. Get a storage ottoman that doubles as seating and a place to stash blankets. If budget allows, a Murphy bed or loft bed elevates your sleeping situation while freeing up floor space. Every piece should earn its keep by doing more than one job.
Step 5: Maximize Closet & Storage Space
Studio closets are usually tiny, so you've got to get creative. Install a double rod to double your hanging space. Add shelf dividers to keep things organized and prevent the dreaded collapse. Use slim, vertical organizers on the back of your door. Under-bed storage containers are your friend for seasonal items, extra bedding, and things you don't use daily. Label everything — it sounds obsessive, but trust me, you'll actually use your storage system if you can find things.
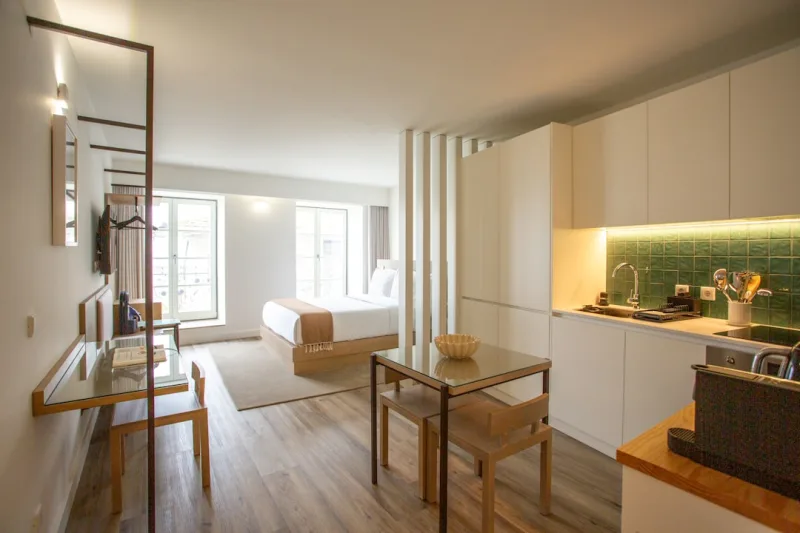
Step 6: Create Visual Separation Without Walls
 Budget Apartment Renovation: DIY Hacks That Actually Work
Even though you can't build actual walls, you can create zones with strategic furniture placement, rugs, and lighting. A bookshelf between your sleeping area and living space creates a visual boundary. An area rug defines your sitting/working zone. Different lighting in different areas makes each space feel distinct. Here's the thing — your brain needs these signals, even in a small space. It helps you actually relax in your "bedroom" area instead of always feeling like you're in your office.
Step 7: Add Final Touches & Personalization
Mirrors are your secret weapon for making spaces feel bigger — hang one opposite your window to bounce natural light around. Add plants (real or high-quality fake ones) for life and color. Hang artwork at eye level. Get quality bedding because you'll spend a third of your time there. Choose a cohesive color palette — three main colors max. Your space should feel like you, not like a hotel room or a showroom from Better Homes & Gardens & Gardens, even though we love looking at those for inspiration.
Pro Tips
Go vertical constantly. Wall space is free real estate in a studio. Shelves, hooks, pegboards, hanging organizers — your walls are doing work here. Don't waste a single square inch.
Invest in quality basics, not trendy stuff. That cute but cheap dresser you love now? It'll probably fall apart in six months. Spend real money on your bed frame, desk, and storage pieces. Everything else can be cheaper and can change as your taste evolves.
Keep your color palette simple. When you're picking paint, furniture, textiles, and decor, having a framework keeps everything from feeling chaotic. Pick a primary color (neutral base), secondary color, and an accent. Stick to it.
Use smart tech intentionally. Smart bulbs, smart strips, voice control — these are amazing for convenience. But don't go overboard just because the tech exists. Focus on things that genuinely improve your daily life.
Rent-friendly is the way to go. Even if you own, removable solutions are flexible. Peel-and-stick wallpaper, command hooks, magnetic strips — these let you redo things without permanent damage if you change your mind.
Cost Breakdown
← Scroll to see full table →
| Category | Low Budget | Mid Budget | Higher Budget |
|---|---|---|---|
| Furniture & Multifunctional Pieces | $600 | $1,200 | $2,000+ |
| Smart Tech & Lighting | $100 | $250 | $500+ |
| Storage & Organization | $150 | $350 | $600+ |
| Paint & Wall Treatments | $80 | $150 | $300+ |
| Finishing Touches | $150 | $400 | $800+ |
| TOTAL PROJECT COST | $1,080 | $2,350 | $4,200+ |


