How to Create a Cozy Studio Apartment Layout That Doesn't Feel Cramped
Let me be honest — living in a studio apartment can feel like a puzzle that's missing half the pieces. You've got your bedroom, kitchen, and living room all competing for the same square footage. But here's the thing: a tiny space doesn't have to feel tiny. I've seen rentals transform from chaotic to cozy with just a few strategic layout changes and the right approach to furniture placement.
The secret isn't about having more stuff or even spending a fortune. It's about being intentional with every single item you bring in — understanding how zones work, where your light hits, and honestly, what you actually need versus what you think you need. After years of helping renters tackle this challenge, I'm convinced that a well-designed studio can feel just as comfortable as a sprawling one-bedroom.
So let's walk through how to create a layout that works for you, your lifestyle, and your landlord's rules. No permanent changes required.
What You'll Need
Before you start moving furniture around, here's what typically makes the biggest difference in a studio layout:
- Room divider or bookshelf — to create visual separation between sleeping and living areas ($80–$300)
- Multi-functional furniture — like a bed frame with storage or an ottoman that opens ($200–$600)
- Floating shelves — wall-mounted to save floor space ($40–$150 per shelf, check The The Home Depot for options)
- Area rug — helps define zones without permanent changes ($60–$250)
- Tall, narrow nightstand or side table — maximizes vertical space ($50–$200)
- Under-bed storage containers — for seasonal items and clutter ($20–$80)
- Vertical curtain rod or tension rod — creates a pseudo wall ($15–$50)
- Mirrors — large ones that reflect light and create depth ($30–$150)
- LED strip lighting or smart bulbs — for layered, flexible lighting ($20–$100)
- Desk organizer or wall-mounted file holder — if you work from home ($15–$60)
Step-by-Step Guide
Step 1: Map Out Your Natural Zones
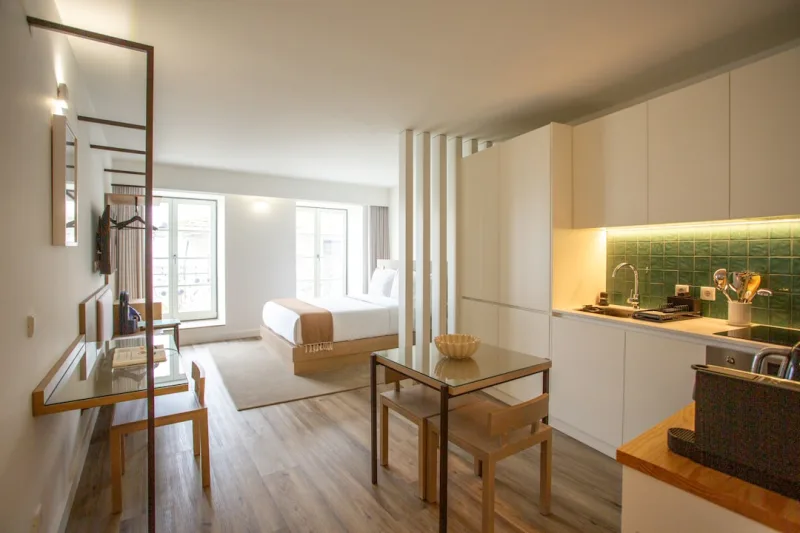
Start by looking at your studio with fresh eyes. Where's your natural light coming from? That's usually where you want to spend the most time awake. I always recommend sketching a quick floor plan — nothing fancy, just rectangles and measurements. Identify where doors, windows, and outlets are. Your kitchen probably has its own corner, so protect that. Your bed shouldn't be visible from your front door if you can help it. That's not just about privacy; it's psychology. When your sleeping space feels separate, even just visually, your brain relaxes more.
Step 2: Create a Sleeping Zone
This is where a room divider becomes your best friend. You don't need anything permanent — renters, listen up — a tall bookshelf, a sliding curtain rod, or even a fabric panel works beautifully. Position your bed against the wall farthest from the entrance if possible. I've found that placing a bookshelf perpendicular to the bed creates an incredible sense of enclosure without walls. Make sure your bed frame has storage drawers underneath. That's not optional in a studio; it's essential.
Pro move: a platform bed with built-in drawers can add 50+ cubic feet of storage. Game changer.
Step 3: Define Your Living Space
Once your sleeping zone is established, anchor your living area with that area rug we mentioned. This visual trick makes your brain register it as a separate room. A small sectional or loveseat works better than a full sofa — you need movement space. Position it to face a focal point: a window, a gallery wall, or even a streaming device. HGTV has some fantastic small-space layouts if you need visual inspiration.
Step 4: Organize Your Kitchen Nook
Studio kitchens are tiny, but they don't have to be overwhelming. Use vertical space obsessively. Wall-mounted shelves above the counter, hooks on the sides of cabinets, and magnetic strips for knives save precious counter real estate. Keep a rolling cart nearby for extra storage — it's mobile, so you can tuck it away when needed.
Step 5: Install Lighting in Layers
Overhead lighting in a studio can feel harsh and unflattering. This is why layering matters. Add a floor lamp near your reading nook, LED strips behind floating shelves, and consider smart bulbs you can dim. Different light levels for different times of day make your space feel bigger and way more livable.
Step 6: Use Mirrors Strategically
A large mirror opposite your window bounces light around and creates an illusion of more space. Don't just throw it anywhere — place it where it reflects natural light. This is one of those tricks interior designers use constantly, and honestly, it costs almost nothing.
Step 7: Keep Sight Lines Clear
 Budget Apartment Renovation: DIY Hacks That Actually Work
This matters more than you'd think. Avoid blocking windows with large furniture. Don't stack things in corners unless they're vertical (like shelves). Clear sight lines make small spaces feel breathable. Better Homes & Gardens & Gardens constantly emphasizes this, and they're absolutely right.
Pro Tips
Embrace vertical living. Every wall is real estate. Floating shelves, hanging organizers, and wall-mounted cabinets multiply your storage without eating floor space. I've seen studios completely transformed just by thinking up instead of out.
Choose furniture with intention. Every piece should serve at least two functions. A storage ottoman that doubles as seating? Perfect. A bed with drawers? Essential. A desk that folds against the wall? Genius. This isn't about being clever — it's about survival in a small space.
Color matters more than you realize. Light, neutral walls make everything feel more open. Save bold colors for accents: throw pillows, artwork, plants. Your brain processes visual clutter as actual clutter.
Don't overfurnish. Honestly, this is where most people stumble. You want your studio to feel homey, so you add a chair, a side table, a bookshelf, and suddenly you can't walk. Stick to furniture you actually use daily. That decorative ottoman? If you don't sit on it, it doesn't belong.
Cable management is non-negotiable. Visible cords make spaces feel messier and smaller. Use clips, ties, and wall boxes to hide them. Your eyes will thank you.
Cost Breakdown
← Scroll to see full table →
| Item | Estimated Cost | Priority |
|---|---|---|
| Tall Bookshelf (Room Divider) | $150 | High |
| Platform Bed with Storage | $400 | High |
| Area Rug | $120 | Medium |
| Floating Shelves (Set of 3) | $100 | Medium |
| Large Mirror | $80 | Medium |
| Under-Bed Storage Containers | $50 | Low |
| LED Strip Lighting | $40 | Low |
| Compact Nightstand | $100 | Medium |
| Tension Rod for Curtain Divider | $25 | Low |
| Small Loveseat or Sectional | $500 | High |
| Total (All Items) | $1,565 | — |
| Budget-Friendly Option (High Priority Only) | $550 | — |
FAQ
Q: Can I create a studio layout without moving large furniture?
Absolutely. Start with smaller items: add a room divider, bring in an area rug, hang floating shelves, and strategically place mirrors. These changes create zones without requiring a furniture shuffle. For renters worried about lease restrictions, these approaches work beautifully and are completely reversible.
Q: What's the best way to make a studio feel bigger without actually spending a lot?
Mirrors and lighting are your secret weapons. A large mirror opposite a window costs $30–80 and immediately makes space feel bigger. Adding LED strip lighting behind shelves or a simple floor lamp transforms how your space feels for under $100. Decluttering is free and equally impactful — seriously, I've seen studios feel 30% larger just by removing unnecessary items.
Q: Is it possible to have a functional workspace in a studio apartment?
Yes, but it requires planning. A wall-mounted desk that folds away, a small drop-leaf table, or even a murphy desk works beautifully. Keep it in your living zone to maximize the separation between sleep and work. If you work from home, this boundary becomes even more important for your mental health.


