Elegant Living Room Storage on a Budget: Your Complete DIY Guide
Look, I get it. You're scrolling through Instagram and seeing those perfectly styled living rooms with floor-to-ceiling built-ins and custom shelving — and your first thought is probably, "Yeah, that costs more than my car." But here's the thing: you absolutely can create elegant, functional storage without mortgaging your future. I've done it. My readers have done it. And honestly, the best part? Nobody has to know you didn't spend thousands.
The secret to pulling off budget-friendly elegant storage is all about strategy. It's not about cutting corners; it's about working smarter, choosing your battles, and mixing high-impact pieces with clever DIY solutions. Whether you're drowning in throw blankets or your books have invaded every corner of your living room, we're going to tackle this together with style and a realistic budget.
I've been helping friends and family transform their living spaces for years, and what I've learned is that people are often shocked at how quickly a room can go from chaotic to sophisticated when you have a proper storage plan. So grab a coffee, let's talk about what you actually need, and I'll walk you through the entire process — step by step.
What You'll Need
- Floating Shelves (set of 3) — $45-60 from The The Home Depot
- Wall Brackets — $15-25
- Decorative Storage Baskets (2-3) — $40-70
- Wooden Crate Set (unfinished) — $25-35
- Wood Stain or Paint — $8-12
- Shelf Styling Books & Decor Items — $30-50 (optional; use what you have)
- Hardware (anchors, screws, wall plugs) — $10-15
- Fabric Bins or Canvas Organizers — $20-35
- Sandpaper & Wood Filler — $8-12
- Painter's Tape & Drop Cloth — $10-15
Total Estimated Budget: $200-330
Step-by-Step Guide
Step 1: Assess Your Space and Plan Your Layout
Before you buy anything — and I mean anything — sit down with a tape measure and really look at your living room. Where's your natural focal point? Is there a wall above your sofa? Beside the television? These are your prime real estate for elegant storage. Measure the wall height, width, and note any obstacles like outlets, vents, or light switches.
Sketch out what you're thinking — it doesn't have to be fancy. Just rough boxes representing where things will go. This prevents expensive mistakes and buyer's remorse, trust me. Better Homes & Gardens & Gardens has some fantastic planning templates online if you want something more structured to work with.
Step 2: Declutter and Categorize What You're Storing
 Boho DIY Room Makeover: Full Revamp Under $200
I know, I know. Nobody wants to hear this. But decluttering before you build storage is literally the difference between a beautiful space and a jammed-full mess that looks expensive but feels like chaos. Go through your items honestly. Books you've never read? Gone. Decorative items you don't actually love? Donate them. Your storage shouldn't be a museum of "someday" items — it should celebrate what you actually use and enjoy.
Once you've purged, organize what's left into categories: books, blankets, media, decorative items, daily-use items. This tells you exactly what type of storage you need and how much.
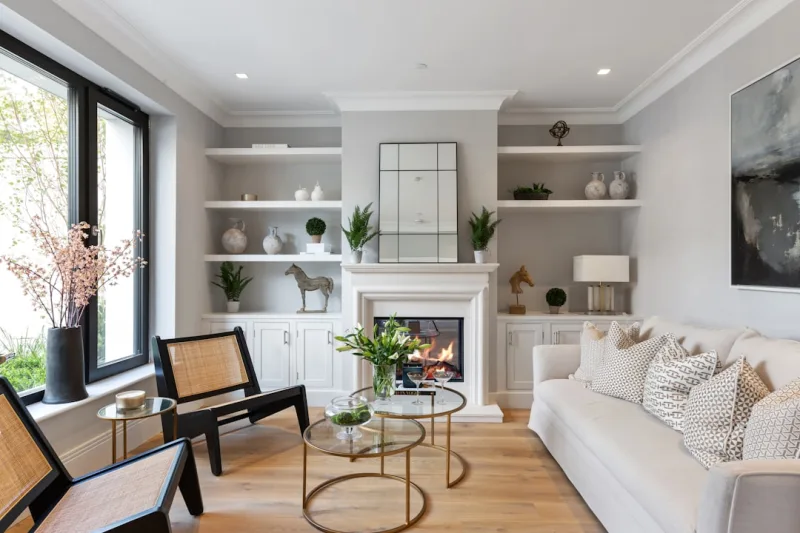
Step 3: Install Floating Shelves
Floating shelves are the MVP of budget storage. They look way more expensive than they actually are, and they give you instant display-worthy real estate. Here's how to install them without destroying your walls:
- Find your studs using a stud finder — this is non-negotiable for heavy shelves. If you can't hit studs, use heavy-duty wall anchors rated for the shelf weight.
- Mark your shelf height with a level and pencil. For most living rooms, 48-60 inches from the floor works beautifully.
- Pre-drill holes to prevent wall damage — seriously, this one step saves so much stress.
- Install your brackets firmly, double-checking that they're level. An unlevel shelf is the enemy of elegance.
- Slide your shelves on — most quality shelves fit snugly and look seamless.
Step 4: Paint or Stain Your Wooden Crates
Raw wooden crates are cute, but they scream "I just got these from a hardware store." Transform them in 20 minutes. Sand lightly with fine-grit sandpaper, apply wood stain (white, gray, or natural walnut all photograph beautifully), or paint them to match your decor. Let them dry fully — at least 4-6 hours — before using them for storage. This is where Pinterest-worthy happens, honestly.
Step 5: Arrange Baskets Strategically
Baskets aren't just functional; they're design elements. Place them on lower shelves or under side tables to hide the less glamorous items (remotes, chargers, that one box of old phone cables). Choose woven or fabric baskets in neutral tones — they photograph well and won't clash with any aesthetic.
Step 6: Style Your Shelves Like You Mean It
This is where elegance comes in. Don't just line books up. Mix them with decorative objects, plants, and breathing room. The rule I follow? Try the "rule of three" — group items in odd numbers. Three books stacked horizontally, a small plant, and a framed photo creates visual interest without looking cluttered. HGTV does amazing videos on this if you want more styling inspo.
Pro Tips
- Diy Coffee Table Ideas Cheap
- Boho Home Decor Ideas Diy Budget
- Master Bedroom Makeover Ideas On A Budget
- cheap diy living room decor ideas
📷 Photo by Tile Merchant Ireland on Unsplash


