Smart Bathroom Design for Modern Homes: Your Complete DIY Guide
Look, I'll be honest with you — the bathroom is one of those spaces that people tend to overlook when thinking about smart home upgrades. But here's the thing: your bathroom is literally the first place you visit in the morning and the last before bed. Shouldn't it work as hard as you do? I've spent the last few years transforming bathrooms from basic utility spaces into genuinely smart, functional havens, and I'm here to tell you that it doesn't require a fortune or a contractor's degree.
Smart bathroom design isn't just about installing fancy gadgets and calling it a day. It's about thoughtfully combining technology, lighting, storage, and layout in a way that actually makes your daily routine smoother. Whether you're dealing with a tiny half-bath or a sprawling master suite, the principles remain the same: maximize comfort, minimize clutter, and embrace automation where it actually matters.
The best part? You can tackle most of these upgrades yourself. I'm talking about projects that range from weekend warriors to slightly longer endeavors — nothing that requires specialized licensing or years of experience. Let's dive into how to create a bathroom that feels like it belongs in 2024, not 2004.
What You'll Need
Before you get started, let's talk materials and tech. I always recommend making a solid list rather than winging it — trust me, that third trip to The The Home Depot gets old fast.
- Smart LED Mirror with Demister — $250-$400 (brands like Kohler or Hydrant have solid options)
- Motion-Sensor Faucet — $150-$300 (touchless is where it's at)
- Smart Thermostat for Heated Floor — $80-$200
- LED Recessed Lighting (dimmable) — $15-$30 per fixture
- Bluetooth Speaker System — $50-$150
- Smart Exhaust Fan with Humidity Sensor — $100-$250
- Floating Shelves (set of 3) — $60-$120
- Under-Cabinet Lighting — $40-$80
- Electrical Wire and Junction Boxes — $25-$40
- Basic Hand Tools (if you don't have) — $50-$100
- Drywall Anchors and Hardware — $10-$20
- Smart Dimmer Switches — $25-$60 each
Step-by-Step Guide
Step 1: Assess Your Current Layout and Electrical Setup
This is crucial, and honestly, it's where a lot of DIYers stumble. Before you buy a single smart device, understand what you're working with. Walk around your bathroom with a notebook — literally. Map out your outlets, light switches, and water fixtures. Take photos from multiple angles. If your bathroom has outdated wiring or limited outlets, you might need to call in a licensed electrician for some of the heavier lifting. That's not a failure; that's being smart.
Step 2: Install Smart Lighting First
I always recommend tackling lighting before anything else because it transforms the entire space. Dimmable LED recessed lights are your friend — they're energy-efficient, long-lasting, and they give you flexibility with mood and functionality. Here's what I do: turn off power at the breaker, remove existing fixtures, and install your new recessed lighting cans. Then wire them to a smart dimmer switch. This is where Better Homes & Gardens & Gardens' lighting guides have actually been helpful for understanding lumens and color temperature.
Pro move: Install under-cabinet LED strips while you're at it. These create amazing ambient lighting around your vanity and make late-night bathroom trips way less jarring than the harsh overhead light.
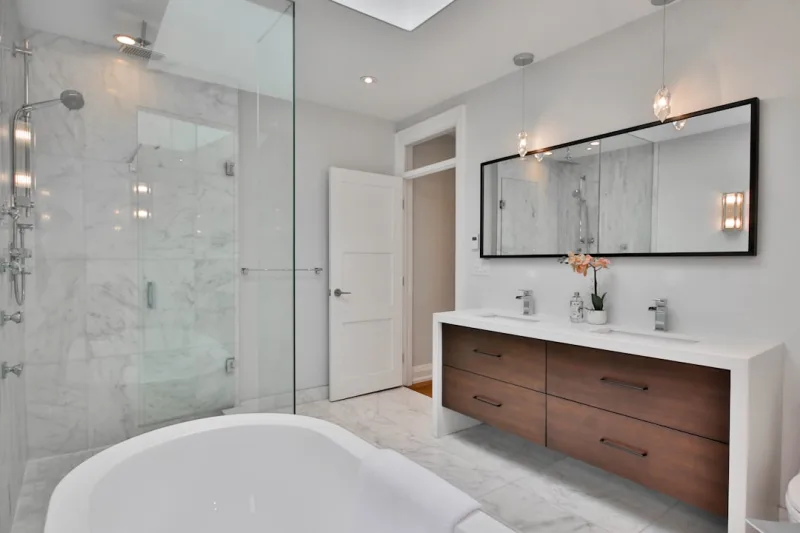
Step 3: Upgrade Your Mirror and Vanity Area
A smart LED mirror with an integrated defroster is game-changing. I installed one about two years ago and haven't looked back. These mirrors typically come with Bluetooth capability, touch controls, and they heat up so you get a fog-free surface immediately after your shower. Mount it securely to studs or use heavy-duty wall anchors if studs aren't accessible. Most come with clear installation instructions, but basically: drill holes, insert anchors, screw in mounting brackets, hang the mirror, and connect the power.
Step 4: Install Motion-Sensor Faucets
Touchless faucets reduce water waste and they're honestly just convenient. They typically replace your existing faucet, so turn off the water supply under the sink, disconnect the old faucet, and follow the manufacturer's instructions for installation. Most models come with a sensor module that mounts under the counter — think of it as giving your faucet a little brain. Connect it, test it, and adjust the sensitivity settings. Honestly, the first time someone uses your new sensor faucet without touching the handle, the little smile on their face makes the whole project worth it.
Step 5: Add Smart Temperature Control
If you've got heated floor cables or a heated towel rack, connect them to a smart thermostat. This lets you schedule warm floors for before you wake up or heat your towels on a timer. Install the thermostat according to its specific instructions — most wall-mounted ones just need to be screwed to the wall, and the wiring connects to your existing electrical line.
Step 6: Install Smart Exhaust Fan
A humidity-sensing exhaust fan is genuinely smart — it turns on automatically when moisture reaches a certain level and runs for a preset duration. Turn off power to your existing fan at the breaker, remove the old unit, and install the new one following the manufacturer's guide. Make sure it's properly vented to the outside; this isn't the place to cut corners.
Step 7: Create Smart Storage with Floating Shelves
 Budget Apartment Renovation: DIY Hacks That Actually Work
This isn't tech-related, but it's part of smart design. Floating shelves keep items organized and visible, reducing that cluttered feeling. Mount them at varying heights using sturdy brackets anchored into studs. They're perfect for storing folded towels, decorative items, and frequently used products.
Step 8: Add a Bluetooth Speaker
Finally, install a waterproof Bluetooth speaker. Most come with suction cups or mounting brackets — find a location away from direct shower spray and secure it. Now you've got music, podcasts, or even smart home announcements in your bathroom. It's a small addition that makes a surprisingly big difference in how you feel about the space.
Pro Tips
Plan Your Zones: Think of your bathroom in zones — the shower zone, the vanity zone, the toilet zone. Each zone might need different lighting, temperature, or humidity control. Smart design means each zone works independently but harmoniously.
Start with Essentials: Don't go overboard your first time. I recommend starting with smart lighting and a humidity sensor. Once you're comfortable with that, add other gadgets. HGTV has some solid examples of bathrooms that didn't go overboard, and honestly, those are the ones that age well.
Use Outlets Wisely: If outlets are limited, invest in an outlet expander with USB ports. Smart devices love USB charging, and this saves you from needing additional electrical work.
Water-Resistance Matters: Not all smart devices are created equal when it comes to moisture. Always check IP ratings — IP65 or higher is ideal for bathrooms. This tells you the device can handle splashing and steam.
Keep It Simple: The best smart bathrooms aren't the ones with the most gadgets; they're the ones where everything actually gets used. Choose devices that solve real problems in your routine.
Cost Breakdown
← Scroll to see full table →
| Component | Item | Cost Range |
|---|---|---|
| Lighting | LED Recessed + Under-Cabinet | $100-$200 |
| Mirror | Smart LED Mirror with Demister | $250-$400 |
| Faucet | Motion-Sensor Touchless | $150-$300 |
| Climate Control | Smart Thermostat + Heated Floor | $80-$200 |
| Ventilation | Smart Exhaust Fan | $100-$250 |
| Storage | Floating Shelves | $60-$120 |
| Audio | Waterproof Bluetooth Speaker | $50-$150 |
| Controls | Smart Dimmer Switches (2) | $50-$120 |
| Total Project Cost | $840-$1,740 | |
FAQ
Q: Do I Need a Professional Electrician for Smart Bathroom Design?
A: Not necessarily, but it depends on your comfort level and local codes. Simple installations like smart dimmer switches? You can handle that. Adding new circuits or significantly altering your electrical panel? Call a pro. It's about knowing your limits and respecting electrical safety. I'd rather spend a few hundred bucks on an electrician than risk something serious.
Q: What's the Most Important Smart Upgrade for a Bathroom?
A: Hands down
📷 Photo by Lotus Design N Print on Unsplash


