Transform Your Tiny Bathroom Into a Cozy Sanctuary (Yes, It's Possible)
Look, I get it. Small bathrooms are basically the furniture Tetris of home design — everything's jammed in there, nothing quite fits right, and you're convinced it's impossible to make it feel anything other than cramped and utilitarian. But here's the thing... I've seen some absolutely stunning small bathroom transformations, and honestly, they're often way cozier than those sprawling master baths I've toured.
The secret isn't about square footage. It's about intention. It's about choosing warmth over just... stuff. We're talking soft lighting, clever storage solutions, textures that actually feel good, and a color palette that makes you want to linger instead of sprint through your morning routine. Small spaces can be incredibly intimate and inviting when you approach them the right way.
I've put together this guide after helping friends and readers tackle their own bathroom cramped quarters, and I'm pumped to share exactly what works. We're going to cover everything from materials to step-by-step transformation tips, and I promise you — by the end of this, you'll see your small bathroom as an opportunity, not a limitation.
What You'll Need
Before we get into the actual transformation, let's talk materials. You don't need to gut the entire space or blow through your savings account. Here's what I typically recommend for a successful cozy bathroom upgrade:
- Warm LED Lighting Fixtures — $40-$120 per fixture (The The Home Depot carries excellent options)
- Paint (Bathroom-Grade) — $30-$50 per gallon
- Floating Shelves — $25-$75 per shelf
- Soft Towels & Bath Mats — $50-$150 total
- Storage Baskets/Organizers — $30-$80
- Mirrors (Decorative or Replacement) — $50-$200
- Adhesive Tile or Peel-and-Stick Wallpaper — $20-$60
- Plant or Greenery Decor — $15-$40
- Caulk, Sealant & Hardware — $20-$40
- Bathroom Hardware (Towel Racks, Hooks) — $30-$100
The total investment we're looking at is generally somewhere between $300-$800 for a complete cozy transformation — nowhere near what you'd spend on a full renovation. That's the beauty of this approach.
Step-by-Step Guide
Step 1: Assess Your Space and Plan the Layout
Start by really looking at your bathroom. Take photos from different angles. Measure everything — ceiling height, wall widths, floor space. I know it sounds tedious, but you'll be grateful later. Identify what's working and what's creating visual chaos. That towel bar taking up precious wall real estate? We might relocate it. Those open shelves cluttering the space? Let's incorporate them strategically.
Sketch out a simple layout on paper or use your phone. This doesn't need to be architectural drawings — just a rough map of where things currently live and where you want them to go.
Step 2: Declutter and Organize
This is honestly my favorite step because you'll immediately feel the difference. Go through everything in your bathroom. Be ruthless. Does that expired sunscreen need to stay? Probably not. Those twelve bottles of product you used once? Gone. Keep only what you actually use and love. This alone makes a small space feel 30% bigger — I'm not exaggerating.
Invest in matching storage containers or baskets. The visual cohesion matters way more than you'd think. Everything hidden and organized creates an instant sense of calm.
Step 3: Choose Your Color Palette
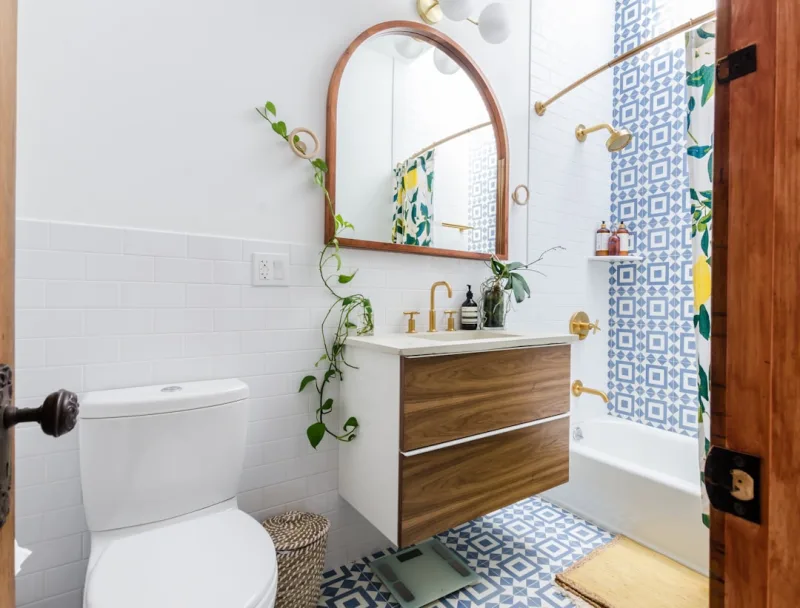
For cozy small bathrooms, I typically lean toward warm neutrals — soft whites, warm grays, pale creams, or gentle taupe. You can add depth with one accent wall, but honestly, the walls should whisper, not shout. Save the personality for textures and accessories.
Browse Better Homes & Gardens & Gardens' bathroom color inspiration to see what resonates with you. The paint is probably the quickest way to transform the entire feel. Just pick bathroom-specific paint from The Home Depot — the moisture-resistant formulas are worth the few extra dollars.
Step 4: Upgrade the Lighting
This is absolutely critical. Harsh fluorescent lighting in a small space? That's a recipe for feeling cramped and exhausted. Replace overhead lighting with warm LED fixtures that offer 2700K-3000K color temperature. Add secondary lighting — maybe a small sconce by the mirror or even LED strip lighting behind shelves.
Dimmable switches are your friend here. You'd be amazed how the same bathroom transforms when you can dial the light intensity up or down.
Step 5: Add Floating Shelves and Vertical Storage
 Budget Apartment Renovation: DIY Hacks That Actually Work
Small bathrooms need to go vertical. Install floating shelves above the toilet, beside the vanity, or over the bathtub. This draws the eye upward and makes the space feel taller. Keep the shelves styled but not overcrowded — a few rolled towels, a small plant, maybe a candle. Less is more in tight quarters.
Make sure you're using quality anchors and brackets. The Home Depot staff can help you pick the right hardware for your wall type.
Step 6: Incorporate Warmth With Textures and Soft Materials
This is where cozy actually happens. Upgrade to plush towels in neutral tones. Add a soft bath mat that feels good underfoot. Consider a small woven basket for storing toilet paper or extra toiletries. Introduce a faux plant or real low-light tolerant greenery. Hang lightweight linen curtains if you have a window.
All these soft, natural materials create an environment that feels inviting and spa-like. It's not about the size anymore — it's about the feeling.
Step 7: Style Your Surfaces
The mirror is your biggest opportunity here. Consider upgrading to a larger mirror with warm-toned framing, or add decorative mirror tiles. This reflects light and makes the space feel bigger while adding character.
Style your shelves and counters intentionally. A small glass jar with cotton balls, a ceramic soap dispenser, a minimal frame with artwork — these tiny touches matter. Follow HGTV's staging principles: cluster items in odd numbers and leave breathing room.
Step 8: Address the Walls
If you want something beyond paint, peel-and-stick wallpaper or adhesive tiles are game-changers for renters and those avoiding permanent changes. A subtle geometric pattern or soft botanical print adds visual interest without overwhelming the space. Apply it to just one wall or as an accent strip to keep things balanced.
Pro Tips
Go Vertical With Everything: Towel racks on walls instead of towel bars. Tall, narrow shelving instead of wide cabinets. This visual trick makes small spaces feel more spacious.
Use Light Reflectively: Mirrors aren't just for vanity (pun intended). They're functional design elements. A well-placed mirror bounces light around and creates depth.
Embrace Minimalism: Honestly, the most beautiful small bathrooms I've seen follow the "one in, one out" philosophy. Keep your counters clear. Let the space breathe. I know it sounds counterintuitive, but empty space is a design feature in small rooms.
Layer Your Lighting: Avoid relying on one overhead light. Combine ambient, task, and accent lighting for versatility and warmth.
Choose Quality Over Quantity: One really beautiful towel set beats five mediocre ones. One good storage basket beats a dozen plastic organizers. Small spaces demand curation.
Cost Breakdown
← Scroll to see full table →
| Item | Quantity | Price Each | Total Cost |
|---|---|---|---|
| LED Lighting Fixtures | 2 | $80 | $160 |
| Bathroom Paint | 1 gallon | $40 | $40 |
| Floating Shelves | 2 | $50 | $100 |
| Premium Towels & Bath Mat | 1 set | $120 | $120 |
| Storage Baskets | 3 | $40 | $120 |
| Decorative Mirror | 1 | $85 | $85 |
| Peel-and-Stick Wallpaper | 1 roll | $35 | $35 |
| Plants & Greenery | 2 | $20 | $40 |
| Hardware & Fixtures | Various | — | $75 |


