Designer Kitchen Makeover for Renters: The Ultimate Game-Changer
Listen, I get it. You're renting, and the thought of living with that tired, builder-grade kitchen for the next year or two makes you want to cry into your morning coffee. But here's the thing — you don't need permission slips or a contractor's salary to completely transform your rental kitchen into something that looks like it belongs on an HGTV set. I've been there, staring at laminate countertops and cabinet hardware from 2003, wondering if I was stuck with it forever.
Honestly? The secret isn't spending thousands of dollars or drilling holes in walls. It's about working smart, using temporary solutions, and choosing upgrades that pack serious visual punch without violating your lease. I'm talking about swapping out hardware, upgrading your backsplash with peel-and-stick tile, adding open shelving, and introducing strategic lighting that makes everything feel expensive and intentional.
Over the past few years, I've helped dozens of renters pull off designer-level kitchen makeovers on modest budgets — and I'm going to walk you through exactly how to do it. By the end of this guide, your kitchen won't just be functional; it'll be a space you actually enjoy spending time in.
What You'll Need
Before you dive in, let's talk materials. The beauty of a renter-friendly kitchen upgrade is that most of what you'll be buying is either removable or affordable enough that replacing it doesn't hurt your wallet.
Essential Materials & Approximate Costs:
- Cabinet Hardware: Knobs and pulls from The The Home Depot or Wayfair — $2-$8 per piece (budget $100-$200 for 15-20 pieces)
- Peel-and-Stick Backsplash Tile: $30-$80 per pack (covers roughly 25-50 sq ft)
- Paint (Cabinet-Grade): Benjamin Moore or Sherwin Williams — $35-$50 per quart (you'll need 1-2 quarts)
- Paint Primer: Bonding primer for glossy surfaces — $15-$25
- Removable Wallpaper or Peel-Stick Contact Paper: $20-$50 per roll
- Under-Cabinet LED Lighting Strips: Smart or USB-powered — $25-$60
- Open Shelving Brackets & Floating Shelves: $40-$150 depending on materials
- Paint Roller, Brushes & Sandpaper: Basic painting supplies — $30-$50
- Painter's Tape & Drop Cloth: $10-$15
Step-by-Step Guide
Step 1: Update Your Cabinet Hardware
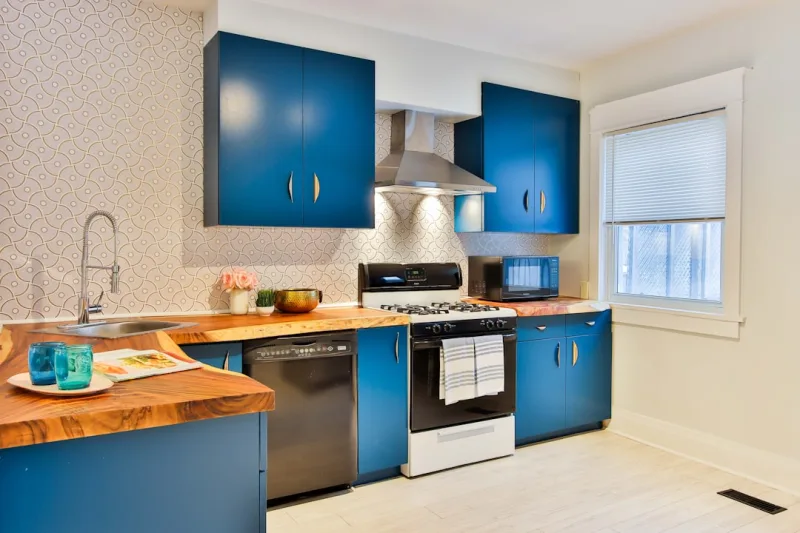
Start here. Seriously. Swapping out those original metal knobs for something modern and intentional takes maybe 30 minutes and costs under $200, but it completely changes how the kitchen feels. It's like putting on a fresh coat of lipstick — small change, huge impact.
Grab a power drill with a screwdriver bit, unscrew the old hardware (keep them in a bag so you can reinstall before moving out), and screw in your new pieces. Match them to a cohesive style — matte black, brushed gold, or warm brass all work beautifully. Trust me on this: The Home Depot has an incredible selection, and you can browse online before committing.
Step 2: Paint Your Cabinets (Without Commitment)
Now, I know what you're thinking — "Paint? Isn't that permanent?" Not the way I'm suggesting you do it. Use a bonding primer (it's designed specifically for slick surfaces) and high-quality cabinet paint. Popular choices? Soft whites, warm grays, or even a bold navy if you're feeling adventurous.
Apply two coats with a quality brush and roller, let it cure for a week, and boom — your entire kitchen looks like you hired an interior designer. The best part? When you move out, you can repaint them back to original color. Landlords are surprisingly okay with this because it doesn't damage the cabinets.
Step 3: Install a Statement Backsplash
Peel-and-stick tile has come SO far. I'm not talking about the textured plastic stuff from ten years ago — I mean actual-looking subway tile, geometric patterns, even faux marble that's honestly hard to distinguish from the real thing. Measure your backsplash area, grab a squeegee, and apply carefully. It's that simple, and there's zero permanent damage when you leave.
Step 4: Add Under-Cabinet Lighting
 Budget Apartment Renovation: DIY Hacks That Actually Work
This is where amateur kitchens become professional-looking ones. Under-cabinet LED strips (USB-powered are easiest for renters) make your countertops feel designer and provide functional task lighting that transforms the space. Install them along the bottom edge of your upper cabinets using the adhesive backing, plug in, and you've got yourself a kitchen that photographs beautifully and feels genuinely high-end.
Step 5: Bring in Open Shelving
Don't have the budget or inclination to remove cabinet doors? Use removable shelving brackets instead. Pick open shelving to replace one or two cabinet sections, style with beautiful dishware, plants, and cookbooks from Better Homes & Gardens & Gardens, and suddenly you've got a focal point that screams designer kitchen.
Step 6: Refresh Walls & Countertops
Removable wallpaper, peel-and-stick contact paper, or even a fresh coat of paint on walls makes everything feel intentional. For countertops that you can't replace, consider temporary countertop covers or a beautiful runner. It's all about visual cohesion.
Pro Tips
Invest in Lighting: Seriously, good lighting is 80% of what makes kitchens feel expensive. Under-cabinet strips, a dimmer switch (ask your landlord first), and maybe a statement pendant if there's a kitchen island can transform everything.
Go Monochromatic: Pick a color story and stick with it. Matte black hardware on white cabinets? Chef's kiss. Brass accents with warm neutrals? Also gorgeous. Consistency is what separates "Pinterest-worthy" from "I threw random stuff in here."
Style Open Shelves Intentionally: Don't just throw stuff up there. Use matching jars, beautiful serving pieces, a small plant, and one or two cookbooks. It takes five minutes but elevates everything.
Keep a Record: Take photos of how everything looked before. When you move out, document that you restored things to original condition. Protects your deposit.
Hardware Uniformity Matters: Match all your hardware finishes. Don't mix brushed gold with matte black — pick one and commit. Your future self will thank you.
Cost Breakdown
← Scroll to see full table →
| Project Item | Estimated Cost | Impact Level |
|---|---|---|
| Cabinet Hardware Replacement | $150 | High |
| Cabinet Paint & Primer | $70 | Very High |
| Peel-and-Stick Backsplash | $60 | High |
| Under-Cabinet Lighting | $50 | Very High |


