Minimalist Kitchen Storage for Small Spaces: Transform Your Tiny Kitchen Into a Functional Oasis
Look, I've been there. You're standing in your cramped kitchen — maybe it's a studio apartment, maybe you're just chronically short on square footage — and you're wondering how on earth you're supposed to fit everything you need without it looking like a disaster zone. The thing is, minimalist kitchen storage isn't about deprivation or living without nice things. It's actually about being intentional. It's about keeping what matters and ditching what doesn't.
I spent years cramming my kitchen with gadgets I never used, storing things three-deep on shelves, and generally making my mornings more stressful than they needed to be. Then I discovered minimalist storage principles, and honestly? It changed everything. Not just how my kitchen looks, but how I actually use it. Your small kitchen doesn't have to feel small when you're strategic about what goes where.
Here's what we're going to cover today: practical, budget-friendly solutions that actually work in tight spaces. We're talking vertical storage, smart organization systems, and some real talk about what you actually need versus what's just taking up real estate on your counters. Let's dive in.
What You'll Need
Before you start rearranging everything, grab these essentials. Most of these items are inexpensive, and honestly, you might already have some hanging around your place.
- Floating shelves (36-48 inches) — $30-$80 per shelf at The The Home Depot
- Magnetic knife strips or wall-mounted racks — $15-$40
- Clear drawer dividers or bamboo organizers — $12-$25 per set
- Stackable container sets (glass or plastic) — $20-$50
- Under-sink cabinet organizers — $15-$35
- Wall-mounted spice rack or magnetic board — $20-$45
- Lazy Susan turntable (for cabinets) — $10-$20
- Tension rods for vertical storage — $8-$15 per rod
- Paint or stain (optional refresh) — $10-$30
- Basic hardware: brackets, anchors, screws — $10-$20
Step-by-Step Guide
Step 1: Audit Everything You Own
This is the hard part, but it's absolutely crucial. Pull everything out of your cabinets and drawers — yes, everything. And I mean everything. Be honest with yourself about what you actually use. That waffle maker you bought three years ago? The seven mixing bowls when you only ever use two? The gadget that does one thing you could do with a knife? Get real about it. Most people find they're only using about 40% of what's actually stored in their kitchen. Donate, sell, or give away the rest.
Step 2: Measure Your Spaces Carefully
Before you buy a single thing, measure your kitchen walls, cabinet interiors, and counter space. Write everything down — height, width, depth. Bring these measurements when you're shopping. It sounds tedious, but I promise it prevents expensive mistakes. Check out guides on Better Homes & Gardens & Gardens for inspiration on how other people tackle small spaces, and note what dimensions work best.
Step 3: Implement Vertical Storage
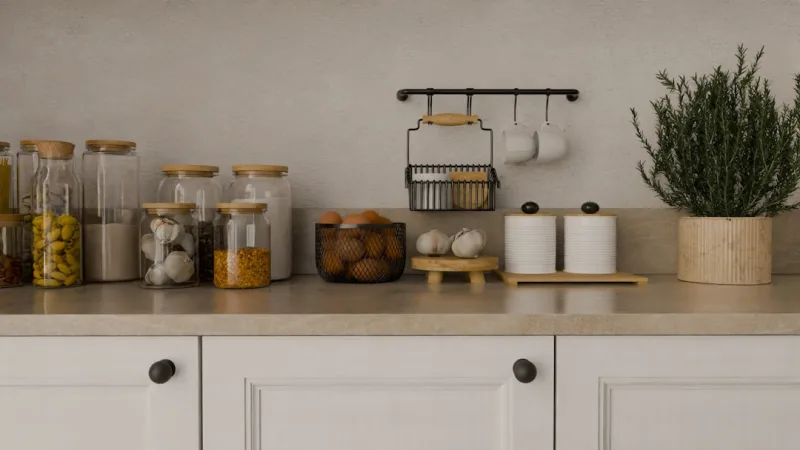
Here's where the magic happens. Small spaces don't have much floor or counter space, but walls? You've got plenty of wall space. Install floating shelves above your counter or anywhere there's blank wall real estate. These create visual interest while keeping frequently used items accessible. Pair them with wall-mounted magnetic strips for knives (saves drawer space immediately) and a wall-mounted spice rack. You're essentially using airspace that was previously wasted.
Step 4: Organize Your Cabinets With Zones
Create zones within your cabinets. Keep cooking tools together. Keep baking supplies in one section. Keep dishes in another. Use clear containers for dry goods — you'll see when you're running low and everything stays fresh longer. Lazy Susans in corner cabinets are game-changers; they let you access stuff in the back without doing yoga contortions. Add tension rods to create vertical dividers for baking sheets and cutting boards. It keeps things standing upright so you can grab what you need without toppling everything else.
Step 5: Optimize Your Drawers
Drawer organizers are non-negotiable. Separate utensils, cooking tools, and kitchen gadgets into distinct compartments. Clear dividers are better than opaque ones because you can see exactly what's where at a glance. Stack smaller items strategically. Keep your most-used items in the most accessible spots — usually the drawer closest to your prep area.
Step 6: Tackle Under-Sink Storage
The space under your sink is prime real estate. Install under-sink organizers or pull-out shelves to maximize every inch. Keep cleaning supplies, trash, and compost in designated spots. Use drawer-style organizers to keep things from shifting around. This is an area people often ignore, but it makes a huge difference in overall kitchen function.
Step 7: Refresh the Look (Optional)
If your cabinets look tired or dated, a fresh coat of paint or stain can make everything feel newer and more intentional. You don't need to go crazy — even a soft neutral tone can transform the space. This step is completely optional budget-wise, but it's surprisingly impactful.
Pro Tips
 Boho DIY Room Makeover: Full Revamp Under $200
Keep It Visible: Store things you use daily where you can see them. The more you use something, the more accessible it should be. Counter real estate should be reserved for your absolute favorites.
Use Vertical Space Aggressively: Don't be shy about shelves and wall-mounted storage. Go high — even up to the ceiling if your ceilings are tall. It looks intentional, not cramped.
Embrace the Power of Containers: Matching containers aren't just pretty; they're functional. They protect food, they stack neatly, and they make your storage look organized even when you're busy.
Label Everything: I know it sounds excessive, but labels are your friend. They keep everyone in your household on the same page and prevent you from buying duplicates.
One In, One Out Rule: Once you've decluttered, keep it that way. When you buy something new, something old leaves. This prevents the creep back into chaos.
Check HGTV for Inspiration: Seriously, their small space kitchen transformations are incredible. You'll see real examples of what works and what doesn't in actual kitchens.
Cost Breakdown
← Scroll to see full table →
| Item | Quantity | Unit Cost | Total Cost |
|---|---|---|---|
| Floating shelves | 2 | $55 | $110 |
| Magnetic knife strips | 1 | $25 | $25 |
| Clear drawer dividers | 2 sets | $18 | $36 |
| Stackable containers | 1 set | $35 | $35 |
| Under-sink organizers | 1 | $25 | $25 |
| Wall-mounted spice rack | 1 | $32 | $32 |
| Lazy Susan turntables | 2 | $12 | $24 |
| Tension rods | 4 | $10 | $40 |
| Hardware & miscellaneous | 1 | $15 | $15 |
| Total (Budget Option) | $342 | ||
| Total (With Paint/Stain) | $372 | ||
Frequently Asked Questions
Q: How much storage can I realistically add to a tiny kitchen?
A: More than you'd think if you go vertical. Two floating shelves above your counter plus wall-mounted storage for knives and spices can give you as much usable storage as three additional cabinets. The key is thinking about your walls as real estate instead of just blank space. You can double your effective storage capacity without making the space feel cramped.
Q: Won't floating shelves make my kitchen look cluttered?
A: Only if you use them wrong. The trick is intentionality. Store beautiful things you use regularly — nice glasses, cookbooks, fresh herbs in pretty containers. Avoid stacking random clutter. When everything on your shelves is either functional or beautiful (or ideally both), they become part of your design instead of clutter.
Q: What's the best way to start if I'm completely overwhelmed?
A: Start with one cabinet
📷 Photo by Jivitharsan Suresh on Unsplash


