Minimalist Bedroom DIY Decor Ideas: Create Your Perfect Serene Sanctuary
Introduction: The Art of Minimalist Bedroom Design
Your bedroom deserves to be a sanctuary—that peaceful retreat where you can finally escape the noise and chaos of daily life. Yet somehow, for so many of us, bedrooms have become dumping grounds for clutter, conflicting colors, and visual overwhelm that absolutely tanks our sleep quality and mental clarity. The minimalist bedroom movement offers something genuinely refreshing. It's so much more than just owning fewer things—it's about intentional design choices and creating a space that actually supports your wellbeing in meaningful ways.
Here's what I want you to know: minimalist bedroom design doesn't require your space to feel cold, sterile, or clinical. Absolutely not. Instead, it celebrates clean lines, furniture that actually earns its place, a carefully considered color story, and the strategic use of breathing room. The real magic of minimalism? It's all about what you choose to keep—each piece should justify its existence through either genuine function or authentic aesthetic appeal. Whether you're working with a sprawling master bedroom, a guest room, or a cozy studio apartment, minimalist DIY projects can genuinely transform your space without draining your wallet or requiring expensive professional help.
In this comprehensive guide, I'm walking you through practical, budget-friendly minimalist bedroom DIY projects that you can tackle immediately. From simple wall treatments to functional storage solutions that actually work—you'll discover how to create a bedroom that feels genuinely luxurious, calm, and authentically you, all while staying reasonable on budget.
What You'll Need: Complete Materials List with Pricing
Before you dive in, let's gather everything you'll actually need. Most of these items are easy to find at major retailers, and I've included approximate pricing to help you plan your budget:
- Neutral Paint (2 gallons): $40-60 per gallon at The The Home Depot or your local paint suppliers
- Wood Shelving Boards: $25-50 per 8-foot board
- Floating Shelf Brackets: $15-30 for a set of two
- Wood Stain or Whitewash Kit: $12-25 per can
- Linen Bedding Set: $80-150 for genuinely quality natural fibers
- White or Cream Curtain Rods and Fabric: $30-80 depending on your window situation
- Concrete or Ceramic Plant Pots: $5-15 each—mix and match sizes
- Wall Decals or Removable Wallpaper: $15-40 per roll
- Natural Fiber Storage Baskets: $20-50 for a set of three
- Wooden Bed Frame or Platform: $150-400 depending on size and quality
- LED Strip Lighting (warm white): $20-40 per kit
- Wood Filler and Sandpaper: $8-15
- Primer and Paint Brushes: $15-30 total
- Drill and Basic Tool Set: $50-100 if you're starting from scratch
- Level and Measuring Tape: $20-30
- Drywall Anchors and Screws: $8-12 per package
Step-by-Step Instructions: Creating Your Minimalist Bedroom
Project 1: Paint Your Walls with Calming Neutral Colors
Why Start with Paint: Paint is honestly the foundation of everything. A fresh coat in the right soothing neutral tones immediately shifts your entire bedroom's mood and energy.
- Choose your color palette thoughtfully. Stick to one or two neutral tones maximum—that's the golden rule. I'm talking soft whites, warm grays, pale beiges, or maybe a muted sage green. Head over to Better Homes & Gardens & Gardens for color inspiration and trending palettes that actually work.
- Prep your room properly by removing furniture, covering floors with drop cloths, and running painter's tape along trim, ceiling edges, and outlet covers.
- Apply primer first—especially if you're covering darker colors. This makes a genuine difference in coverage and color accuracy.
- Paint in long, even strokes using quality brushes. You'll need two coats, and yes, allow proper drying time between applications. Patience here pays off.
- Remove painter's tape while the paint is still slightly tacky—this gives you those clean, crisp edges.
- Give it 24-48 hours before moving furniture back in. I know it's tempting to rush, but your future self will appreciate waiting.
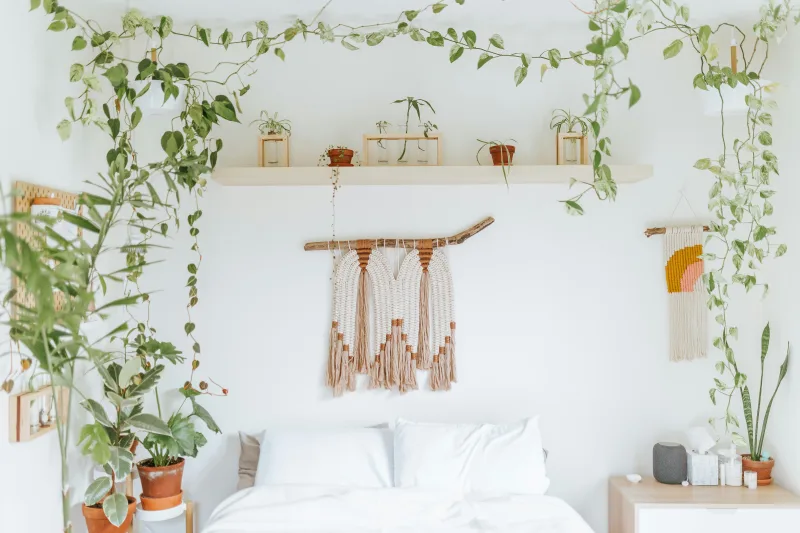
Project 2: Build and Install Floating Shelves
Floating shelves are game-changers—they provide the storage you actually need while keeping everything visually clean and intentional. They're infinitely cleaner than traditional bookcases and create genuine visual interest without cluttering the space.
- Measure and mark your shelf locations using a level. Standard height for bedroom shelves sits around 48-60 inches from the floor, though adjust based on what feels right for your space.
- Find wall studs using a stud finder. This is non-negotiable—floating shelves absolutely need to anchor to studs for safety and stability.
- If you're installing between studs over drywall, use heavy-duty drywall anchors that can handle the weight of your items.
- Install floating shelf brackets exactly per manufacturer instructions, and I mean exactly. Take time ensuring they're perfectly level—it matters more than you'd think.
- Choose natural wood boards or have them cut to your desired length at The Home Depot. Custom sizing is worth it.
- Sand boards smooth and apply a light stain or whitewash that matches your overall palette.
- Carefully position shelves on brackets and secure according to specifications.
- Now here's where the magic happens—style with 3-5 carefully chosen items per shelf: maybe a meaningful book, a small plant, one decorative object. Leave substantial negative space around everything. Your shelves should breathe.
Project 3: Create a Minimalist Headboard
A headboard anchors your entire bed and adds real sophistication without the expensive upholstered options. It's truly one of my favorite budget-friendly moves.
- Option A (Wooden Headboard): Grab a solid wood board—roughly 4 feet wide by 3-4 feet tall—from The Home Depot.
- Sand the entire surface smooth and apply stain that matches your furniture, or go with crisp white for that clean, intentional look.
- Mount directly to the wall using heavy-duty brackets, positioning it about 12 inches behind where your bed headboard will sit.
- Option B (Fabric Headboard): Stretch natural linen or canvas across wooden frame pieces, stapling on the back side for a soft, minimal aesthetic.
- Option C (Accent Wall): Simply paint a single accent wall behind your bed in a slightly deeper shade of your neutral—it's subtle but creates real depth.
Project 4: Install Soft, Layered Lighting
Proper lighting is absolutely crucial for minimalist design—I cannot stress this enough. Those harsh overhead lights? They completely contradict the serene vibe you're working toward.
- Replace standard ceiling fixtures with something simple—a flush mount works beautifully, or consider recessed lighting for an even cleaner look.
- Install warm white LED strip lighting—aim for that 2700K color temperature—along the ceiling perimeter or tucked behind your headboard for gorgeous ambient light.
- Add one understated table lamp with a linen shade on each nightstand. Simple, functional, effective.
- If possible, include a dimmable switch so you can control mood and light intensity based on what you need.
- Position everything strategically to eliminate shadows while maintaining that warm, inviting atmosphere.
Project 5: Install Minimalist Window Treatments
 Boho DIY Room Makeover: Full Revamp Under $200
Your windows need proper coverage—but coverage that's functional yet stays visually minimal. It's all about balance.
- Measure windows precisely from ceiling to floor. This creates that modern, elongated appearance that feels sophisticated.
- Install simple metal curtain rods in black, white, or natural wood finishes—nothing ornate.
- Choose natural linen curtains in white, cream, or light gray. The fabric needs to be substantial enough for light filtering but should still allow soft natural light through.
- Mount rods at ceiling height—seriously, do this. It creates a visual trick that makes ceilings feel higher.
- Hang curtains floor-to-ceiling for that dramatic, intentional minimalist look.
- Skip patterns, heavy textures, or ornate fabrics. You want visual quiet.
Pro Tips and Expert Advice for Minimalist Bedroom Success
Tip 1: Master the Art of Negative Space
Negative space—that intentional emptiness throughout your room—is honestly the most critical element in minimalist design. Don't feel pressured to fill every corner or cover every wall. Your eyes genuinely need places to rest. Leave significant areas of your walls bare, keep your nightstands relatively empty, and think of negative space as an essential design feature, not unused real estate. HGTV.com" target="_blank" rel="noopener">HGTV designers often highlight how successful minimalist spaces have 40-50% of wall and furniture surfaces intentionally empty. That's not a flaw—that's the point.
Tip 2: Choose a Cohesive Color Palette and Stick to It
Minimalist design absolutely thrives on color restraint. Select a primary neutral—white, gray, or beige—and maybe one secondary neutral if you want depth. Every permanent fixture—walls, flooring, large furniture pieces—should harmonize within this palette. This creates visual continuity and that calm, grounded feeling that's so essential for a bedroom. Your bedding, curtains, and major furniture should share undertones. It sounds specific, but it creates that sophisticated, pulled-together appearance.
Tip 3: Invest in Quality Natural Materials
This is where minimalism gets real about values. Choose genuine wood, natural linen, authentic wool, and ceramic over plastic substitutes. These materials age beautifully—imperfections actually tell a story—and they align with what minimalism is really about: sustainability and quality over quantity. Yes, natural materials cost more upfront, but they last exponentially longer than cheaply made alternatives. You're actually saving money long-term.
Tip 4: Implement Hidden Storage Solutions
Here's the secret: minimalist bedrooms aren't cluttered because everything's stored out of sight. Invest in natural fiber baskets that slide under your bed, built-in closet organizers, and quality drawer dividers. Everything you own deserves a designated home. Your storage should be invisible or architecturally integrated—not decorative storage units that add visual weight.
Tip 5: Curate Minimal Decor Intentionally
If you're displaying items—a framed photograph that genuinely means something, a piece of art that speaks to you, a small plant—ensure each piece truly earns its place. One high-quality piece of abstract art on a feature wall creates more impact than a gallery wall covered in multiple prints. Ask yourself honestly: "Would I genuinely miss this if it disappeared?" If the answer is no, it doesn't belong in your minimalist bedroom.
Tip 6: Use Plants Strategically for Life and Freshness
A single potted plant or small curated collection in coordinating ceramic pots adds organic beauty without creating clutter. Low-maintenance options like snake plants, pothos, or peace lilies thrive in typical bedroom conditions. Group plants in odd numbers (1, 3, or 5) on shelves or nightstands for visual interest while maintaining those minimalist principles you've worked so hard to establish.
Common Mistakes to Avoid When Creating Minimalist Bedrooms
- Over-Decorating: This is the biggest trap. People add "minimalist decor" until the room feels decorated, which completely misses the point. Minimalism should feel effortless and genuinely uncluttered, not like you've simply chosen a theme. Resist that urge to add items "to fill space." Seriously resist it.
📷 Photo by Cole Keister on Unsplash


