Minimalist Bedroom DIY Decor Ideas: Complete Guide to Creating Your Serene Sanctuary
Introduction: Why Minimalism Matters in Your Bedroom
Here's the thing—in today's chaotic world, your bedroom deserves to be a true sanctuary. That one place where the day's stress just... melts away. If you're anything like me, you've probably felt that overwhelming weight of clutter, struggled through restless nights, or simply yearned for a space that actually reflects what matters to you. Well, minimalist bedroom design might be your answer. And no, I'm not talking about living like a monk—minimalism is really about surrounding yourself with only what genuinely serves you, what brings authentic joy or real purpose into your life.
The minimalist movement has absolutely exploded among American homeowners, and honestly, I get it. A bedroom free from unnecessary clutter doesn't just look better—it actually helps you sleep deeper, eases anxiety, and gives you a blank canvas to express your personal style. Here's the best part: you absolutely don't need to hire some fancy designer or drain your bank account to pull this off. With some thoughtful DIY projects and smart decisions, you can create a minimalist bedroom that's genuinely beautiful and uniquely yours.
I've created this comprehensive guide to walk you through everything—proven minimalist DIY projects, complete materials lists, detailed step-by-step instructions, and honest expert tips. Whether you're picking up a drill for the first time or you've done plenty of projects before, these ideas are designed to be approachable, budget-friendly, and genuinely transformative.
What You'll Need: Essential Materials and Their Costs
Let's talk about what you'll actually need before you dive into this transformation. The wonderful thing about minimalist projects is their simplicity—the materials are straightforward and won't break the bank. Here's your shopping list:
- White Paint (1 gallon) - $25-$35 at The The Home Depot
- Wood Shelving Boards (8 ft length) - $15-$25
- Floating Shelf Brackets (set of 2) - $12-$20
- Black Matte Finish Paint (1 quart) - $8-$12
- Wood Stain (natural or walnut) - $6-$12 at The Home Depot
- Linen Bedding Set - $60-$150
- Picture Frames (8x10, set of 3) - $20-$30
- Drywall Anchors and Screws - $4-$8
- Wood Filler - $3-$5
- Sandpaper (assorted grit) - $5-$8
- Paint Brushes and Rollers - $10-$15
- Level Tool (24-inch) - $12-$20
- Measuring Tape - $6-$10
- Potted Plants (2-3 small varieties) - $15-$30
- Minimal Artwork Prints (digital files) - $5-$20 per print
Step-by-Step Instructions: DIY Minimalist Bedroom Projects
Project 1: Painting Your Walls for a Clean Foundation
Every great minimalist bedroom starts with a fresh canvas—and that means fresh paint. Seriously, one coat of white or soft neutral paint instantly transforms a room into something calm and intentional.
- Prepare Your Space — First things first: move your furniture to the center of the room and cover it with plastic sheeting. Pop off those outlet covers and switch plates. Lay drop cloths everywhere—trust me, paint splatters happen when you least expect them.
- Clean and Prime — Grab a mild detergent solution and wash those walls down to remove dust and grime. Any holes need wood filler, which you'll sand smooth once dry. If you're transitioning from a dark color to white, definitely use a primer—it'll save you from needing a third coat.
- Select Your Color — This is where your personal taste comes in. Popular minimalist choices include crisp whites, soft grays (like greige, which sits beautifully between gray and beige), or warm creams. Head over to The Home Depot, grab some paint samples, and test them on your walls. Lighting changes throughout the day, so live with those samples for a bit.
- Paint Application — Use a quality roller for large wall areas—it's faster and creates a smoother finish than a brush. Grab a brush for edges and corners where the roller can't reach. Two coats is standard; allow 2-4 hours between coats. Pro tip: paint in the evening so dust doesn't settle on your wet walls overnight.
- Final Details — Once everything's completely dry, reinstall those outlet covers and switch plates. Consider white or soft-colored versions to keep that minimalist vibe going strong throughout the room.
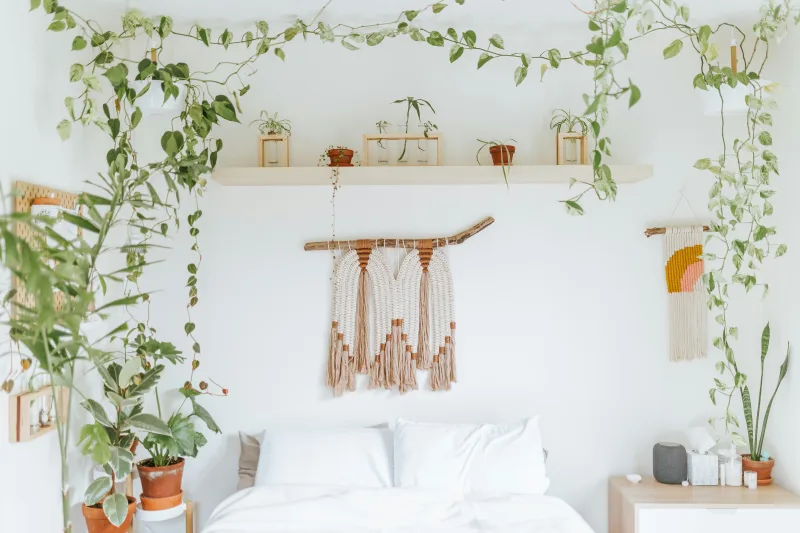
Project 2: Installing Floating Shelves for Smart Storage
Floating shelves are my secret weapon—they give you practical storage while maintaining those clean lines that make minimalism actually work. Plus, they look sophisticated without being fussy.
- Plan Your Layout — Think about where these shelves make sense visually and functionally. Eye level is usually ideal, maybe slightly above. Use a stud finder to locate wall studs—this matters for security. Shelves should be at least 12 inches deep so they're actually useful and not just decorative.
- Prepare Your Shelving — If you're not getting pre-cut boards, measure carefully and cut to length. Now here's where patience pays off: sand everything smooth with medium-grit sandpaper first, then fine-grit. Apply your finish—whether that's clean white paint, natural wood stain showing the grain, or matte black for contrast. Let it cure completely before installation.
- Install Brackets — Using a level (seriously, don't skip this), mark where those brackets go. Drill pilot holes, then insert drywall anchors if you're not hitting studs. Screw the brackets in securely—you want zero wobble. Check them again with your level.
- Mount Shelves — Carefully set shelves onto brackets and secure them from underneath with the provided screws. Double-check that everything's level before you tighten everything down completely. This is not the time to eyeball it.
- Minimize Shelf Styling — This is crucial and honestly where a lot of people mess up minimalism. Leave breathing room on those shelves. Display maybe 3-5 meaningful items per shelf—perhaps a small plant, a favorite book, a framed photo. The rest? Empty space. That emptiness is actually the design.
Project 3: Creating a Minimalist Headboard
A DIY headboard adds visual anchor and interest to your bedroom without unnecessary bulk. It's one of those projects that looks more complicated than it actually is.
- Choose Your Headboard Style — You've got options here. Horizontal wooden slats create clean lines. A geometric paint design adds interest without physical mass. Or go padded—simple, modern, and surprisingly cozy. Each approach works beautifully in a minimalist space.
- Measure Precisely — Your headboard width should be about your bed width plus 2-4 inches on each side. Height typically ranges from 36-48 inches above your mattress—play with what feels right proportionally in your room.
- Source Materials — For slats, grab wooden strips from your local hardware store. For padded styles, you'll need plywood, high-density foam, and linen fabric—all readily available at The Home Depot.
- Build Your Structure — For a slat design, construct a simple frame from 2x4s if needed, then arrange and secure your slats, paint, and let cure. For padded headboards, attach foam to plywood using spray adhesive, then wrap everything in linen fabric that you'll staple to the back. The staples stay hidden, giving you that clean look.
- Secure to Wall — Use heavy-duty wall anchors or mount directly into wall studs if possible. Make sure everything's perfectly level before pushing your bed against it. A crooked headboard will bug you every single morning.
Pro Tips and Expert Advice for Minimalist Bedroom Success
Tip 1: Master the Art of Negative Space
Negative space—those intentionally empty areas—is honestly just as important as what you actually put in your room. It's what makes minimalism feel peaceful instead of sparse. Fight that urge to fill every surface. Your nightstand should have your lamp, maybe a small plant, and that's it. Not a collection of items, no matter how nice they are. This kind of restraint creates genuine visual calm and stays true to minimalist principles.
Tip 2: Choose a Cohesive Color Palette
Minimalist design thrives on—you guessed it—simplicity. Limit yourself to three colors maximum: a base neutral (think white, beige, or light gray), a secondary neutral (deeper gray or soft tan), and one accent color if you really want it. This restraint creates harmony throughout the space and actually makes everything feel more intentional.
Tip 3: Invest in Quality Basics
 Budget Apartment Renovation: DIY Hacks That Actually Work
When you're working with fewer items, each one matters more. Splurge on a genuinely good mattress, excellent quality linen bedding that actually feels wonderful, and storage solutions that are built to last. These investments pay for themselves over years of use and seriously contribute to both comfort and functionality. Check out Better Homes & Gardens & Gardens for honest product recommendations from people who actually test this stuff.
Tip 4: Incorporate Natural Elements Thoughtfully
Minimalism and nature actually go together beautifully. Add one or two small potted plants—a pothos or snake plant works great—to improve air quality and add subtle visual warmth. Use natural wood finishes on your shelving or furniture for that warmth without visual clutter. But here's the thing: keep it minimal. Two plants create a nice accent; a plant-filled corner defeats the purpose.
Tip 5: Embrace Vertical Storage Solutions
Think vertically, not horizontally. Wall-mounted shelving, tall narrow bookcases, and hanging storage keep your floors clear and create that airy feeling that minimalism is all about. This approach to storage is inherently minimalist because everything's organized and contained rather than scattered across surfaces. Plus, it makes the room feel larger.
Tip 6: Perfect Your Lighting Design
Lighting in a minimalist bedroom should be subtle and functional—no ornate chandeliers or elaborate fixtures. Consider a simple pendant light or clean-lined ceiling fixture. Add a minimalist bedside lamp with straight edges and no fussy details. Avoid layering multiple light sources everywhere; let natural light be your daytime star and keep artificial light simple and purposeful.
Common Mistakes to Avoid
Mistake 1: Confusing Minimalism with Emptiness
This is the biggest misconception I see. Minimalism doesn't mean your bedroom should feel cold or incomplete—like you're living in a hotel. Fill your space with items you genuinely love and that actually serve a purpose. Your bedroom should feel warm, inviting, and deeply personal. It's about intentionality, not deprivation.
Mistake 2: Choosing Style Over Functionality
Every single item in a minimalist bedroom should pull its weight—either bringing you joy or serving a real purpose. Don't add decorative elements just because they photograph well. Ask yourself honestly: do I actually love this? Does it serve me? If the answer is no, it doesn't belong in your space.
Mistake 3: Ignoring Storage Needs
Poor storage is absolutely the enemy of minimalism. If you don't have adequate closed storage—quality dressers, organized closet systems, under-bed storage—your belongings end up scattered around, and your minimalist aesthetic completely falls apart. Invest in storage that keeps things out of sight while remaining accessible and organized.
Mistake 4: Using Too Many Colors or Patterns
Multiple colors and patterns create visual chaos, which is the opposite of what you're going for. Stick to your chosen palette and resist
📷 Photo by Cole Keister on Unsplash


