How to Create an Elegant Closet Layout on a Budget (That Actually Works)
Look, I get it. Your closet is basically a black hole where good intentions go to die. Clothes are piled on the floor, hangers are tangled together like spaghetti, and you're pretty sure there's something growing in the corner. The thing is — you don't need to drop thousands of dollars on a professional closet system to turn this mess into something actually elegant and functional.
I've been redesigning closets for years, and here's what I've learned: the magic isn't in expensive built-ins or fancy hardware. It's about smart planning, strategic use of vertical space, and choosing the right budget-friendly materials that don't look cheap. You can absolutely create a closet that looks like something out of Better Homes & Gardens & Gardens without the Better Homes & Gardens budget.
In this guide, I'm walking you through everything you need to know — from measuring your space to installing shelves, organizing like a pro, and styling it so it actually looks elegant. Ready to reclaim your closet? Let's do this.
What You'll Need
Before you grab your toolkit, let's talk about materials. The sweet spot for budget-friendly elegance is mixing a few quality items with smart, inexpensive options. Here's what I typically recommend:
- Wood shelving boards (1x10 or 1x12 pine) — $20-40 per 8-foot board
- Metal shelf brackets (L-shaped, 8-10 inch) — $8-15 per pair
- Closet rod and hardware — $25-50
- Wood screws and wall anchors — $8-12
- Wood stain or paint (optional but transforms everything) — $10-20
- Matching hangers (velvet or wooden) — $15-30 for a set
- Storage baskets or bins (woven or fabric) — $20-60 total
- Label maker or stickers — $5-10
- Basic hardware (drill, level, measuring tape) — $0 if you have them, $60-100 if not
Pro tip: The The Home Depot and local lumber yards often have remnant boards at discounts. I once scored beautiful pine boards at 40% off just because they had minor cosmetic scratches. Perfect for a closet where nobody's judging your wood grain.
Step-by-Step Guide
Step 1: Empty It Completely (Yes, Everything)
This is non-negotiable, honestly. Pull everything out of your closet and I mean everything. Your brain can't design a layout when you're surrounded by stuff. Plus, this is your chance to declutter — and decluttering is basically free design work. Be ruthless. That sweater you haven't worn since 2019? It's not coming back into style in your closet; it's just taking up space.
Step 2: Measure Your Space Like It Matters
Grab a measuring tape and get exact dimensions. Height, width, depth — treat it like you're measuring for a custom suit. Note where electrical outlets are, how the door swings, and if there are any weird angles or obstructions. Sketch it out on paper. This step feels tedious, but it's the difference between a closet that works beautifully and one where nothing fits quite right.
Step 3: Plan Your Layout on Paper
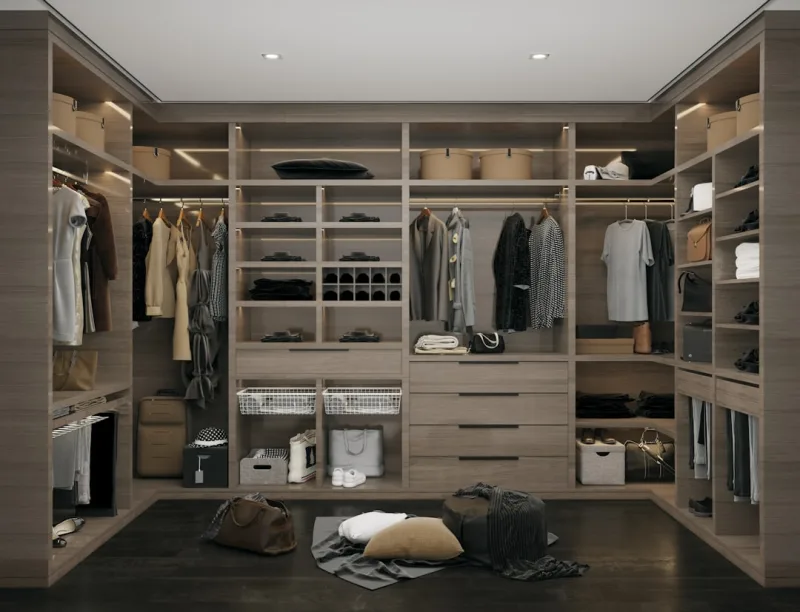
Decide on your zones: hanging space for shirts, hanging space for dresses or coats, folded sweater storage, shoes, and accessories. Generally, you'll want to maximize vertical space — install shelves high up, use the rod for long items, and reserve lower shelves for heavier pieces. Here's the thing about elegant closets: they breathe. Don't cram everything into every square inch. Space is part of the design.
Step 4: Prep Your Walls
Use a stud finder to locate wall studs — this is where you'll anchor your brackets for maximum support. Mark them lightly with a pencil. If you're installing shelves between studs, you'll need quality wall anchors rated for your closet's contents. Use a level obsessively. Seriously, an unlevel shelf is going to drive you crazy every single day.
Step 5: Install Your Shelving System
Start with your closet rod if you're keeping traditional hanging space. Mount sturdy brackets into studs, then secure the rod. Next, install shelf brackets at your marked points. If you're staining or painting your boards, do that before installation — it's a thousand times easier. Once dry, place your boards on the brackets and secure with screws from underneath for a clean look.
Install shelves from top to bottom, working your way down. Space them based on what you're storing — taller gaps for hanging items below, compact spacing for folded clothes or accessories.
Step 6: Add Your Finishing Layer
 Budget Apartment Renovation: DIY Hacks That Actually Work
Install your closet rod at a comfortable height — typically 60-65 inches from the floor for shirts, higher if you have longer coats. Add shelf liners if you want (adhesive ones look chic and protect your wood). Install any additional rods for double-hanging space if your closet depth allows.
Step 7: Organize and Style
This is where it gets elegant. Invest in matching hangers — this single choice transforms a closet more than anything else, I promise. Arrange clothes by category, then by color. Fold sweaters using the KonMari method so they stand upright and you can see everything. Use matching baskets or bins for smaller items — socks, underwear, accessories. Label everything if you're the type who forgets where things are (no judgment).
Pro Tips
Paint or Stain Your Boards: Raw wood looks budget-y. A coat of soft white, gray, or natural stain makes everything look intentional and elevated. I typically use semi-gloss finishes because they're easier to clean and slightly reflective, which makes small closets feel bigger.
Use Vertical Space Aggressively: Install shelves all the way to the ceiling if possible. That top shelf is perfect for seasonal storage in pretty bins. It's out of sight but not wasted space.
Lighting Matters More Than You Think: A single LED strip light under the top shelf costs about $15-20 and absolutely transforms how your closet looks and functions. This detail makes everything feel more luxe.
Don't Mix Metal Finishes Randomly: Stick to one metal tone — either all brushed nickel, all oil-rubbed bronze, or all chrome. Mixing creates visual chaos, which is the opposite of elegant.
Keep It Accessible: Your everyday items should be at eye level. Seasonal or rarely-used pieces go higher or lower. This is both practical and creates a naturally organized appearance.
Cost Breakdown
← Scroll to see full table →
| Item | Quantity | Price Per Unit | Total |
|---|---|---|---|
| Wood Shelving Boards (1x10 Pine) | 3 | $30 | $90 |
| Metal Shelf Brackets | 8 pairs | $12 | $96 |
| Closet Rod & Hardware | 1 | $40 | $40 |
| Screws & Wall Anchors | 1 pack | $10 | $10 |
| Wood Stain/Paint | 1 can | $15 | $15 |
| Matching Hangers (set of 20) | 2 | $20 | $40 |
| Storage Baskets (set) | 3 | $15 | $45 |
| LED Lighting Strip | 1 | $18 | $18 |
| Labels/Stickers | 1 | $8 | $8 |
| TOTAL INVESTMENT | $362 | ||
This assumes you already have basic tools. If you need to purchase a drill, level, and stud finder, add another $100-150. Honestly, these tools pay for themselves on future projects — they're an investment, not just a closet expense.
Frequently Asked Questions
Q: Can I do this in a rental without damaging walls?
A: Absolutely. Use damage-free command strips and temporary adhesive shelf liners instead of permanent installation. You can also lean open shelving units against the wall — they look great and are totally portable. Just make sure they're secured to the wall studs for safety.
Q: What if my closet is really small?
A: Small closets actually benefit most from smart organization
📷 Photo by Ali Moradi on Unsplash


