DIY Bedroom Transformation on a Budget: A Complete Room Makeover Guide
Your bedroom deserves to be your personal sanctuary—that sacred space where you can finally escape the chaos of daily life and actually recharge. But I get it. Many of us find ourselves staring at the same dated walls, outdated furniture, and awkward layouts, convinced that a real transformation requires thousands of dollars and hiring expensive contractors. Here's what I've learned after years of tackling design projects: that's simply not true. You absolutely can create a stunning, personalized bedroom that actually reflects who you are for under $500. Seriously.
Whether you're battling bland walls that drain your energy, dealing with furniture that's seen better days, or stuck with a layout that just feels off—this guide walks you through the entire process. I'm talking detailed instructions, budget-friendly material recommendations, insider tips I've picked up from design experts, and the common pitfalls that trip up most DIYers. By the time you finish reading, you'll have the knowledge and confidence to completely reimagine your bedroom into a space you genuinely love coming home to.
And here's my favorite part? You can knock this whole project out over a weekend or two without needing specialized skills or a garage full of expensive tools. Let's make your bedroom dreams a reality—without the financial stress.
What You'll Need: Complete Materials List with Budget Prices
Let me break down exactly what you'll need to gather before diving in. These prices are realistic estimates based on current market rates, though they'll vary a bit depending on where you shop and what sales are happening. Most of these materials are readily available at The The Home Depot or similar retailers.
- Paint and Supplies - Two gallons of quality interior paint ($45-60), primer ($15-20), paintbrushes and rollers ($20-30), paint tray ($5-8)
- Wall Decor - Removable wallpaper or peel-and-stick wall decals ($25-40), or save budget for an accent wall in paint
- Bedding - Quality sheets, pillowcases, and a duvet cover set that actually feels nice ($60-100)
- Lighting - One or two stylish table lamps or pendant lights ($40-80)
- Window Treatments - Blackout or privacy curtains and a curtain rod ($35-60)
- Storage Solutions - Floating shelves, under-bed storage containers, or wall-mounted organizers ($50-80)
- Flooring Enhancement - An area rug, runner, or even affordable laminate ($40-100)
- Accessories - Throw pillows, blankets, wall art, picture frames—the stuff that makes it feel like home ($50-80)
- Hardware and Fasteners - Nails, screws, anchors, brackets ($15-25)
- Cleaning and Preparation Supplies - TSP (trisodium phosphate), drop cloths, painter's tape, sponges ($20-30)
Total Estimated Budget: $385-633 (This guide keeps you right around $500 for all the essentials)
Step-by-Step Instructions for Your Bedroom Transformation
Step 1: Declutter and Plan Your Space
Here's where everything starts—and trust me, this step matters more than you might think. Before you even look at a paint brush, completely empty your bedroom of everything that doesn't serve a real purpose or genuinely make you happy. I mean everything. This isn't just organizing—it's a complete refresh of your mental space too.
Sort items into three piles: keep, donate, and discard. You'll be amazed how much lighter the room feels immediately, and honestly? A clutter-free space is so much easier to work with during your transformation. It's also way more peaceful, which is the whole point of a bedroom.
While you've got the room empty, take measurements, photograph the current state, and note where your windows, doors, and natural light come from. Create a mood board using HGTV.com" target="_blank" rel="noopener">HGTV or Better Homes & Gardens & Gardens—inspiration is free, and it helps solidify your vision. Nail down a color scheme (typically 3-4 colors work beautifully together) and decide what you're keeping versus refreshing.
Step 2: Prepare Walls and Surfaces
This is the unglamorous part that separates amateur results from professional-looking finishes. Proper prep work is absolutely essential—I can't stress this enough. Protect your floors with drop cloths and mask off trim, ceiling lines, and outlets with painter's tape. It takes an extra 20 minutes but saves you hours of cleanup frustration.
Use wall patch compound to fill any holes or dings, let it dry completely, then sand it smooth. Now here's the step everyone wants to skip: wash all your walls with a diluted TSP solution and a sponge. Remove the dust, pet dander, and months of wall grime. Paint simply adheres better to clean surfaces—it's not optional if you want results that last. Let everything dry thoroughly before moving forward.
Step 3: Paint Your Walls
This is where the magic happens. Painting delivers the biggest visual transformation for your budget—nothing changes a room faster than fresh color on the walls. Start with a primer coat, especially if you're covering dark colors or going bold with a dramatic new shade. Good primer means you often need just one coat of finish paint, which saves time and money.
Use proper technique here: paint in W-patterns rather than back-and-forth strokes, which distributes paint more evenly and prevents visible lines. Apply thin, consistent coats instead of one thick coat—you'll get a smoother, more professional finish that way. Most bedrooms need two coats of finish paint for complete, even coverage. Respect the drying time between coats—rushing this shows in the final result.
Consider painting an accent wall—typically the one behind your bed—in a deeper or bolder color. It creates visual interest without overwhelming the entire space, and it instantly draws your eye to your bedroom's focal point. The Home Depot provides paint samples you can test right on your walls before committing to full gallons, so take advantage of that.
Step 4: Add Texture and Wall Interest
Beyond solid paint colors, layer in some visual interest with removable wallpaper or peel-and-stick wall decals. Modern options won't damage walls—perfect if you're renting or like changing things up. Think about a feature wall with subtle textures, geometric patterns, or botanical designs that complement your color scheme.
Or try paint techniques like color blocking or stripes—painter's tape makes this so simple even if you've never done it before. Measure carefully, apply your tape, paint the second color, and remove the tape while the paint is still slightly wet for those crisp, clean edges that look intentional.
Step 5: Update Lighting
Good lighting isn't optional—it absolutely transforms how a bedroom feels. Harsh overhead lights? Replace them with something softer and more intentional. Add table lamps on your nightstands for reading and creating mood lighting, or if you're comfortable with basic electrical work, consider pendant lights for a more modern vibe.
 Boho DIY Room Makeover: Full Revamp Under $200
Smart bulbs that let you adjust brightness and color temperature are genuinely worth the investment—they're game-changers for creating different moods throughout the day. Battery-powered LED strip lights under floating shelves or tucked behind your headboard add a modern, almost spa-like feel. These subtle touches create depth and make the room feel larger by drawing the eye upward.
Step 6: Install Window Treatments
Fresh window treatments instantly elevate a bedroom's design. Upgrade to new curtains or blackout shades that actually complement your walls instead of clashing with them. Quality window treatments serve double duty—they look beautiful and they actually function, controlling light and temperature while you sleep.
Install a sturdy curtain rod at the proper height—typically 4-6 inches above the window frame. Quality brackets matter because they support the weight and allow smooth operation. Hang curtains all the way to the floor or just above for that luxurious, intentional look that elevates the entire room.
Step 7: Refresh Flooring
If your carpet or flooring looks tired and worn, an area rug can completely change the room's character. Layer in a quality area rug—at least 8x10 feet—in a color that harmonizes with your walls and overall scheme. A good rug defines the bedroom space, adds warmth underfoot, and absorbs sound for a cozier, more intimate feel.
Want something more dramatic? Peel-and-stick vinyl flooring or click-together laminate planks offer affordable alternatives without needing professional installation. These systems are genuinely DIY-friendly and can completely transform how the room feels—sometimes more impactfully than anything else you do.
Step 8: Add Storage Solutions
Floating shelves provide practical storage while keeping the room feeling open and spacious. Install shelves 12-18 inches below the ceiling on either side of your bed or along blank wall space. Make sure your brackets are rated for the weight you're planning to put on them, and always locate wall studs for secure installation that won't end badly.
Under-bed storage containers maximize often-wasted space for seasonal items, extra bedding, or shoes. Wall-mounted organizers keep clutter off surfaces, and that instantly makes any room feel more spacious and intentional. It's the kind of thing guests notice without consciously realizing it.
Step 9: Update Bedding and Soft Furnishings
New bedding does something almost magical to a bedroom's appearance. Choose sheets with at least 300 thread count—your skin will thank you at 2 AM. Add a comfortable duvet and pillowcases in colors that work with your scheme, then layer in textures with throw pillows in different sizes and a cozy throw blanket draped across the foot of the bed.
Quality bedding isn't just about looking pretty—it actually improves your sleep quality, and that affects everything from your mood to your productivity. This is where I recommend investing if your budget allows it, since you're literally spending eight hours a night in contact with it.
Step 10: Add Final Touches and Accessories
Now for the fun part—personalizing your space. Add wall art that makes you smile, family photos in frames, a decorative mirror to bounce light around, maybe some plants for life and oxygen. Small decorative objects with meaning transform a room from empty to inviting.
Keep accessories intentional and minimal though—too much creates visual clutter that undoes all your hard work. Layer in a few candles or an essential oil diffuser for sensory appeal. These finishing touches make your bedroom feel thoughtfully designed, like someone who actually knows what they're doing created it.
Pro Tips and Expert Advice from Design Professionals
Tip 1: Use Color Psychology to Create the Right Mood
Colors directly impact your mood and sleep quality—this isn't just design theory, it's science. Cool tones like blues, greens, and soft grays naturally promote relaxation and better sleep. Warm tones like warm grays, soft beiges, and gentle whites create cozy, inviting atmospheres. Avoid overly bright or saturated colors that stimulate your brain when you're trying to wind down. Better Homes & Gardens consistently recommends keeping bedrooms in soft, muted tones for maximum relaxation benefit—and I agree completely based on experience.
Tip 2: Maximize Vertical Space
Most bedrooms are limited in floor space, so here's a trick: draw the eye upward. Use tall furniture, wall-mounted shelving, and vertically-oriented artwork to make rooms feel larger than they are. You get functional storage without consuming precious floor real estate. Hang curtains from ceiling to floor rather than just above windows for an elongating effect that makes ceilings feel higher.
Tip 3: Create a Focal Point
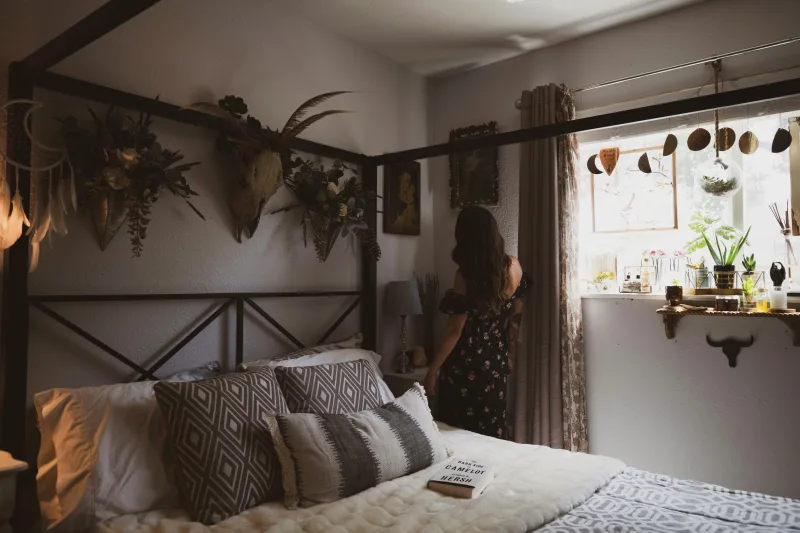
Every room needs a visual anchor—and in a bedroom, that's almost always the bed. Frame it with an accent wall, wallpaper, or an interesting headboard treatment. This naturally draws the eye and creates a sense of intentional design. Your focal point should be the most visually interesting element in the room—everything else supports and complements it.
Tip 4: Layer Your Lighting
Never rely on a single overhead light source alone—that's a recipe for a space that feels flat and uninviting. Use three types of lighting: ambient (ceiling fixture or dimmer), task (bedside or reading lamps), and accent (strip lights or decorative fixtures). Layered lighting gives you flexibility for different moods and activities. It makes your bedroom feel sophisticated and, honestly? It's more functional too.
Tip 5: Don't Neglect the Details
Here's
📷 Photo by Ashley Byrd on Unsplash


