Warm Kitchen Upgrade with Smart Home Gadgets: Transform Your Space
Here's the thing — your kitchen doesn't have to choose between looking gorgeous and being functional. I've spent years helping homeowners strike that perfect balance, and honestly, the game has changed with smart home technology. Gone are the days when upgrading your kitchen meant picking between aesthetics or convenience. Now you can have both, wrapped up in a space that's not just beautiful, but actually makes your life easier.
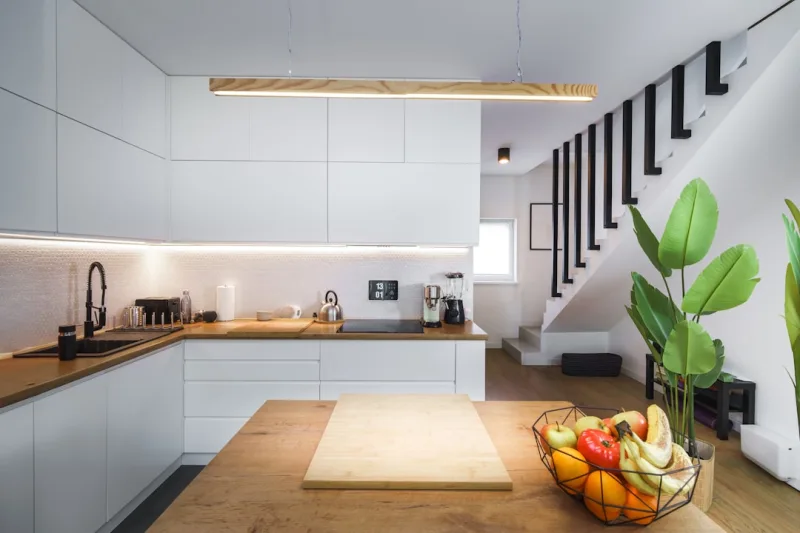
When I talk about a "warm" kitchen upgrade, I'm not just referring to the color palette (though we'll definitely touch on that). I'm talking about creating an inviting, comfortable hub — the heart of your home — that feels both modern and timeless. By integrating smart home gadgets thoughtfully, you'll end up with a kitchen that responds to your needs, anticipates problems, and honestly? Makes you actually want to spend time cooking again.
The best part? You don't need to gut renovate to make this happen. Smart gadgets are incredibly affordable these days, and they work beautifully with existing designs. Let me walk you through exactly how to pull this off.
What You'll Need
Before you dive in, let's talk about the essentials. I've put together a realistic shopping list that covers the most impactful smart gadgets for a warm kitchen upgrade. These aren't gimmicks — they're genuinely useful tools that'll make a difference.
← Scroll to see full table →
| Item | Type | Estimated Price |
|---|---|---|
| Smart Speaker (Amazon Echo or Google Home) | Voice Control Hub | $50-$100 |
| Smart Lighting System (Philips Hue or LIFX) | Ambient Lighting | $70-$150 |
| Smart Thermostat | Climate Control | $120-$250 |
| Smart Refrigerator Organizer/Sensors | Kitchen Management | $30-$80 |
| WiFi-Enabled Coffee Maker | Appliance Control | $80-$200 |
| Smart Plugs (set of 4) | Device Automation | $15-$40 |
| Motion-Sensor Cabinet Lighting | Task Lighting | $20-$60 |
| Installation Materials & Paint | Preparation | $50-$150 |
Don't panic looking at that list. You don't need everything at once. Pick 2-3 items that speak to you, and build from there over time. That's actually my preferred approach — it lets you see what works and what doesn't before overcommitting your budget.
Step-by-Step Guide
Step 1: Plan Your Layout and Identify Problem Areas
Start by spending a week in your kitchen like you normally would. Notice where you struggle. Is it hard to see when you're preparing food? Do you forget what's in the back of your fridge? Do you wish your coffee was ready when you walked in? These observations are gold — they'll tell you exactly which smart gadgets will actually improve your life rather than just look cool on the counter.
Sketch out your kitchen space roughly. Note where outlets are, where natural light comes from, and where you spend most of your time. This isn't about being an architect — it's about understanding your space.
Step 2: Prepare Your Color Palette and Warm Aesthetic
Before you buy anything tech-related, nail down your design direction. Warm kitchens typically use creams, soft whites, warm grays, and earth tones — think terracotta, soft sage, or warm brass accents. If you're painting, grab samples from somewhere like The The Home Depot and live with them for a few days.
Smart lighting is going to be your secret weapon here. Choose warm white bulbs (around 2700K color temperature) to maintain that cozy feeling. Your gadgets should complement your design, not dominate it — that's the key to keeping things looking intentional rather than tech-heavy.
Step 3: Install Your Smart Lighting System
This is honestly the most transformative upgrade you can make. Smart lighting doesn't require rewiring — get smart bulbs that screw into your existing fixtures. Start with your main overhead light and task lighting above counters. Install them one at a time, test them out, then expand.
 Budget Apartment Renovation: DIY Hacks That Actually Work
Here's my pro move: create lighting "scenes" in your app. One scene for cooking (brighter, cooler white), one for entertaining (softer, warmer), and one for everyday. You'll control these with voice commands or your phone. It genuinely feels like magic the first time you ask Alexa to dim your lights while you're chopping vegetables.
Step 4: Set Up Your Smart Speaker Hub
Choose a spot that's central but not in the way — I like the corner of the counter near where people naturally gather. Your smart speaker is the command center for everything else, so placement matters. Make sure it has a clear line to WiFi.
Once it's placed, set it up according to the manufacturer's instructions. This takes about 10 minutes. Test it out — ask it for a recipe, set a timer, play music. Get comfortable with voice commands before you expand to other devices.
Step 5: Add Smart Appliance Controls
Smart plugs are underrated. They let you control non-smart appliances like your coffee maker or toaster. Plug your coffee maker into a smart plug, set it to turn on automatically 10 minutes before you usually wake up. Sounds silly until you're actually living it — it's genuinely amazing.
If you're considering a new refrigerator or coffee maker anyway, look for WiFi-enabled models. They're not much more expensive, and the convenience factor is real. Just make sure whatever you buy has good reviews — you don't want a fancy gadget that doesn't actually work well.
Step 6: Install Cabinet and Under-Counter Lighting
Motion-sensor cabinet lighting completely changes how your kitchen feels. They're easy to install with adhesive backing or simple screws. Put them under upper cabinets for task lighting, or inside glass-door cabinets to show off beautiful dishware.
Pro tip: these are best installed after you've finalized your color scheme and have your kitchen styled. You don't want to light up a cabinet full of clutter.
Step 7: Test Everything and Automate
Once everything's installed, take a day to just play with it. Test different automation routines. Create a "good morning" routine that starts your coffee, turns on soft lighting, and plays your favorite playlist. Build an "entertaining" routine that sets ambient lighting and maybe adjusts temperature.
Don't overcomplicate it though. Simple is better. Three solid automations beat ten complicated ones that you never actually use.
Pro Tips
Start with lighting. Seriously. If you only do one thing, upgrade your lighting. It changes everything about how your space feels, and it's the most cost-effective upgrade by far.
Invest in a quality WiFi 📷 Photo by Jakub Żerdzicki on Unsplash


