DIY Bedroom Decor Ideas for Small Rooms: Transform Your Compact Space Into a Stylish Sanctuary
Introduction: Making the Most of Your Small Bedroom
Struggling with a small bedroom? Trust me, you're definitely not alone in this. So many American homeowners wrestle with this exact challenge — creating something functional *and* beautiful when square footage is at a premium. But here's the exciting part: you absolutely don't need to hire a fancy interior designer or drain your savings account to completely reimagine your space. With the right DIY bedroom decor ideas for small rooms, you can squeeze maximum potential from every corner and craft a bedroom that feels wonderfully spacious *and* inviting.
Small bedrooms are actually this fantastic opportunity to flex your creative muscles. Think clever storage hacks, thoughtful color selections, and spatial tricks that work wonders. Whether you're renting a cozy apartment, settling into a tiny house, or just refreshing a guest bedroom, this guide walks you through practical, wallet-friendly strategies that genuinely deliver results. From unexpected wall treatments to multipurpose furniture arrangements — you'll uncover how straightforward changes can absolutely transform your room's functionality and visual appeal.
The really wonderful news? These DIY projects don't demand fancy tools, years of experience, or hefty budgets. You can honestly knock out several projects over a single weekend, and the transformation will genuinely astound you. Ready to reclaim your small bedroom space and make it work smarter for you? Let's dive in.
What You'll Need: Materials List with Pricing
Before launching your bedroom transformation, let's gather your essentials. You'll find most of these items at The The Home Depot or other home improvement stores, plus various online retailers if that's more convenient.
- Paint (1-2 gallons) - $25-$50 per gallon for quality interior paint
- Paintbrushes and rollers set - $15-$30 from The Home Depot
- Peel-and-stick wallpaper - $20-$60 per roll
- Floating shelves (set of 3) - $40-$80
- Shelf brackets and hardware - $15-$25
- LED strip lighting - $20-$40
- Adhesive wall hooks (removable) - $10-$15
- Curtain rod and curtains - $30-$80
- Under-bed storage containers - $25-$60 for a set
- Wall mirror (large) - $30-$75
- Bedding set - $50-$150
- Area rug - $40-$100
- Paint primer - $15-$25
- Caulk and caulking gun - $8-$15
- Stud finder - $15-$30
- Level (4-foot) - $15-$25
Step-by-Step Instructions: Transform Your Small Bedroom
Step 1: Assess Your Space and Create a Plan
Start by measuring your bedroom with precision — and I mean *really* measure. Document every wall dimension, note where windows sit, mark door openings, and map your existing furniture. Snap photos from multiple angles too. This planning phase is honestly the backbone of the entire project, especially in small spaces where each decision ripples through the whole room's flow and atmosphere.
Think carefully about which wall will be your focal point. In most small bedrooms, the wall behind your bed works beautifully. This is exactly where you'll layer on visual interest through color, compelling textures, or strategic decor choices. Even just sketching a quick layout on paper or using a free online room planner tool helps you visualize everything before you spend a dime on materials.
Step 2: Choose Your Color Palette
Here's something I've seen transform rooms countless times — color selection genuinely affects how spacious your bedroom feels. Light, neutral shades like soft whites, pale grays, and warm beiges bounce light around beautifully and create that airy, breathing atmosphere. If you're craving actual *color*, consider painting just one accent wall — typically the one behind your bed works perfectly.
Splurge on quality paint here. In small rooms, imperfections are way more noticeable, so good coverage and durability matter. A gallon of quality paint from The Home Depot runs $25-$50 and covers roughly 350-400 square feet with two coats.
Before you commit to painting your entire room, grab a few sample pots (usually $5-$8 each) of your top color contenders. Paint large swatches right on your walls and live with them for a few days — observe them in morning light, afternoon light, evening light. Lighting absolutely transforms how colors read in smaller spaces, and you want to be certain before diving in.
Step 3: Prep and Paint Your Walls
Proper prep separates amateur results from professional-looking work. Remove outlet covers, switch plates, and any existing wall hangings. Fill in nail holes and surface imperfections with spackle, sand everything smooth, and prime those patched spots.
Lay down painter's tape meticulously along the ceiling line, baseboards, and trim edges. Apply primer to the entire room (two coats really do make a difference), then apply your chosen paint color with care. Two thin coats consistently outperform one thick coat — you'll get better adhesion and more even coverage. Follow your paint manufacturer's drying times religiously between coats.
For accent walls, focus on the wall opposite your bed or the wall behind it — either approach creates that wonderful depth and draws your eye exactly where you want it. This technique works magic in small rooms because it adds dimension without adding clutter.
Step 4: Install Floating Shelves for Vertical Storage
Small rooms absolutely demand smart, vertical storage solutions. Floating shelves are honestly genius — they maximize your vertical real estate without consuming precious floor space. Plan your shelf placement at eye level (around 54-58 inches from the floor) for the most balanced, visually pleasing result.
Hunt down wall studs with a stud finder — this is non-negotiable for secure installation that'll last. Mount your brackets directly into studs using appropriate anchors and fasteners. A shelf kit from The Home Depot typically runs $40-$80 for three shelves.
Style your shelves thoughtfully with books, decorative boxes, small potted plants, and personal treasures that make you happy. Keep everything clutter-free by using matching storage boxes that tuck between decorative items. This balanced approach maintains visual interest while preserving that spacious feeling your small room desperately needs.
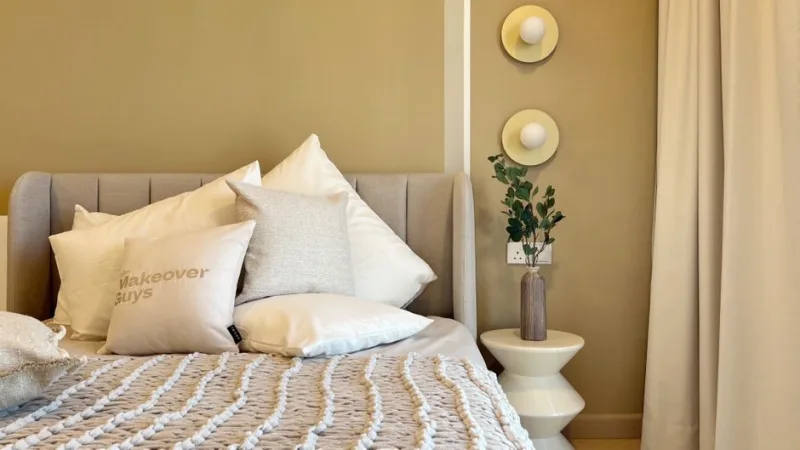
Step 5: Add Strategic Lighting
Honestly, proper lighting is like a secret weapon for small rooms — it expands perceived size and dramatically improves how your space functions. Layer different lighting types: ambient lighting for general brightness, task lighting for specific activities, and accent lighting for visual interest. LED strip lights positioned behind your headboard or shelving add contemporary appeal while creating wonderful visual depth.
 Budget Apartment Renovation: DIY Hacks That Actually Work
Wall sconces flanking your bed eliminate the need for bulky bedside tables in truly small rooms. A matching pair costs $40-$80 and delivers focused reading light without stealing floor space. It's a brilliant trade-off.
Pendant lights instead of traditional flush-mount ceiling fixtures provide excellent task lighting and add decorative personality. Just ensure all electrical work follows local codes — when in doubt, bring in a licensed electrician, especially for anything complicated.
Step 6: Hang a Large Mirror
Mirrors genuinely work magic in small spaces — they're one of my favorite design tricks, honestly. They bounce light around beautifully and create the optical illusion of additional square footage. Position your mirror directly across from or perpendicular to your window to maximize natural light reflection throughout the room.
A 36-40 inch mirror typically costs $30-$75 and makes a dramatic visual impact on the room's perceived size. Use your stud finder to locate solid mounting points. Apply appropriate anchors for drywall, or mount directly into studs if possible. Securely fastened mirrors are absolutely essential — safety always comes first.
Step 7: Implement Window Treatments
Windows control how much light floods into your room, which directly impacts the perceived size — so don't overlook this detail. Mount your curtain rod close to the ceiling, even if your window starts lower down. This clever visual trick creates the illusion of taller walls and more generous proportions. Hang curtains floor-to-ceiling for additional height perception.
Light, sheer curtains allow maximum natural light while preserving privacy — they're ideal. Heavier curtains in neutral tones work beautifully for rooms lacking excellent natural light. A quality curtain rod with complementary curtains costs $30-$80 from retailers like The Home Depot.
Step 8: Create Under-Bed Storage
That space beneath your bed? It's prime real estate that most people waste. Invest in rolling storage containers or low-profile storage boxes specifically designed to fit under standard bed frames — they're game-changers. A set runs $25-$60 and accommodates seasonal items, extra bedding, or overflow clothing beautifully.
Label everything clearly so you remember what's stored where. This hidden storage keeps your room looking spacious and intentionally organized while maximizing actual functionality.
Step 9: Add an Area Rug
A properly sized area rug anchors your entire space and defines the bedroom as a distinct zone within your home. For small rooms, choose a rug at least 6x9 feet. Position it so the bed's front legs rest on the rug. This approach creates a cohesive, intentional look rather than appearing cramped and disconnected.
Select colors that complement your wall paint and bedding selections. Natural materials like jute or wool add wonderful texture and warmth. Quality area rugs cost $40-$100 and instantly elevate your room's overall aesthetic and sophistication.
Step 10: Style Your Bedding and Accessories
Your bedding is honestly the largest visual element in the room, so choose thoughtfully. Select a cohesive set in colors that harmonize with your painted walls. Layer textures with coordinated throw pillows and a lightweight blanket to add visual interest without overwhelming the compact space.
Keep accessories intentional and minimal. Three coordinating throw pillows work better than six mismatched ones scattered everywhere. Select items that serve dual purposes: decorative baskets that hide storage, books that display your personality, plants that purify the air. Every item should earn its place.
Pro Tips and Expert Advice from Design Experts
Tip 1: Embrace Vertical Design Principles
Small rooms require you to think *upward* rather than outward — this is honestly the fundamental shift in mindset. Draw eyes upward by arranging artwork vertically, installing tall mirrors, and hanging floor-to-ceiling curtains. This vertical emphasis makes ceilings feel higher and rooms feel dramatically larger. Design experts at HGTV.com" target="_blank" rel="noopener">HGTV consistently recommend this principle specifically for compact spaces.
Tip 2: Use Multipurpose Furniture Strategically
Choose furniture that pulls double — or triple — duty. An ottoman with hidden storage accommodates extra seating while concealing items. A desk that moonlights as a vanity maximizes functionality without additional footprint. Look for bed frames with built-in drawers. Every single piece should justify occupying your limited square footage.
Tip 3: Maintain Consistent Color Continuity
Keep your color palette intentionally limited — think three primary colors plus neutral accents. This constraint makes small spaces feel cohesive rather than chaotic and confusing. When you limit colors, your eye travels smoothly throughout the room, which genuinely enhances the perception of space and tranquility.
Tip 4: Invest in Quality Storage Solutions
Clutter makes small rooms feel claustrophobic — it's that simple. Implement robust storage solutions *before* bringing in decorative elements. Beautiful storage boxes, hanging organizers, and shelf dividers keep items hidden while maintaining easy access. This is honestly where your small room makeover either completely succeeds or falters.
Tip 5: Layer Lighting for Ambiance and Function
Multiple light sources prevent shadows, add depth, and prevent that harsh, flat feeling. Combine overhead lighting with task lighting and accent lighting. Smart bulbs that adjust color temperature help your


