Farmhouse Kitchen Renovation for Renters: Transform Your Space Without Losing Your Deposit
Look, I get it. You're renting, and the idea of committing to a full kitchen renovation sounds about as appealing as scheduling a root canal. Your landlord probably isn't thrilled about permanent changes, and honestly — who wants to invest thousands into a space you don't own? But here's the thing: you can absolutely nail that cozy farmhouse aesthetic without driving nails into your walls or signing away your security deposit.
I've helped so many renters transform their bland, builder-grade kitchens into Pinterest-worthy farmhouse havens. The secret? Focusing on temporary, removable upgrades that pack major visual impact. We're talking about strategic styling, smart swaps, and projects that your landlord will actually love you for. By the time you move out, you can take all your charm with you.
Whether you're working with a galley kitchen that feels like a shoebox or an open concept space that needs character, this guide will walk you through every renter-friendly farmhouse renovation idea that actually works. Let's get started.
What You'll Need
Before you panic about the cost, let me be transparent: you don't need to spend a fortune here. Most of these materials are affordable and easily available through places like The The Home Depot, and many can be repurposed or resold later.
- Peel-and-Stick Wallpaper (farmhouse patterns) — $25-$60 per roll
- Contact Paper or Shelf Liner (for cabinet interiors) — $8-$15
- Paint Samples (chalk paint or furniture paint) — $5-$8 per sample
- Hardware Pulls and Knobs (rustic or vintage styles) — $2-$6 per piece (budget 20-30 pieces)
- Open Shelving Brackets (if landlord approves) — $15-$30 per bracket set
- Removable Backsplash Tiles or Peel-and-Stick Option — $50-$120 for a small section
- Butcher Block or Wood Countertop Covering — $40-$80
- Primer and Paint (cabinet-grade) — $30-$50
- Decorative Accessories (open shelving styling) — $100-$200
- Magnetic Spice Jars or Containers — $20-$40
- Vintage-Style Light Fixtures (if you can swap existing ones) — $40-$100 each
- Wood Stain or Whitewash — $10-$20
Total budget for most projects: $300-$800 (depending on scope)
Step-by-Step Guide
Step 1: Get Permission From Your Landlord (Don't Skip This)
I cannot stress this enough. Before you paint a single cabinet, send your landlord a message. Honestly, most landlords appreciate renters who ask permission and show they're serious about maintaining the property. Frame it as temporary improvements — focus on removable options. Keep receipts and take before-and-after photos. If something goes wrong, you'll have documentation that you made a good-faith effort to restore the space.
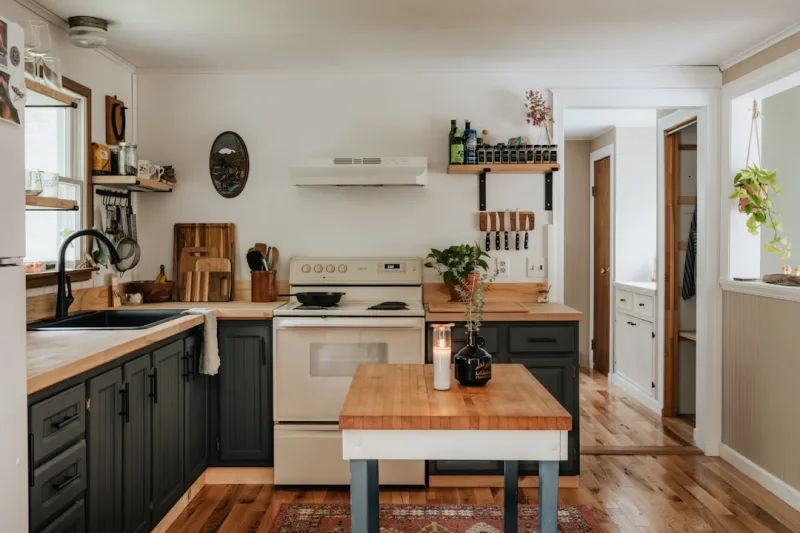
Step 2: Paint Your Cabinets (The Game-Changer)
This is where you'll see the biggest transformation for your time and money. Don't panic if you've never painted cabinets before — it's actually pretty forgiving if you take your time.
Start by emptying your cabinets completely. Remove the doors and hardware if possible, and lay them flat on a drop cloth in a well-ventilated area. Clean everything with a degreaser — I'm not kidding, greasy kitchen cabinets won't hold paint properly. Once they're dry, sand lightly with 120-grit sandpaper. You're not stripping them down, just scuffing the surface so paint adheres.
Apply primer next — this is non-negotiable. Use a cabinet-specific primer that'll bond to whatever finish is currently on there. Then paint with quality cabinet paint. Better Homes & Gardens & Gardens recommends two coats, and honestly, you'll be glad you did. Let everything cure for at least 24 hours before rehanging.
Popular farmhouse colors? Soft whites, creamy ivory, sage green, or that gorgeous light gray. Avoid anything too trendy — you want timeless charm, not "I painted this in 2024" vibes.
Step 3: Swap Hardware for Maximum Personality
This is the easiest way to change the vibe instantly. Farmhouse style thrives on vintage-looking pulls and knobs — think cup handles, bin pulls, or anything with that lived-in character. Most hardware only requires a screwdriver and takes about 30 seconds per cabinet. If your landlord is worried about holes, reassure them that you'll fill them when you leave (wood filler is your friend).
Step 4: Add a Removable Backsplash
Peel-and-stick backsplash tiles are a renter's best friend. White subway tiles, shiplap patterns, or even brick-look tiles can completely change the wall behind your stove. Install above the countertop and extend up to the cabinets. These peel off cleanly without damage when you move out. If you're nervous, test a small section first.
Step 5: Update Your Countertops (Without Actually Replacing Them)
Okay, so you probably can't rip out laminate counters — but you can cover them. Butcher block contact paper, wood-grain overlays, or even a temporary wood countertop covering can make dingy countertops look intentional and farmhouse-y. These cost a fraction of real countertops and peel right off later.
Step 6: Install Open Shelving
Here's where you want to check with your landlord again. If they approve, open shelving is quintessentially farmhouse. You can use floating shelves (use heavy-duty removable adhesive strips instead of drilling) or adjustable shelving units that don't require permanent installation. Style them with vintage dishes, glass jars, and herbs. HGTV has incredible inspo for this if you need ideas.
Step 7: Style Your Shelves and Counters
Empty, styled shelves hit different. Use vintage glass jars for dry goods, display farmhouse-style canisters, add some cookbook propping, and sprinkle in small decorative pieces. Styling is free or cheap if you shop your home first — honestly, everyone has items lying around that look perfect on open shelving.
Pro Tips
- Document Everything: Take photos of the original kitchen before you start. This protects you and makes restoration easier later.
- Invest in Paint Quality: Cheap paint chips and peels. Spend the extra $20 on good cabinet paint — it'll last and look professional.
- Use Removable Wallpaper Strategically: One accent wall can change the entire feel without commitment. Peel it off when you leave.
- Layer Lighting: Add vintage-style under-cabinet lighting or a farmhouse pendant. Swapping light fixtures is usually totally doable with landlord approval.
- Go Magnetic for Spices: Magnetic spice jars on the side of the fridge? Chef's kiss. Super farmhouse, totally temporary.
- Think in Layers: The farmhouse aesthetic works because it's layered — combine painted cabinets, open shelving, vintage accessories, and natural wood textures for depth.
- Save Your Original Hardware: Keep the original knobs and cabinet hardware in a box. When you move out, swap them back, and your landlord will never know the difference.
Cost Breakdown
← Scroll to see full table →
| Project | Estimated Cost | Temporary or Permanent |
|---|---|---|
| Cabinet Paint & Primer | $80 | Temporary (removable with effort) |
| Hardware Upgrade (20-30 pieces) | $50-$150 | Removable |
| Peel-and-Stick Backsplash | $60-$120 | Completely Removable |
| Countertop Contact Paper/Overlay | $50-$80 | Completely Removable |
| Peel-and-Stick Wallpaper (accent wall) | $40-$100 | Completely Removable |
| Floating Shelves (removable adhesive) | $80-$150 | Removable |
| Decorative Accessories & Styling | $100-$200 | Take With You |
| Lighting Upgrade (if swappable) | $60-$120 | Removable |
| TOTAL | $520-$920 |
FAQ
Q: Will painting my cabinets hurt my security deposit?
A: Not if you do it right. Use quality cabinet paint, keep your original hardware, and document the process. If you're worried, ask your landlord beforehand. Most will appreciate that you're upgrading the space. When you move out, the painted cabinets actually add value — you don't need to restore them to original condition. That said, keep your receipts and take photos just in case.
Q: Can I really use peel-and-stick backsplash without it leaving residue?
A: Yes, but quality matters. Avoid dollar-store versions — they leave sticky residue. Invest in higher
- Diy Coffee Table Ideas Cheap
- Boho Home Decor Ideas Diy Budget
- Master Bedroom Makeover Ideas On A Budget
- cheap diy living room decor ideas
🔗 You Might Also Like
📷 Photo by Clay Banks on Unsplash


