Quiet Luxury Bedroom Storage for Renters: The Ultimate Guide to Stylish, Damage-Free Organization
Look, I get it. You're renting, which means you're stuck between wanting your bedroom to feel like a sanctuary and absolutely not wanting to lose your security deposit because you drilled one too many holes in the wall. The struggle is real. But here's the thing — you don't have to choose between stunning, minimalist storage and renter-friendly solutions. Quiet luxury isn't about loud logos or expensive price tags. It's about intentional, beautiful pieces that make you feel calm the moment you walk into your bedroom. And the best part? You can achieve it without a single landlord complaint.
I've spent years styling rental spaces, and honestly, some of my favorite designs have come from making the most of temporary living situations. The key is investing in moveable, multifunctional furniture pieces that whisper elegance rather than scream for attention. We're talking about those subtle storage solutions that work harder than they look — floating shelves mounted on damage-free strips, upholstered benches that double as storage cubes, and wooden crates styled so beautifully they look like intentional décor. Ready to transform your bedroom without upsetting anyone on the other side of that lease agreement? Let's dive in.
What You'll Need
Before we get started, let me break down what you're actually going to need to pull this off. Most of these materials are affordable, stylish, and — this is important — totally returnable if you change your mind or move out.
- Heavy-Duty Adhesive Strips (Command Strips brand) — $12-18 for a multi-pack
- Floating Shelves (wood or composite) — $25-80 per shelf, depending on size
- Upholstered Storage Bench — $120-250
- Wooden Storage Cubes or Crates — $30-100 each
- Woven Baskets (various sizes) — $15-60 per basket
- Wooden Rolling Dresser Cart (3-tier) — $80-150
- Over-the-Door Organizer (fabric or slim wood) — $20-45
- Decorative Boxes or Bins — $10-35 per box
- Stud Finder (optional but helpful) — $15-25
- Level Tool — $10-20
- Wooden Dowels or Brackets (if floating shelves need support) — $5-15
The beauty here is that you can start with just a few of these items and build your storage system gradually. No need to buy everything at once.
Step-by-Step Guide
Step 1: Assess Your Space and Plan Your Layout
Seriously, this is the most important step, and so many people skip it. Spend a day actually looking at your room. Where's the natural light coming from? What walls feel empty? Where does clutter tend to accumulate? I always recommend taking photos of your room from different angles — it helps you see it more objectively. Once you know your problem areas, you can plan storage solutions that actually make sense for how you live. Don't just buy random pieces and hope they work.
Step 2: Install Floating Shelves Using Damage-Free Methods
If your walls can handle it, floating shelves are the MVP of quiet luxury storage. Here's how to do it properly without damaging the rental. First, use a stud finder to locate wall studs — mounting into studs is always the most secure option. Mark your spot lightly with a pencil. Install your brackets into the studs with screws, then slide your shelf onto the brackets. If you can't mount into studs or you're nervous about drilling, use heavy-duty Command Strips designed for shelves. They genuinely work, and they won't ruin your walls when you remove them. Style your shelves with a mix of storage boxes, books, and a few decorative pieces. Keep it minimal — this is quiet luxury, not maximalism.
Step 3: Set Up a Rolling Storage Cart
A three-tier rolling cart is honestly my secret weapon for renters. It's mobile, it looks expensive, and it stores a surprising amount of stuff. Position it in a corner or against a wall, and fill the tiers with woven baskets, foldable bins, or even rolled-up sweaters. The tiered design means everything is visible and accessible, which actually encourages you to keep things organized. Plus, when you move, you just wheel it into the truck.
Step 4: Add Wall-Mounted Storage Without Drilling
Not ready to commit to floating shelves? No problem. Over-the-door organizers are underrated storage workhorses. Hang one on your closet door or bedroom door — choose one in a neutral color or woven material that fits your aesthetic. It holds so much and takes up zero floor space. Alternatively, adhesive-backed wall pockets in natural linen create vertical storage and look like intentional décor rather than utilitarian catch-alls.
Step 5: Style Storage Boxes and Baskets
Here's where it gets fun. Layer your storage options: use woven baskets under your bed or in closet shelves, decorative boxes on open shelves, and fabric bins in cubes. The key is choosing materials that complement each other — think natural wood, soft linens, woven seagrass, and neutral tones. Everything should feel like it belongs together, even though it's technically serving different purposes. This is what makes storage feel intentional rather than haphazard.
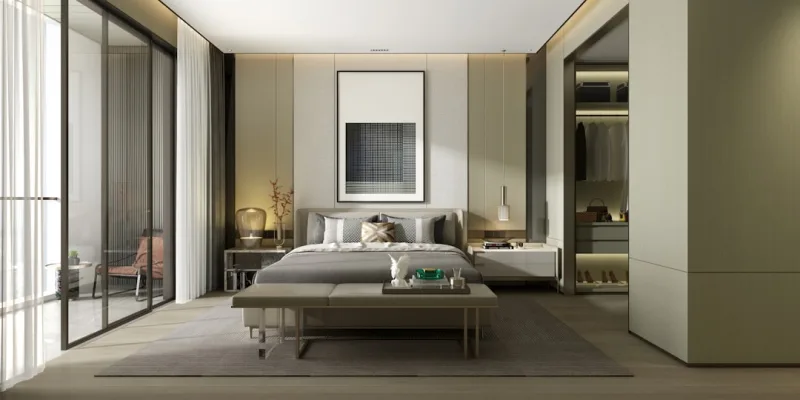
Step 6: Create a Bedroom Bench with Hidden Storage
 Boho DIY Room Makeover: Full Revamp Under $200
If you have a foot of space at the end of your bed or by a window, an upholstered storage bench is genuinely a game-changer. It's a seat, it's décor, and it's storage all in one. Fill it with off-season clothes, extra bedding, or items you don't use daily. Choose a bench in a neutral color — cream, gray, or natural linen — to keep that quiet luxury feeling.
Pro Tips
Embrace Vertical Storage: Your walls are real estate. Maximize them with shelves, wall-mounted organizers, and hanging solutions. This keeps your floor open and makes the room feel larger and calmer.
Use the Under-Bed Zone Strategically: Flat, shallow storage containers under the bed are invisible but incredibly useful. Store off-season items or extra linens here, but make sure everything is in airtight containers to keep dust and bugs out.
Stick to a Color Palette: Choose two or three neutral tones — maybe natural wood, cream, and soft gray — and repeat them throughout your storage pieces. This creates cohesion and that subtle luxury feeling that makes people say "your room feels so calm" without knowing why.
Label Everything: I know it sounds basic, but labeled bins actually make you more likely to maintain your system. Use simple labels in a consistent font or handwriting. It's both functional and aesthetically pleasing.
Check The The Home Depot and HGTV's Renter-Friendly Collections: Both have caught onto the renter storage trend and offer tons of options specifically designed for temporary living situations. Better Homes & Gardens & Gardens also has gorgeous budget-friendly storage that doesn't scream "college dorm."
Invest in Quality Basics: Spend a little more on pieces you'll actually use every day — like a really good storage bench or high-quality baskets. Splurge less on things that are purely decorative.
Cost Breakdown
← Scroll to see full table →
| Item | Quantity | Price Per Unit | Total |
|---|---|---|---|
| Heavy-Duty Adhesive Strips | 1 pack | $15 | $15 |
| Floating Shelves | 2 | $50 | $100 |
| Upholstered Storage Bench | 1 | $180 | $180 |
| Wooden Storage Cubes | 2 | $60 | $120 |
| Woven Baskets | 4 | $35 | $140 |
| Rolling Dresser Cart | 1 | $110 | $110 |
| Over-the-Door Organizer | 1 | $35 | $35 |
| Decorative Boxes | 3 | $20 | $60 |
| Stud Finder | 1 | $20 | $20 |
| Level Tool | 1 | $15 | $15 |
| TOTAL INVESTMENT | $795 | ||
Note: You don't need to buy everything at once. Start with the rolling cart and baskets ($250) and build from there as your budget allows.


