The Ultimate High-End Closet Setup with Smart Home Gadgets
Look, I've been doing home design for over a decade now, and I can tell you without hesitation — your closet is basically the heart of your personal space. Seriously. It's where you start your day, it's where you decompress after work, and honestly? It says a lot about how you live. That's why I get genuinely excited when people want to elevate their closet game beyond just hanging clothes on a rod. This isn't about being bougie (though there's nothing wrong with that). It's about creating a space that actually *works* for you.
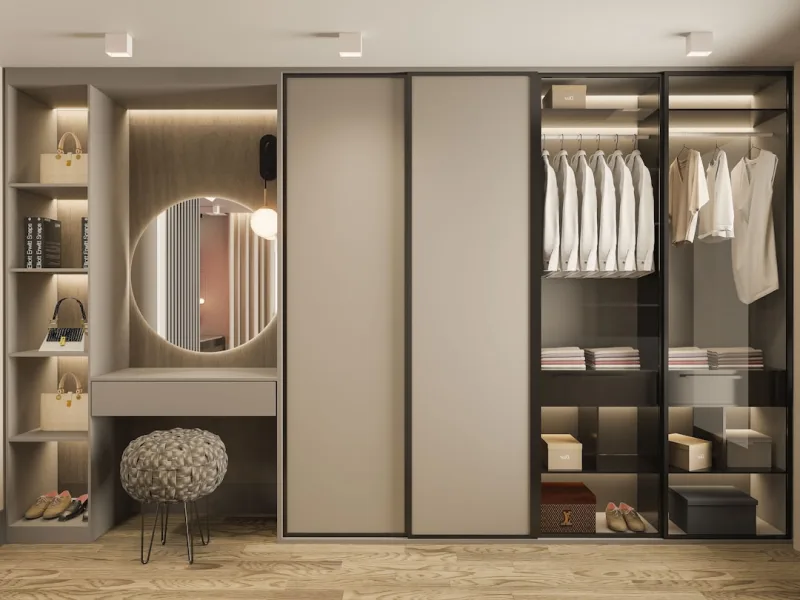
Here's the thing about smart closets — they've completely transformed how we organize, find, and care for our clothes. We're talking automated lighting, app-controlled systems, climate management, and inventory tracking. A few years ago, this stuff was pure fantasy. Now? It's totally doable, and the price points are way more reasonable than you'd think. Whether you've got a walk-in the size of a bedroom or a compact reach-in that needs serious optimization, I've got the blueprint for making it genuinely luxe.
So let me walk you through building a high-end closet setup that actually transforms how you get dressed. This isn't fluff — we're creating a functional, beautiful, and smart space that'll make you happy every single day.
What You'll Need
Before we dive into the nitty-gritty, let's talk about the actual components. I've broken these down into categories so you can pick and choose based on what matters most to your lifestyle.
Smart Lighting System
- Philips Hue Smart Light Strips ($50-70 each) — These are genuinely game-changing for closet lighting. Motion-activated, adjustable color temperature, and they sync with your phone.
- LED Ceiling Panels with Motion Sensor ($30-150 depending on size) — The The Home Depot carries solid options here. Full-spectrum lighting is key because artificial light can seriously mess with color matching.
- Under-Shelf Accent Lighting ($40-80) — For those of us who want to see everything clearly without the glare.
Climate Control & Air Quality
- Smart Dehumidifier ($150-300) — Humidity is seriously destructive for fabrics. A wifi-enabled dehumidifier means you can monitor levels from anywhere.
- Air Purifier with HEPA Filter ($100-250) — Keeps dust and allergens away from your clothes. It actually matters more than you'd think.
Organization & Inventory Systems
- Smart Closet Rods with Weight Sensors ($200-500) — These alert you if something's overloaded and some models track what you've worn.
- RFID-Tagged Clothing System ($50-150 for starter kit) — Apps like Stylebook or Acloset let you photograph items and mix-and-match outfits digitally.
- Drawer Dividers and Shelf Systems ($100-400) — California Closets vibes at a fraction of the cost, honestly.
Tech Accessories & Integration
- Smart Hub or Control Panel ($50-150) — Amazon Echo Show or similar to control everything from one place.
- Smartphone Mirror with Built-In Lighting ($200-500) — Shows you outfit previews and weather for the day. Better Homes & Gardens & Gardens just featured one of these, and yeah, they're worth it.
- WiFi-Enabled Full-Length Mirror ($300-800) — Lets you see your whole outfit with perfect lighting adjustment.
Storage & Display
- Luxury Hangers ($3-8 per hanger) — Go for wood or premium plastic. Your expensive clothes deserve better than cheap wire.
- Closet Rod Extension Kit ($80-200) — Double your hanging space smartly.
- Custom Shelving Unit ($500-2000) — This is where you splurge if you've got the budget.
Step-by-Step Guide
Step 1: Assess Your Space and Plan the Layout
First things first — measure everything. Length, width, height, electrical outlets (so important!), and natural light sources. Sketch it out, even if you just use your phone's notes app. This isn't glamorous, but it saves you from expensive mistakes. Figure out where your hanging space, shelving, drawers, and full-length mirror will go. Think about traffic flow too — you want to move through the space easily without bumping into things at 6 AM.
Step 2: Install Your Smart Lighting Foundation
This is where the magic starts. If you're not comfortable with electrical work, hire someone — it's honestly worth the $150-300. You want motion-sensor ceiling lights as your base layer, then add Philips Hue strips along shelves and inside drawers. Make sure everything is on smart circuits so you can dim or adjust color temperature through an app or voice command. The goal is lighting that's bright enough to see true colors but doesn't create harsh shadows.
Step 3: Set Up Climate Control
Install your dehumidifier in a corner where it won't take up valuable real estate. Make sure it's connected to WiFi so you can monitor humidity levels on your phone. Same with the air purifier — place it where air can circulate freely. These aren't just nice-to-haves; they literally extend the life of your clothes. Your investment pays for itself in the long run.
Step 4: Install Your Closet Storage System
Whether you're building custom shelving or using modular systems (The Home Depot has some brilliant options), make sure everything is level and secure. Install your smart closet rods if you're going that route. Add drawer dividers for smaller items. This is where organization gets real — you want everything accessible and visible. The whole point is that you'll actually wear what you own.
Step 5: Add Your Mirror and Accessory Tech
Mount your smart mirror or tech-enabled full-length mirror at the right height — usually 36 inches from the floor to the center of the mirror. Make sure it gets enough light from your ceiling panels. Connect it to your WiFi and download the companion app. Set up your smart hub in an accessible location, ideally outside the closet so you're not wasting prime storage space.
Step 6: Implement Your Inventory System
 Budget Apartment Renovation: DIY Hacks That Actually Work
Here's where HGTV gets excited (and so do I). Take high-quality photos of every item in your closet and input them into an app like Stylebook or Acloset. Tag items by color, occasion, season, and brand. This takes a weekend but honestly changes your life. You can start making outfits digitally before you even get dressed. It sounds extra, but it cuts down decision fatigue and helps you actually *see* what you have.
Step 7: Test and Calibrate Everything
Spend a few days living with your new setup. Does the lighting work for makeup application? Can you easily reach everything? Is the temperature and humidity stable? Make adjustments as needed. Some people need brighter lighting, others prefer a warmer tone. Your perfect closet is personalized to *you*, not some magazine spread.
Pro Tips
Invest in Quality Basics First: Before you get fancy with the tech, make sure your foundational storage and hanging systems are top-notch. You can add smart gadgets later, but a poorly designed layout will frustrate you forever.
Go with Neutral Colors for Built-Ins: I know white closets look Instagram-perfect, but honestly? Soft gray, warm white, or even pale taupe photographs better and feels less clinical. Your clothes are the stars, not the walls.
Layer Your Lighting: Don't rely on just overhead lights. Combine ceiling panels, under-shelf strips, and accent lighting. You want options for different tasks — getting dressed, folding laundry, finding something specific.
Think About Humidity Control Year-Round: In dry climates, you might need a humidifier sometimes. In humid areas, that dehumidifier is non-negotiable. Check your local climate and adjust your approach accordingly.
Don't Go Full Automation If It Stresses You: Some people love having everything smart and connected. Others find it overwhelming. Start small — maybe just smart lighting and a dehumidifier — then add features as you get comfortable. There's no "right" amount of tech.
Cost Breakdown
← Scroll to see full table →
| Component | Budget Option | Mid-Range Option | Premium Option |
|---|---|---|---|
| Smart Lighting System | $80-120 | $200-350 | $500+ |
| Climate Control | $150-200 | $300-450 | $600+ |
| Organization Systems | $200-300 | $500-1000 | $2000+ |
| Smart Mirror/Display | $100-200 | $300-500 | $800+ |
| Smart Hub & Integration | $50-100 | $150-250 | $400+ |
| Storage & Display | $150-250 | $400-700 | $1500+ |


