High End Kitchen Storage for Beginners: A Real Guide to Luxury Organization
Look, I get it. You've scrolled through enough Instagram kitchen reveals to know that there's a difference between shoving things in cabinets and actually having a beautiful, functional kitchen storage system. But here's the thing — achieving that high-end, designer-magazine look doesn't require hiring a kitchen pro or emptying your entire savings account. I'm here to show you that beginners can absolutely nail this.
When I talk about "high end" kitchen storage, I'm not just talking about expensive stuff for the sake of it. I'm talking about smart, intentional choices that make your kitchen feel curated, organized, and honestly? Peaceful. Because let's be real — opening a cabinet to find everything perfectly arranged is therapeutic.
The beautiful part? You can start small, learn as you go, and build a system that actually works for your life. No designer degree required. Just patience, a little creativity, and willingness to think differently about what your kitchen can be.
What You'll Need
Before we dive into the actual installation, let's talk materials. You'll want to grab these essentials from places like The The Home Depot or even Better Homes & Gardens & Gardens for some inspiration on styling:
- Drawer Dividers and Organizers — $15-45 per set (brands like Rev-A-Shelf are worth the splurge)
- Pull-Out Shelves — $30-80 each (makes cabinet access feel luxe and functional)
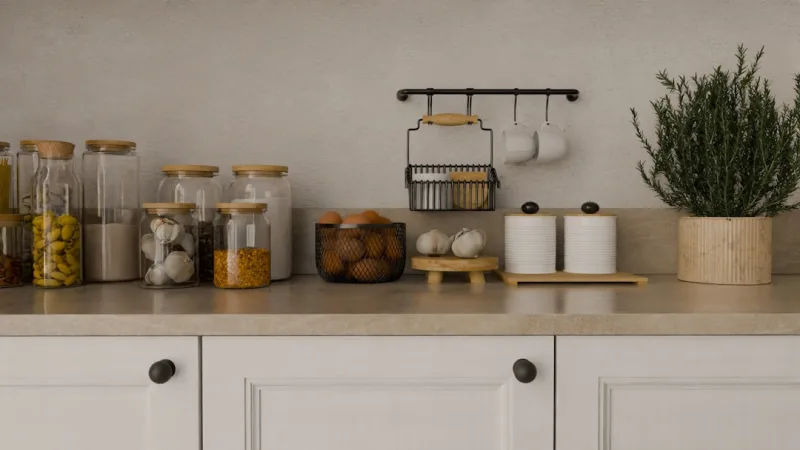
- Glass Canisters with Airtight Seals — $12-30 each (the visual appeal is half the battle)
- Stackable, Labeled Storage Containers — $25-60 for a set of 4-5
- Lazy Susan Turntables — $20-50 (seriously changes the game for corner cabinets)
- Over-the-Door Organizers — $15-40 (instant vertical storage without installation)
- Magnetic Spice Racks — $30-70 (clean, modern, chef-approved)
- Cabinet Liners (Premium) — $20-35 for a roll (protects and looks intentional)
- Open Shelving Brackets — $25-60 per pair (if you're feeling adventurous)
- Hardware Installation Kit — $15-25 (drill bits, anchors, screws)
Total estimated investment: $200-450 (depending on how many pieces you need)
Step-by-Step Guide
Step 1: Audit Everything You Actually Have
I know this sounds boring, but trust me — before you buy a single organizer, pull everything out of your cabinets and drawers. Yes, everything. Lay it all out on your counter or dining table. This isn't just about decluttering; it's about understanding your lifestyle. Do you have twelve mugs or three? Are those specialty cooking tools you actually use, or are they just taking up space? Be honest. High-end spaces feel that way because they're intentional, not because they're full.
Step 2: Create Zones and Categories
Here's where it gets fun — think about how you actually use your kitchen. Create logical zones: breakfast items, baking supplies, everyday dishes, spices, snacks. Everything should have a home that makes sense to you. The designer kitchens you admire? They work because items are grouped thoughtfully. Your coffee station shouldn't be three cabinets away from where you keep your mugs. It's that simple.
Step 3: Install Pull-Out Shelves and Drawer Dividers
These are probably the biggest game-changers for beginners. Pull-out shelves (sometimes called roll-out shelves) transform deep cabinets from "black hole" status to completely accessible. Most come with clear installation instructions, and honestly, they're easier to install than you'd think. Simply slide out the old shelf, install the new mechanism according to the manufacturer's guide, and you're done. For drawers, dividers work the same way — they organize vertically and make everything visible at a glance.
Step 4: Invest in Glass and Labeled Containers
This is where that high-end aesthetic comes from. Swap cardboard boxes and plastic bags for uniform, airtight glass containers. You'll see your pantry items (flour, sugar, pasta, cereals) at a glance, and everything looks intentional. Add labels — even just a simple label maker makes a huge difference. It's not pretentious; it's practical luxury.
Step 5: Tackle Those Dead Zones
Corner cabinets and the awkward space above your upper cabinets? Install a lazy susan in corners to maximize access, and consider open shelving or decorative baskets in that overhead space. These aren't wasted opportunities — they're design moments waiting to happen.
Step 6: Style Your Open Spaces
If you're feeling confident, consider open shelving in one area. Mount shelves above your counter or in an alcove, style them with a mix of practical items and beautiful serving pieces, and suddenly you have a focal point. Check out HGTV for inspiration — their kitchen makeovers often feature open shelving done beautifully. The key is pairing functional items with a few design pieces (like a pretty vase or cookbook).
Step 7: Fine-Tune and Adjust
 Budget Apartment Renovation: DIY Hacks That Actually Work
Live with your new system for a couple weeks. What's working? What's not? Maybe you need another container in one category or the lazy susan needs to be in a different cabinet. This isn't a one-and-done project — it's something you refine. High-end spaces are high-end because they're curated over time.
Pro Tips
Invest in quality where it matters most: Those drawer dividers and pull-out shelves? Worth the splurge. They make your daily life easier and last years. The dollar-store organizers? Skip them. You'll replace them in six months.
Vertical space is your best friend: Don't just fill cabinets horizontally. Stack things vertically with dividers, use wall space for magnetic strips or spice racks, and embrace hanging organizers. This alone makes kitchens feel more organized and intentional.
One in, one out: Once you've organized everything beautifully, maintain it by following this rule. Adding new items? Something leaves. This keeps your space from reverting to chaos.
Light matters: Consider adding small LED strip lights inside glass-fronted cabinets or under shelves. It sounds fancy, but it's affordable (most are under $30) and makes everything look showroom-ready.
Label everything — even drawers: Sounds excessive? It's not. Labels are an inexpensive way to keep the entire household using your system. Plus, they look intentional and add to that curated feel.
Cost Breakdown
← Scroll to see full table →
| Item | Quantity | Cost Per Unit | Total Cost |
|---|---|---|---|
| Drawer Dividers | 2 sets | $30 | $60 |
| Pull-Out Shelves | 2 | $55 | $110 |
| Glass Canisters | 6 | $20 | $120 |
| Storage Containers (Set) | 1 | $45 | $45 |
| Lazy Susan | 1 | $35 | $35 |
| Magnetic Spice Rack | 1 | $50 | $50 |
| Cabinet Liners | 1 | $25 | $25 |
| Estimated Total | $445 | ||
FAQ
Q: Do I really need expensive organizers, or will budget options work?
A: You can mix and match, honestly. Splurge on structural pieces like pull-out shelves and quality drawer dividers — you'll use these daily and they last years. For things like containers and small organizers, you have more flexibility. That said, cheap containers often warp or break, so investing in mid-range, durable options tends to pay off. Think of it like this: quality basics, flexible accessories.
Q: Can I do this without hiring a professional?
A: Absolutely. Most of what we discussed — pull-out shelves, drawer dividers, containers, lazy susans — comes with straightforward instructions. The only part that might require a bit more effort is installing open shelving (if you go that route), but even that is doable for beginners with a basic drill. There are tons of YouTube tutorials. Start simple, gain confidence, then tackle harder projects.
Q: How do I keep things organized once I've set everything up?
A: Consistency is key. Use labels so everyone in your household knows where things go. Keep like items together. Do a quick 10-minute reset once a week (usually Sunday works). And remember — organized spaces stay organized when they're logical. If your system makes sense, it's
📷 Photo by Jivitharsan Suresh on Unsplash


