
High End Apartment Makeover with DIY Hacks: Transform Your Space Like a Designer
There's something magical about walking into a beautifully designed apartment and thinking, "I could never do that." But here's the truth: you absolutely can. I've watched countless women in their twenties through forties completely transform their apartments using smart DIY hacks and designer tricks that don't require a celebrity budget. The space you come home to every single day deserves to feel luxurious, intentional, and authentically you. Whether you're renting or own your place, whether you have $500 or $5,000 to spend, creating that high-end aesthetic is more achievable than you think. It's not about having unlimited funds; it's about knowing exactly where to invest, which corners to cut smartly, and which DIY hacks will give you maximum impact. Let me show you how to create that Pinterest-worthy apartment you've been daydreaming about.
In this comprehensive guide, you'll discover exactly how to plan your high-end apartment makeover without breaking the bank or your sanity. You'll learn which DIY projects deliver the biggest visual impact, how to budget strategically across different price points, and the exact steps to transform each room in your home. We'll walk through styling techniques that professionals use, share real product recommendations with actual prices, and reveal the expert secrets that make apartments look magazine-worthy. By the end, you'll have a complete roadmap for creating a luxurious space that reflects your personal style.

Understanding High End Apartment Makeover with DIY Hacks
A high-end apartment makeover with DIY hacks is about creating a sophisticated, designer-quality living space while keeping costs realistic and doing much of the work yourself. It's the beautiful sweet spot between those $10,000 interior design consultations and settling for a space that doesn't make your heart happy when you unlock your door. This approach combines strategic splurges on statement pieces, smart budget finds from retailers like IKEA, Amazon, and Target, and clever DIY projects that look professional but only cost a fraction of what a designer would charge.
Why does this matter? Because your apartment is more than just the place where you sleep—it's your sanctuary, your creative space, your retreat from the world. The environments we live in directly impact our mood, productivity, and overall well-being. Studies show that living in a thoughtfully designed space actually reduces stress and increases happiness. When your apartment looks like it belongs in a magazine, you feel more confident, more inspired, and genuinely happier spending time at home. Plus, there's the undeniable satisfaction of looking around and thinking, "I did this. I created this beauty with my own two hands." That feeling is priceless.
The common mistakes people make when attempting a high-end makeover include: trying to do everything at once and burning out, splurging on items that won't stand the test of time, ignoring the bones of the space and focusing only on decorations, not having a cohesive design plan, and underestimating the power of simple, clean spaces. Many women get overwhelmed by DIY projects that are too complicated or invest heavily in trendy pieces that will look dated in two years. The key is being strategic, intentional, and willing to invest time in projects that genuinely improve your space rather than just adding more stuff to it.
Planning Guide for High End Apartment Makeover with DIY Hacks
Before you buy a single throw pillow or pull out a paintbrush, you need a solid plan. This is the difference between a cohesive, beautiful apartment and a space that feels jumbled and random. Start by taking an honest inventory of what you already own and what's actually working in your space. Walk through your apartment with fresh eyes—what makes you happy when you see it? What makes you cringe? What pieces are worth keeping, and what's just taking up space? This is important because the best makeover doesn't mean buying everything new; it means curating what you have and adding intentionally.
Next, define your style. Are you drawn to modern minimalism, bohemian warmth, classic elegance, or cozy farmhouse vibes? Spend time on Pinterest, Instagram, and home design websites. Save 20-30 images that speak to you. Don't worry about them all being cohesive yet—patterns will emerge. Look at the colors, textures, and overall feeling these images evoke. This visual research is absolutely crucial because it gives you a clear direction before you start spending money. You might discover you're drawn to warm, earthy tones and natural textures, or you might realize you love jewel tones and velvet. Either way, knowing this prevents impulse purchases that don't align with your actual aesthetic.
Measure your space, document the lighting conditions in different rooms throughout the day, and assess the condition of your walls, flooring, and existing fixtures. Make note of architectural features you want to highlight and problem areas you want to disguise. Create a mood board—digital or physical—with colors, textures, and inspiration images. Then, most importantly, set a realistic timeline. Are you doing this over three months? Six months? A year? Breaking it into phases prevents overwhelm and allows you to spread costs across multiple months. Most smart makeovers follow this order: walls and large furniture first, then lighting and architectural improvements, then styling and accessories.
Your Pre-Makeover Planning Checklist
- ✓ Room Assessment - Take photos and measurements of each room; note lighting, condition of walls, and existing furniture
- ✓ Style Definition - Create a Pinterest board and collect 20-30 images that inspire you
- ✓ Color Palette - Choose 3-4 main colors that will tie your space together cohesively
- ✓ Budget Setting - Determine your total budget and decide how much to allocate to different rooms
- ✓ Keep/Donate/Sell Decision - Ruthlessly evaluate what you own and what actually serves your space
- ✓ Priority Projects - Rank your DIY projects by impact and difficulty level
- ✓ Timeline Creation - Break your makeover into phases across 3-12 months
- ✓ Inspiration Organization - Organize your mood board by room and tag products you want to research

Budget Breakdown
Let's talk money because budgeting is where most DIY makeovers either succeed or fail. The beautiful part about a high-end apartment makeover with DIY hacks is that you control the spending completely. You're not paying for labor, which is typically 40-60% of professional design costs. That alone puts you way ahead. The key is being strategic about where you invest versus where you save.


When budgeting, think of your apartment in layers. The foundation layer—walls, flooring, and large furniture—requires the biggest investment but lasts the longest. The middle layer—lighting, window treatments, and architectural improvements—is where DIY hacks shine because you get premium looks for budget prices. The top layer—accessories, art, textiles—is where you can have fun and experiment without huge financial commitment. Most designers recommend spending about 40% of your budget on furniture, 30% on wall improvements and lighting, and 30% on styling and accessories.
The most important money tips: First, buy quality over quantity. One beautiful piece you love beats five mediocre pieces. Second, spread large purchases across multiple months if possible—your bank account will thank you, and you won't feel guilty about the spending. Third, invest heavily in pieces that get daily use (your bed, sofa, kitchen tools) and find affordable versions of trendy pieces. Fourth, always wait at least 24 hours before clicking "buy" on anything over $100. Most impulse purchases feel less necessary the next day. Finally, shop your own space first—you likely have pieces hiding in closets or storage that can be repurposed or repositioned to feel new.
← Scroll to see full table →
| Under $50 | $50-$200 | $200+ |
|---|---|---|
| Paint supplies (interior house paint) - $25-40 | Floating shelves set - $80-150 | Mid-range sofa - $400-800 |
| Throw pillows from Target - $20-45 | Area rug (5x7) - $60-180 | Dining table - $300-700 |
| LED string lights - $15-35 | Statement mirror - $70-160 | Quality bed frame - $250-600 |
| Curtain rods and fabric - $30-48 | Floor lamp - $80-175 | Premium mattress - $400-1200 |
| Removable wallpaper - $20-40 | Wall art set - $60-150 | Designer lighting fixture - $250+ |
| Picture frame set from IKEA - $25-45 | Bookcase unit - $100-190 | Coffee table - $200-500 |
Step-by-Step Guide
Now let's get into the actual doing. This is where the magic happens, and honestly, it's the most satisfying part. Following these steps in order ensures you're not wasting effort or money. The worst thing would be to paint and decorate only to realize you need to move furniture around or change your whole color scheme. Let's do this right.
Step 1: Deep Clean and Declutter Your Entire Space
Before anything else, purge ruthlessly. Go through every closet, cabinet, and corner. Be honest about what you actually use and what you're keeping "just in case." Most of us use only 20% of what we own. Those items that are broken, out of style, or simply don't make you happy? They go. This isn't about being ruthless for the sake of it—it's about creating space, literally and mentally, for the beautiful new things you're bringing in. Clean every surface, dust baseboards, and make sure your blank canvas is actually clean. You cannot see the potential of a space when it's cluttered. Once you've decluttered, take professional photos of your clean space from multiple angles. These become your baseline for before-and-after comparisons.
Step 2: Address the Walls and Major Paint Projects
Paint is the quickest and most affordable way to completely transform a space, but it's a big job, so do it early before you bring in furniture. Decide on your color scheme—typically one accent wall and 2-3 neutral tones for the rest. Check out The The Home Depot's paint color matching services; they're free and incredibly helpful. Quality paint makes a difference, but you don't need premium brands—The Home Depot's own brands are excellent. Use The Home Depot's paint calculator to determine how much you need. If painting entire walls feels overwhelming, consider removable wallpaper or peel-and-stick solutions from Amazon for one accent wall. These cost $20-40 and deliver huge visual impact with zero commitment. This is also the time to patch holes, caulk baseboards, and handle any wall repairs.
Step 3: Invest in Foundation Furniture Pieces
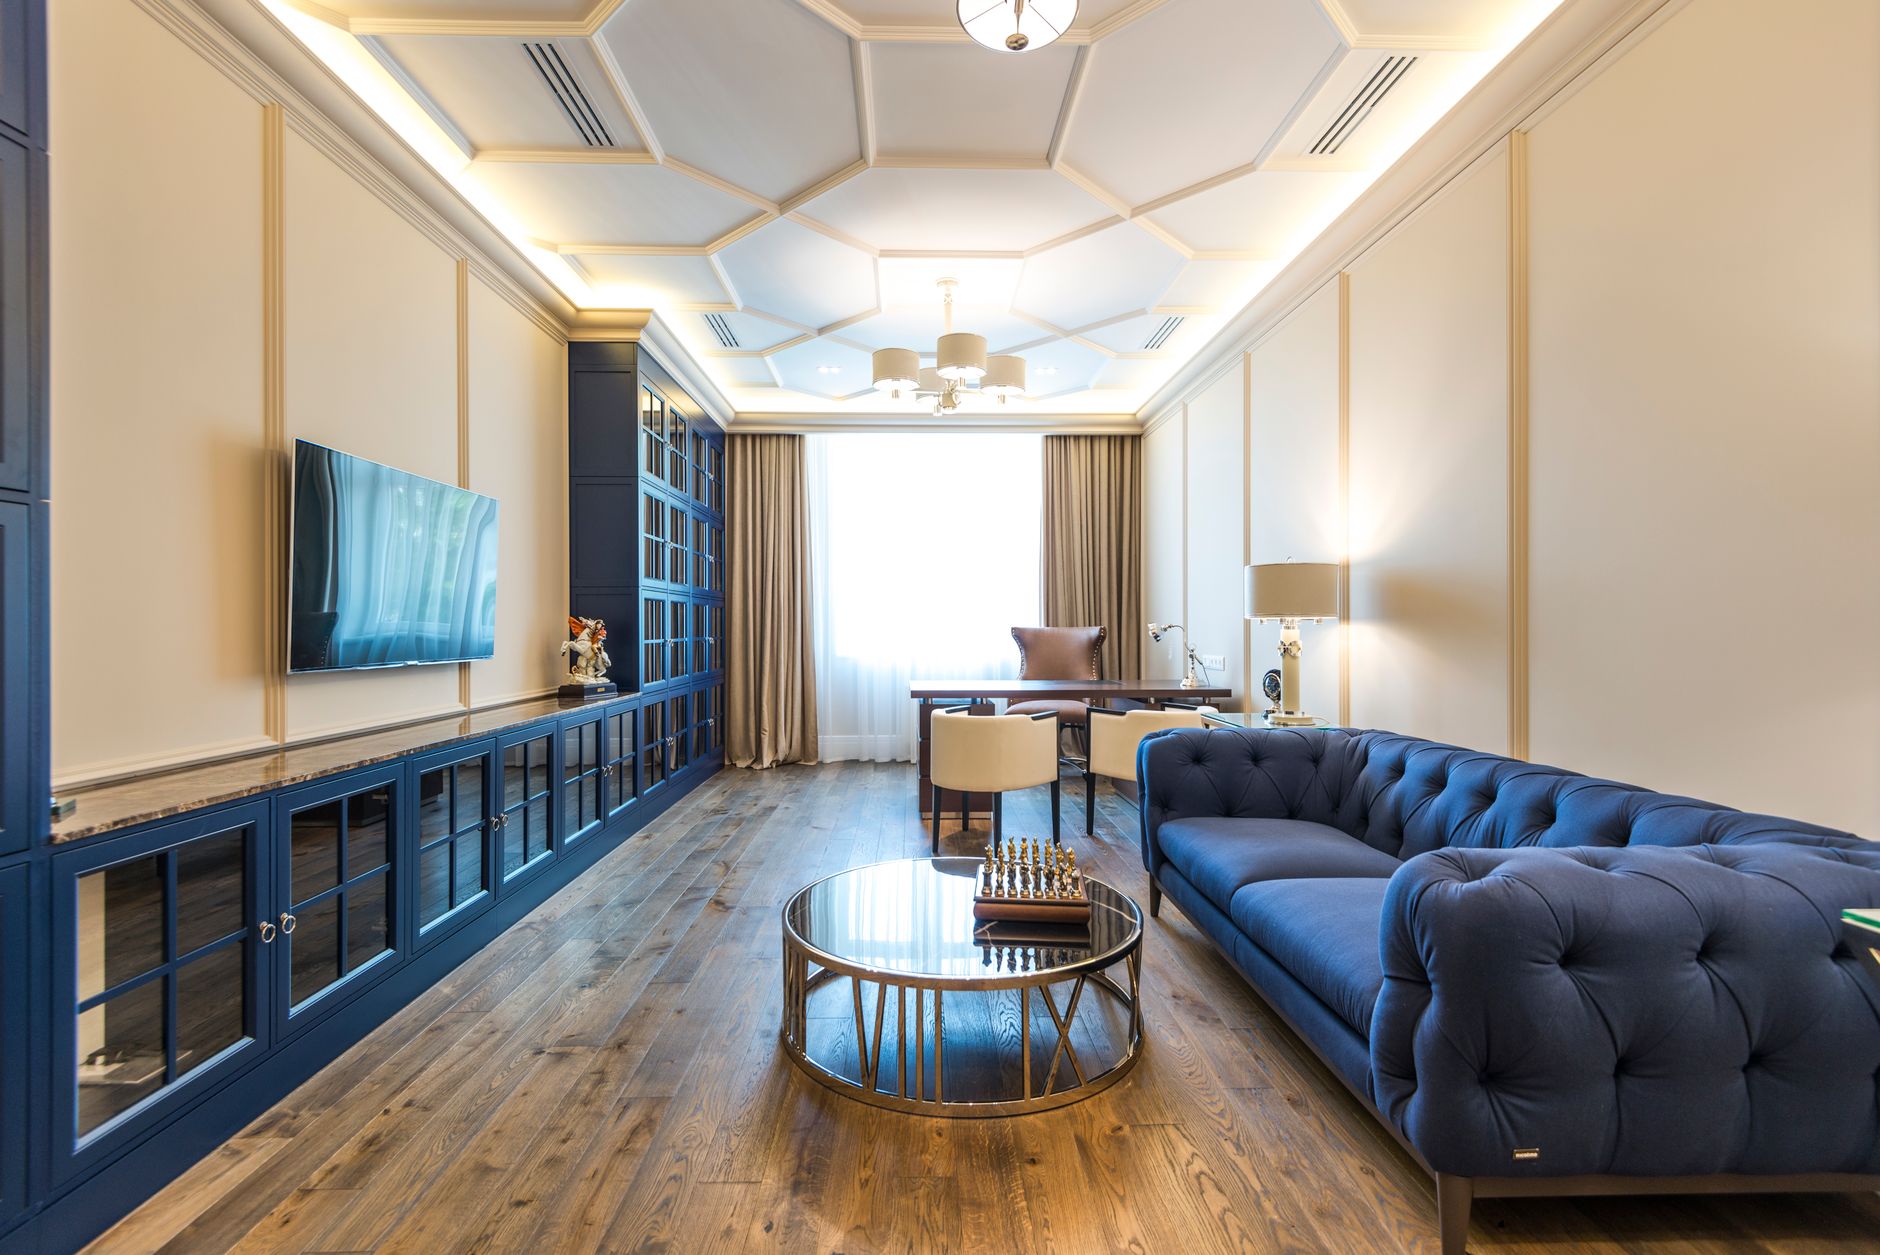
Now bring in your large furniture—your sofa, bed frame, and dining table. These are your biggest investments and should be chosen for quality and longevity, not trends. IKEA offers excellent mid-range options like the Kivik sectional or Malm bed frame. Better Homes & Gardens and Gardens, available at Walmart, has surprisingly sophisticated furniture that punches above its price point. You want pieces that are comfortable, durable, and align with your style vision. This is not the place to cut corners, but it's also not the place to spend a fortune. Look for solid wood rather than particleboard when possible, and read reviews carefully. Arrange these pieces intentionally—don't just push everything to the walls. Create conversation areas and flow.
Step 4: Upgrade Your Lighting Situation
Good lighting completely changes the feel of a space, and this is where DIY hacks shine. Replace harsh overhead lighting with a combination of sources: a beautiful floor lamp in a corner, task lighting near your desk or reading nook, and ambient lighting through Edison bulbs or string lights. Amazon has incredible options for affordable, stylish lighting fixtures. Look for pieces with brass, copper, or black metal finishes to add sophistication. Install dimmer switches if your rental allows it—they're inexpensive and transformative. Layer your lighting: ambient (overhead), task (work areas), and accent (highlighting features or creating mood). This layering is what makes spaces feel high-end and intentional.
Step 5: Add Window Treatments That Look Expensive
Cheap, thin curtains make any space look unfinished. Invest in quality window treatments because they take up a huge visual percentage of your space and they frame your windows. If you rent, use tension rods and removable rods to avoid holes. Choose substantial fabric—linen, velvet,


