Farmhouse Kitchen Decor with DIY Hacks: Transform Your Space on a Budget
So here's the thing about farmhouse kitchens — they've stuck around in our design hearts for good reason. There's something genuinely comforting about that rustic, lived-in aesthetic. Shiplap, vintage finds, open shelving, soft whites and creams... it all just *feels* like home. But let me be honest with you: authentic farmhouse decor can absolutely tank your wallet if you're not strategic about it.
I spent way too much money trying to recreate that Pinterest-perfect farmhouse vibe before I figured out the hack — you don't need to buy everything new or expensive. In fact, some of the best farmhouse elements come from DIY projects and smart shopping at places like The The Home Depot and HGTV-featured thrift stores. I'm talking about transforming what you already have, repurposing wood, and getting creative with paint and hardware.
I've rounded up my favorite DIY hacks that actually work, along with real costs and step-by-step instructions. Whether you're starting from scratch or refreshing an existing kitchen, these ideas will get you that warm, inviting farmhouse feel without the boutique price tags.
What You'll Need
Before we jump into the actual building part, let's talk materials. Most of these projects share common supplies, so you might already have some lying around.
- Reclaimed wood or pallet wood — $15-40 (depending on source)
- White chalk paint (Rust-Oleum brand) — $8-12 per can
- Black hardware and hinges — $20-50 for a variety pack
- Wood stain or whitewash (Minwax) — $6-10 per can
- Drill and basic tools — $40-80 (if starting fresh)
- Sandpaper assortment — $8-15
- Wood glue and nails — $5-10
- Mason jars and vintage bottles — free to $15 (thrift stores)
- Burlap or linen fabric — $10-20 per yard
- Oil-rubbed bronze spray paint — $5-8 per can
Honestly, I've found that The Home Depot has pretty reasonable prices on wood and hardware, plus they'll cut wood for you if you ask nicely. That's saved me hours of work.
Step-by-Step Guide
Step 1: Create DIY Farmhouse Shelving
This is the absolute foundation of farmhouse kitchen design — open shelving that shows off your stuff. The beauty here? You control the entire look and feel, and it costs way less than pre-made shelves.
First, measure your wall space carefully. Mark where you want brackets using a level — seriously, use a level. I learned this the hard way, and watching your mason jar collection slowly slide downhill is not fun. Install heavy-duty brackets (about $15-25 per pair) to your studs, then lay your wood on top. If you're using reclaimed wood, great. If not, grab some pine or barn wood from The Home Depot and apply whitewash or stain.
The trick that actually works? Weathered gray-white is more forgiving than pure white. It hides dust and wear better, and it still reads farmhouse. Sand everything lightly, apply your chosen finish in two coats, and let it cure fully before loading it up with your favorite kitchen pieces.
Step 2: Upcycle Cabinet Doors with Paint and Hardware Swaps
If your kitchen already has cabinets, don't gut them — transform them. This is where chalk paint becomes your best friend. Remove cabinet doors (easier than you'd think), label the hinges with tape so you remember where they go, and lay them flat in a well-ventilated area.
Clean them thoroughly, then apply a bonding primer if they're glossy. Follow up with two coats of chalk paint in white, cream, or soft sage. While those cure, replace your existing hardware with black or oil-rubbed bronze handles and hinges. This single swap absolutely changes the entire aesthetic. I'm talking from "basic builder grade" to "intentional farmhouse" in one afternoon.
Reinstall your doors, step back, and notice how suddenly your kitchen has personality. This project costs around $60-100 if you already own the paint, and the impact is genuinely stunning.
Step 3: Build or Modify a Farmhouse Island
A kitchen island doesn't have to be complicated or expensive. You can repurpose an old dresser, build one from scratch using 2x4s, or modify an existing table.
If you're building from scratch, create a simple frame using basic lumber, add a reclaimed wood top (which reads so much more farmhouse than laminate), and paint the base white or cream. Add vintage-style hardware to any drawers, and maybe install a small shelf underneath for storing cookbooks or displaying baskets.
Total cost? Probably $100-200 if you source smart. That's significantly less than store-bought, and it'll actually fit your space perfectly.
Step 4: Create a Farmhouse Backsplash with Budget-Friendly Tile
 Budget Apartment Renovation: DIY Hacks That Actually Work
Okay, so I know tile installation sounds intimidating, but it's genuinely doable for beginners. Start with a small area — maybe just behind the stove — rather than your entire wall.
Choose subway tiles or shiplap-style tiles in white or cream (Lowe's and The Home Depot both have great options for under $2 per tile). Apply tile adhesive with a notched trowel, place your tiles, let them cure, then grout. Seal the grout, and you're done. The whole vibe? Instantly more farmhouse.
This project costs around $150-300 depending on the square footage, but it completely elevates your kitchen.
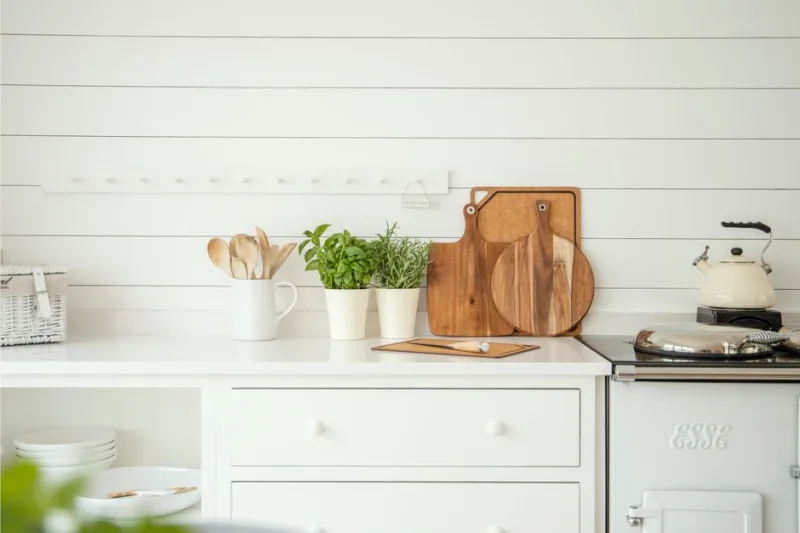
Step 5: Style Open Shelves with Purpose
Here's where decorating gets fun but also where people sometimes go overboard. The key to farmhouse styling is mixing utility with beauty. Think white dishes, vintage glassware, wooden cutting boards, and fresh herbs in mason jars.
Stack plates at varied heights, layer in some fabric (burlap or linen looks incredible), add brass or bronze accents, and don't be afraid of negative space. A cluttered shelf feels chaotic, not charming. Better Homes & Gardens & Gardens has some fantastic shelf styling inspo if you need reference images.
Pro Tips
Shop secondhand first. Honestly, thrift stores and antique shops are where farmhouse magic lives. You'll find vintage bottles, old wooden crates, cast iron pieces, and authentic aging that would cost triple at a home goods store. Plus, the sustainability angle makes you feel good about it.
Don't paint everything white. I see this mistake constantly. White is great, but pair it with soft creams, warm grays, or muted sage. Layering neutrals feels way more sophisticated and less "generic."
Embrace imperfection. Farmhouse isn't about precision — it's about warmth. Slightly uneven shelves, visible wood grain, chipped paint edges? All of that adds to the authentic feel. Stop stressing about perfection.
Mix old and new strategically. Your modern appliances aren't going anywhere, so embrace them. Style around them with vintage decor, and suddenly that stainless steel fridge becomes part of a cohesive design rather than a sore thumb.
Use lighting to set the mood. Farmhouse kitchens thrive under soft, warm lighting. Consider adding pendant lights over the island or installing vintage-style sconces. Lighting makes a bigger difference than you'd think.
Cost Breakdown
← Scroll to see full table →
| Project | Estimated Cost | Time Required |
|---|---|---|
| DIY Open Shelving (per set of 2) | $50-80 | 2-3 hours |
| Cabinet Paint and Hardware Swap | $60-120 | 4-6 hours |
| Farmhouse Island (basic build) | $150-250 | 6-8 hours |
| Backsplash Tile Installation | $150-350 | 4-6 hours |
| Styling and Decor Accessories | $75-150 | 1-2 hours |
| TOTAL (All Projects) | $485-950 | 18-25 hours |
Compared to hiring contractors or buying pre-made pieces, you're looking at roughly 50-60% in savings. That's real money.
Frequently Asked Questions
Q: Do I need professional tools to complete these projects?
A: Not really. A basic drill, saw, level, and sandpaper will cover 90% of what you need. You can rent specialty tools from The Home Depot for smaller projects if you only need them once. I borrowed my neighbor's miter saw for the shelving, and it made everything cleaner. Community is your friend.
Q: What's the best paint finish for farmhouse kitchen cabinets?
A: Chalk paint or matte finish latex paint holds up well in kitchens and photographs beautifully. If you want durability, seal it with a matte topcoat. The flat finish is more forgiving than glossy and reads authentically farmhouse. HGTV specialists often recommend this approach.
Q: Can I combine farmhouse with other styles?
A: Absolutely. Farmhouse blends beautifully with modern, industrial, or coastal styles. Think "modern farmhouse" with clean


