Smart Kitchen Inspiration with DIY Hacks: Transform Your Space Without Breaking the Bank
You know that feeling when you scroll through kitchen inspiration on Pinterest and HGTV, and everything looks impossibly gorgeous? Yeah, I get it. But here's the thing — you don't need a contractor army or a six-figure budget to make your kitchen actually functional and beautiful. I've spent years experimenting in my own kitchen (and my friends' kitchens, honestly), and I've discovered some seriously game-changing DIY hacks that make a real difference.
The best part? Most of these smart kitchen upgrades use stuff you can grab at The The Home Depot, your local hardware store, or even repurpose from items already hiding in your cabinets. We're talking about maximizing storage, improving workflow, adding personality — all without gutting the whole space. Whether you're working with a tiny apartment kitchen or a sprawling suburban setup, there's something here for you.
Let me walk you through my favorite smart kitchen hacks that will make you wonder why you didn't do them sooner. These aren't complicated projects, and most won't take more than a weekend (sometimes just an afternoon).
What You'll Need
Before you dive in, let's talk materials. I'm assuming you've got basic tools — a drill, screwdriver set, level, measuring tape. If you don't, borrow them from a neighbor or grab an affordable starter set. Here's what you'll actually want to buy:
- Magnetic strips for knife storage — $12-18 per strip
- Under-cabinet LED lighting (warm white) — $25-40 per kit
- Pull-out drawer organizers — $15-35 per set
- Wall-mounted spice rack or shelving — $20-50 depending on size
- Lazy Susan turntables (various sizes) — $10-25 each
- Adhesive hooks and rails — $5-15 per pack
- Peel-and-stick backsplash tiles — $20-40 per pack
- Cabinet door organizers — $12-30 each
- Smart power strips — $15-35 per strip
- Open shelving brackets — $15-25 per pair
Most of these items are available at The Home Depot or any decent home improvement store. Better Homes & Gardens & Gardens also has solid guides on selecting the right organizers for your kitchen type.
Step-by-Step Guide
Step 1: Install Under-Cabinet LED Lighting
Honestly, this is the upgrade that changed my kitchen the most. Those strip lights under your cabinets don't just look sleek — they completely transform how functional your counter space is. You can actually see what you're doing when you're prepping food, and it makes the whole kitchen feel bigger somehow.
Start by measuring the length of your cabinets. Most LED kits come with adhesive backing, so clean that underside thoroughly with a damp cloth and let it dry completely. Peel and stick the strips along the bottom of your upper cabinets, running the cord to an outlet (or hiding it behind a cabinet). Plug in, and boom — instant upgrade. Takes about 20 minutes tops.
Step 2: Create a Magnetic Knife Wall
This is one of my favorite space-savers. Instead of taking up drawer space with a knife block, mount a sleek magnetic strip on your wall. It looks more like modern décor than storage, which I'm always here for. Find a spot near your cutting area, use a level to make sure it's perfectly horizontal (trust me on this), and mount it with the brackets included. Your knives will be accessible, visible, and honestly kind of beautiful when displayed properly.
Step 3: Reorganize Cabinet Interiors with Drawer Dividers
The magic of a smart kitchen is knowing exactly where everything lives. Invest in a few pull-out drawer organizers and cabinet door racks. They create zones — one for baking supplies, one for canned goods, one for snacks. Install the rails and dividers according to manufacturer instructions, then organize by category. You'll use the same amount of space but get triple the functionality.
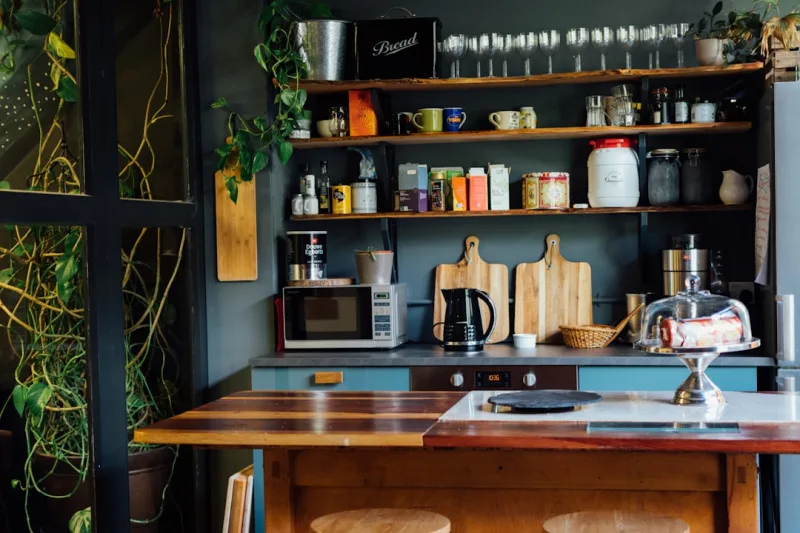
Step 4: Add Open Shelving Above Your Sink or Stove
Open shelving makes kitchens feel lighter and more intentional. Install floating shelves about 18 inches above your counter using sturdy brackets and wall anchors (especially important if you have drywall). Style them with everyday items — beautiful bowls, cookbooks, a small plant. It's practical and gorgeous.
Step 5: Install Smart Power Strips
This is the "smart" part of smart kitchen hacks. Mount a smart power strip inside a lower cabinet or behind your coffee maker to control multiple appliances from your phone. No more wondering if you left the toaster on, and you can set schedules for devices. It's a small change that makes kitchen life easier in ways you won't expect.
Step 6: Upgrade Your Backsplash with Peel-and-Stick Tiles
 Budget Apartment Renovation: DIY Hacks That Actually Work
If your kitchen backsplash is looking tired, peel-and-stick tiles are your friend. They're affordable, come in tons of styles, and honestly, the installation is almost embarrassingly easy. Clean your current wall, measure carefully, and stick them on in a pattern that makes you happy. No grout, no mess, totally removable if you change your mind.
Pro Tips
Label everything. Seriously, get a label maker. Even with perfect organization, you'll forget what's in that container after three weeks. Small, clear labels keep your system actually functional.
Think vertically. Most kitchens are short on counter space but long on wall space. Wall-mounted spice racks, pegboards, and hooks are your best friends. The more you move off the countertop, the more breathing room your kitchen has.
Use the inside of cabinet doors. That's real estate you're probably wasting. Cabinet door organizers hold everything from spices to aluminum foil to cleaning supplies. It's genius space-maximizing.
Invest in clear storage containers. You need to see what you have, especially with pantry items. Clear, stackable containers make everything more efficient and honestly look way better than random boxes.
Create zones. A smart kitchen has stations — coffee corner, baking station, prep area. Organize your tools and ingredients around these zones so everything you need is within arm's reach. It changes how you cook.
Don't go overboard with decor. This is the hardest lesson I've learned. A smart kitchen is functional first, beautiful second. Every item on display should earn its place.
Cost Breakdown
← Scroll to see full table →
| Item | Quantity | Unit Price | Total Cost |
|---|---|---|---|
| Under-Cabinet LED Lighting Kit | 1 | $35 | $35 |
| Magnetic Knife Strip | 1 | $15 | $15 |
| Drawer Organizer Set | 2 | $25 | $50 |
| Floating Shelf Brackets (pair) | 2 | $20 | $40 |
| Floating Shelves (wood) | 2 | $30 | $60 |
| Smart Power Strip | 1 | $25 | $25 |
| Peel-and-Stick Backsplash Tiles | 1 | $35 | $35 |
| Cabinet Door Organizers | 3 | $20 | $60 |
| Clear Storage Containers Set | 1 | $40 | $40 |
| Adhesive Hooks and Rails | 2 | $10 | $20 |
| TOTAL INVESTMENT | $380 | ||
Prices are approximate and vary by region and retailer. You can absolutely do this for less by prioritizing which upgrades matter most to you.
FAQ
Do I need to hire someone to install these hacks?
Nope. All of these projects are genuinely DIY-friendly. The most intimidating part is usually just the first time you pick up a drill, but honestly, wall mounting is not rocket science. If you're nervous, YouTube is your friend — watch a quick tutorial before you start. The worst thing that happens? You drill a hole in the wrong spot and patch it with spackle.
What if I rent and can't drill holes?
You've got options. Adhesive strips, command hooks, and peel-and-stick backsplash tiles are all renter-friendly. Skip the permanent installations and focus on drawer organizers, lazy susans, and over-door organizers instead. Your kitchen will still transform without damaging walls.
How long do these
📷 Photo by SarahCreates on Unsplash


