Farmhouse Closet Storage on a Budget: The Complete DIY Guide
Okay, let's be real — your closet is probably a disaster right now. Mine was too, before I decided to do something about it. And here's the thing: you don't need to drop a thousand dollars at some fancy custom closet company to get that cozy, organized farmhouse vibe everyone's obsessing over these days. I'm talking actual style meets function, without the sticker shock that makes you want to cry.
The farmhouse aesthetic is having a major moment, and honestly, it's because it just works. There's something calming about weathered wood, vintage hardware, and smart organization that makes getting dressed actually enjoyable instead of frustrating. But when you're working with a tight budget — and who isn't? — you have to get creative. Thankfully, I've spent enough time DIY-ing my own spaces (and learning from my mistakes) to walk you through a closet transformation that'll have you feeling like you stepped out of a Better Homes & Gardens & Gardens photoshoot.
We're going to tackle this with reclaimed materials, strategic storage solutions, and a whole lot of elbow grease. Total cost? You're looking at under $300 if you shop smart. Let's do this.
What You'll Need
Before you start rearranging things, gather these materials. Most are available at The The Home Depot, local hardware stores, or even salvage shops if you're feeling adventurous.
- Wooden shelving boards or reclaimed wood — $40-$80 (you can also use pallet wood, seriously)
- L-brackets or shelf supports — $15-$25
- Rope or jute twine — $5-$10
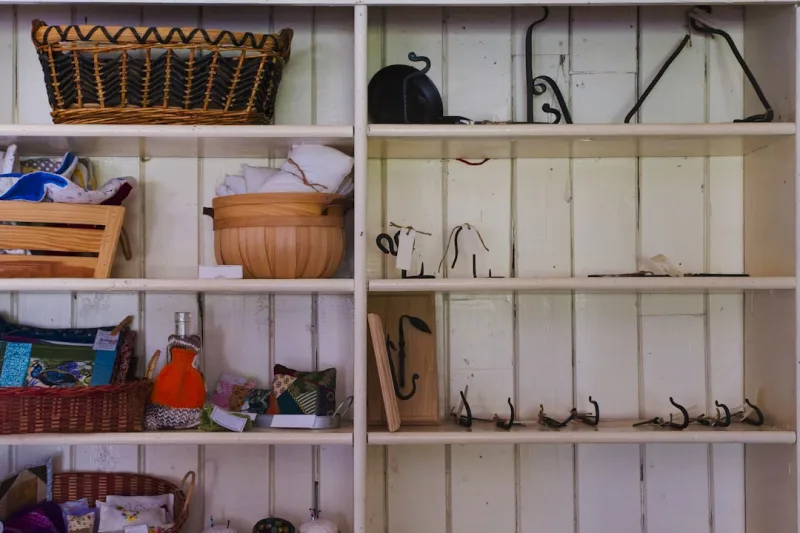
- Wooden baskets or crates — $30-$60
- Dowel rod or curtain rod — $8-$15
- Vintage-style hooks and hardware — $20-$35
- Wood stain or white paint — $8-$12
- Tension rod — $10-$15
- Cardboard storage boxes (labeled) — $15-$25
- Basic tools (drill, level, tape measure, saw) — $0 if you already own them
Step-by-Step Guide
Step 1: Declutter Like You Mean It
I know, I know — this isn't the fun part. But seriously, you can't build a functional storage system if you're keeping things you don't actually wear. Pull everything out and be honest with yourself. That sweater from 2015 that doesn't fit? Gone. Those jeans you haven't touched in two years? Donate them. Your future self will thank you because you'll actually have space to breathe in there.
Step 2: Measure Your Space
Grab your tape measure and get exact measurements of your closet — height, width, depth, and any awkward angles. Sketch it out on paper or snap some photos. This saves you from the frustrating moment when you realize your beautiful shelf doesn't fit. Trust me on this one.
Step 3: Install Wall Shelves
Find the studs in your closet walls using a stud finder (seriously, grab one if you don't have it). Mark where your shelves will go — I typically recommend spacing them 12-14 inches apart for clothing, with one shelf higher up for seasonal items. Use the L-brackets to mount your shelves securely. If you're using reclaimed wood, that weathered patina is chef's kiss for farmhouse style. Level everything obsessively. An unlevel shelf will bug you forever.
Step 4: Add a Hanging Rod
If you don't have adequate hanging space, install a tension rod or traditional dowel rod. Position it about 65 inches from the floor for regular hangers. You can create a secondary rod below it for shorter items if you're feeling fancy. This doubles your hanging capacity without much effort.
Step 5: Incorporate Baskets and Bins
This is where the magic happens. Place woven baskets on shelves for folded items, sweaters, or seasonal clothing. Label them with cute cardboard tags attached with twine — it's functional and looks Pinterest-worthy. Stack smaller boxes for accessories, socks, or undergarments. The key is making sure everything has a home.
Step 6: Install Hooks
Screw vintage-style hooks onto the inside of your closet door or along the walls. Perfect for belts, scarves, bags, or that cardigan you wear constantly. This gets things off your rod and makes the space feel less cramped. Plus, it adds those charming farmhouse details.
Step 7: Add Finishing Touches
Paint your shelves with white or cream farmhouse paint if they're looking sad. Use rope or jute twine as a decorative element — wrap it around basket handles or hang it on hooks. Add some dried flowers or vintage glass jars with buttons or jewelry. The goal is functional and beautiful.
Pro Tips
Shop secondhand first. Hit up thrift stores, Facebook Marketplace, and estate sales before buying new. Honestly, some of the best farmhouse pieces come from places where people are literally giving them away. That reclaimed wood? Might've been someone's bookshelf five years ago.
 Budget Apartment Renovation: DIY Hacks That Actually Work
Use vertical space aggressively. Most people ignore the upper reaches of their closets. Mount shelves all the way up for seasonal storage boxes. You've got room — use it.
Invest in quality hangers. This isn't where you cheap out. Good wooden or velvet hangers make everything look better and actually last. Better Homes & Gardens has some gorgeous options that fit the aesthetic.
Group by category, not color. While aesthetically pleasing, organizing by color can be impractical. Group items by type — all pants together, all tops together. It saves time when you're rushing in the morning.
Keep a donation box nearby. As you organize, you'll find things to let go of. Having a box right there means you're more likely to actually donate them instead of shoving them back in.
Don't forget about door space. The back of your closet door is prime real estate. Over-the-door organizers, hooks, or a narrow shelf for shoes can completely transform your storage capacity.
Cost Breakdown
← Scroll to see full table →
| Item | Estimated Cost |
|---|---|
| Wooden shelving boards | $60 |
| L-brackets and hardware | $30 |
| Baskets and crates | $50 |
| Rope/twine and decorative elements | $15 |
| Hooks and vintage hardware | $25 |
| Tension rod and dowel | $20 |
| Paint or stain | $10 |
| Storage boxes and labels | $20 |
| TOTAL | $230 |
FAQ
Can I do this without a drill?
Technically? Sort of. You can use heavy-duty adhesive hooks for lighter shelves, but honestly, a drill makes everything easier and stronger. They're cheap — under $30 — and useful for so many projects. Plus, renting one from The Home Depot is an option if you really don't want to buy.
What if my closet doesn't have studs in the right places?
Use toggle bolts or heavy-duty drywall anchors for shelves in non-stud areas. They work surprisingly well and hold a decent amount of weight. Just don't overload them with heavy items. For extra security, use a combination — some anchors in drywall and some in studs if you're lucky enough to have them positioned right.
How do I make a small closet feel bigger while organizing it?
Paint the interior a light color — soft white, cream, or pale gray. Install shelves that go nearly to the ceiling to draw the eye upward. Use clear or translucent containers so you can see contents without visual clutter. Remove everything that doesn't serve a purpose, and keep vertical organization prominent. Sometimes less is literally more.
Final Thoughts
Here's what I love most about this project: it proves you don't need a huge budget to create something genuinely beautiful and functional. Your closet is one of the first things you see every morning, and it sets the tone for your whole day. When it's organized and aesthetically pleasing? That matters.
The farmhouse style works on a budget because it celebrates imperfection and authenticity. That weathered wood? It's not expensive — it's real. Those mismatched baskets? They tell a story. This approach to home decor, championed by designers on HGTV and countless home improvement sites, is about making spaces work for you, not against your wallet.
So grab your tools, put on a playlist, and start transforming that closet. You've got this — and you're going to feel amazing every time you open that door. Your future self is already grateful.


