Designer Closet Setup 2026: The Complete Guide to Your Dream Wardrobe Space
Okay, real talk — closets in 2026 are not what they used to be. We're past the era of just cramming everything on one rod and hoping for the best. A designer closet setup is honestly one of those investments that sounds fancy but actually transforms how you live, day to day. I'm talking about walking into your closet and immediately finding exactly what you need, no stress, no five-minute hunt through wrinkled hangers.
Here's the thing: a well-designed closet isn't just about looking Instagram-worthy (though that's definitely a bonus). It's about functionality, accessibility, and creating a space that genuinely works with your lifestyle. Whether you're working from home or heading to the office, a thoughtfully organized closet saves you time, reduces decision fatigue, and actually makes you feel better when you're getting dressed.
This guide walks you through everything — from what you'll actually need to buy, to the exact steps for creating a designer-level closet setup that won't break the bank. Let's build this together.
What You'll Need
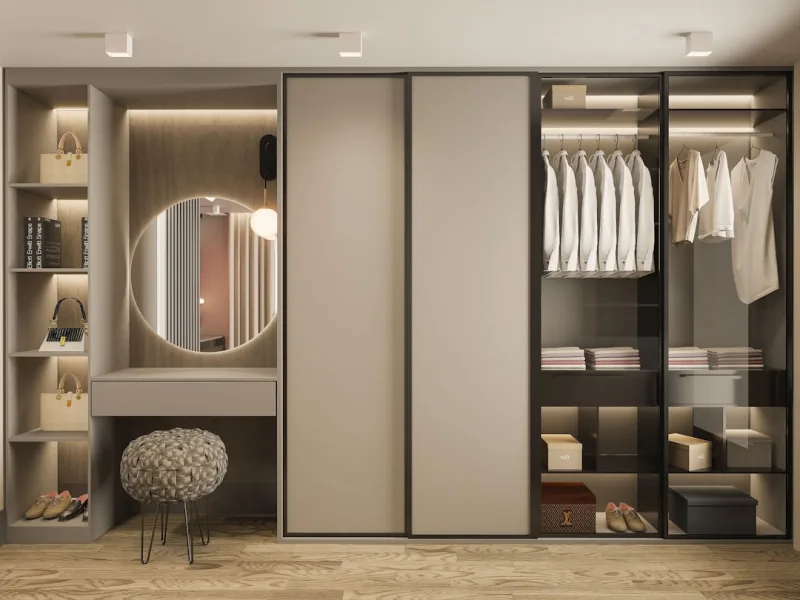
- Closet Organizer System or Shelving Unit — $200-$800 (Wall-mounted or modular systems from The The Home Depot)
- Premium Hangers Set (Velvet or Wood) — $40-$120 (30-50 piece sets)
- Storage Bins & Boxes — $60-$150 (Clear acrylic or fabric with labels)
- Drawer Dividers — $25-$60 (Bamboo or adjustable plastic)
- Closet Lighting (LED Strip or Puck Lights) — $30-$100
- Garment Bags & Hanging Organizers — $50-$120
- Shelving Brackets & Hardware — $20-$50
- Labels & Label Maker — $15-$35
- Shoe Racks or Shelves — $50-$250
- Full-Length Mirror — $80-$200
- Paint (optional refresh) — $25-$50 per gallon
Total Estimated Budget: $595-$2,140 depending on closet size and choices
Step-by-Step Guide
Step 1: Declutter and Take Inventory
Before you buy a single organizer, you need to know what you're actually working with. Pull everything out — and I mean everything. This is your chance to get real about what you actually wear versus what's just taking up space. Hold each piece. If it doesn't fit, make you feel good, or align with your current lifestyle, it goes. This isn't about being ruthless; it's about being honest. Most people find they wear about 20% of what they own anyway.
Step 2: Measure Your Closet Space
Grab a measuring tape and get the dimensions of your closet — width, depth, height, and note where doors open, vents are located, and existing hardware. Take photos too. This might seem tedious, but when you're shopping for organizers (whether at Better Homes & Gardens & Gardens furniture or The Home Depot), having exact measurements prevents costly mistakes. I've learned this the hard way.
Step 3: Plan Your Layout
Think vertically. That's the secret. Most closets waste massive amounts of vertical space. Sketch out where your hanging rods will go, where shelving should be, and where drawers fit. Typically: long hanging items on one side (dresses, coats), shorter items or folded pieces on the other, and shoes at eye level or on lower shelves. Your most-worn items should be at arm height — this isn't complicated, just smart.
Step 4: Install or Upgrade Hanging Systems
 Boho DIY Room Makeover: Full Revamp Under $200
If your closet has the basic wire shelving setup, consider replacing it or adding additional rods. Modular closet systems (like the ones from The Home Depot) make this way easier than it sounds. Most come with clear instructions, and honestly, YouTube has fantastic tutorials if you're DIY-ing it. Double rods maximize space — one high, one low — and they're game-changers for folded items and shorter pieces.
Step 5: Add Shelving and Storage
Install solid shelves where you need them. Floating shelves look sleek and work brilliantly for displaying folded sweaters, bags, or accessories. Use shelf dividers to prevent toppling stacks. For smaller items, invest in clear storage bins — you'll actually use them if you can see what's inside without opening every single box.
Step 6: Implement Drawer Organization
Drawer dividers are non-negotiable here. Socks, undergarments, and smaller accessories need homes. The KonMari method of vertical folding actually works — your items stay visible and accessible, not buried under each other. Use bamboo dividers for a designer feel, or grab adjustable plastic ones if you're budget-conscious.
Step 7: Upgrade Your Hangers
This sounds small, but quality hangers make an enormous visual difference. Velvet or slim wooden hangers take up less space than bulky plastic ones, and everything looks more intentional. Plus, they actually hold your clothes better so items don't slip off. Go for matching hangers — even basic ones — and your closet automatically looks more curated.
Step 8: Add Proper Lighting
A closet without good lighting is a closet you'll hate using. Install LED strip lighting along shelves or at the top of the rod. Battery-operated puck lights work if you can't wire anything permanent. This one addition changes everything — you'll actually be able to see colors, patterns, and what you're grabbing.
Step 9: Organize by Category and Color
Within your hanging section, group by category: work clothes, casual wear, dresses, outerwear. Then organize by color within each section. This system (heavily featured on HGTV home makeovers) actually works because your brain finds things faster. Bonus: it helps you see what you own and creates natural outfit combinations.
Step 10: Style and Label
Label your storage bins. Label your shelves. Label your drawers. Yes, really. It sounds excessive until you're living it, and then it becomes the thing that actually keeps your system functioning months later. Use a label maker — it takes five minutes and adds that designer polish. Plus, if anyone else ever needs to find something, they can.


