Aesthetic Kitchen Storage on a Budget: Transform Your Space Without Breaking the Bank
Let me be honest — when I first started tackling my kitchen storage situation, I thought I'd need to drop thousands on custom cabinetry and those gorgeous built-in pantry systems you see on HGTV. But here's the thing: creating a genuinely beautiful, organized kitchen doesn't require a luxury renovation budget. I've learned that with a little creativity and strategic shopping, you can absolutely nail that aesthetic storage vibe for a fraction of the cost.
The secret? Understanding that beautiful storage is really about three things: intention, repetition, and visibility. When your kitchen storage looks intentional rather than chaotic, when you repeat certain design elements throughout the space, and when you're strategic about what you display versus what you hide — that's when magic happens. And the best part? You probably have options at The The Home Depot, Target, and even your local thrift stores that make this totally doable.
I'm going to walk you through exactly how I've transformed my kitchen storage from a cluttered mess into something that actually makes me happy to look at. No professional contractor needed. No overwhelming project list. Just practical solutions that work with your existing budget.
What You'll Need
Before you start, gather these materials. I've included realistic pricing based on current retail costs — and honestly, prices vary by location and sales, so use this as a general guide:
- Open Shelving Brackets (if adding floating shelves) — $15-30 per set
- Wooden Shelves or Boards (from The Home Depot or lumber yard) — $20-60 depending on length and material
- Clear Glass Jars (bulk set of 4-6) — $12-25
- Woven Baskets (set of 2-3, varies by size) — $25-50
- Shelf Liners (adhesive or non-adhesive) — $8-15
- Label Maker or Chalkboard Labels — $10-20
- Paint or Wallpaper (backsplash or interior cabinet backing) — $15-40
- Decorative Canisters (matching set) — $20-40
- Command Hooks or Hanging Rails — $8-15
- Vintage or Thrifted Items (optional but recommended) — $5-20
Step-by-Step Guide
Step 1: Audit What You Actually Have
Seriously — before you buy anything, pull everything out of your cabinets and drawers. I know it's tedious, but trust me. You need to see what you're working with. Group similar items together. Notice what you use constantly versus what's just taking up space. This is where Better Homes & Gardens & Gardens has given me solid advice over the years: organization starts with honesty about what you own.
Be ruthless. If you haven't used that pasta maker in three years or you have seven wooden spoons when you realistically use two — let it go. Seriously. Your beautiful storage can't happen if you're trying to squeeze too much into it.
Step 2: Choose Your Color Palette
This is where aesthetic actually becomes affordable. Decide on a color scheme — maybe it's warm neutrals with brass accents, or perhaps you're going cool-toned with black and white. Whatever you choose, stick with it. This consistency is what makes budget storage look intentional and designed rather than random.
I personally went with cream, natural wood, and soft gray because it feels calming and works with literally everything. Your palette should complement your kitchen walls and countertops, but it doesn't have to match exactly.
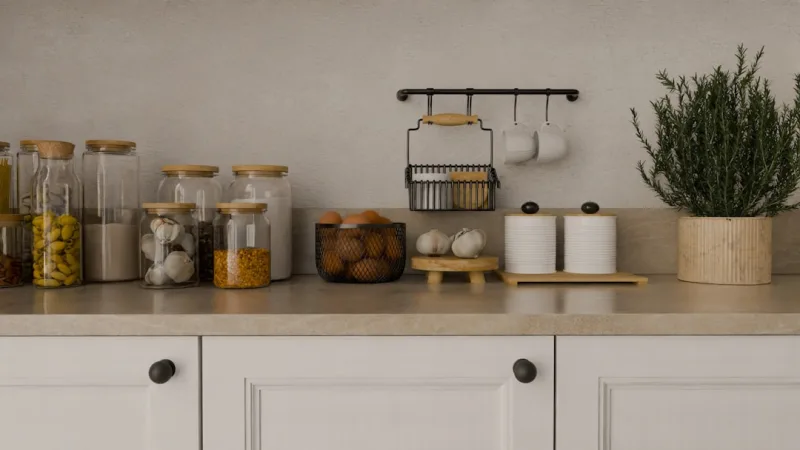
Step 3: Decant Dry Goods Into Glass Jars
This is perhaps the easiest win for aesthetic storage. Flour, sugar, pasta, rice, cereal — transfer all of it into matching glass jars. Buy them in bulk sets (Amazon and The Home Depot have excellent options). Add labels using a simple label maker or chalkboard paint pens.
The transformation is real. Your shelves immediately look more curated and intentional. Plus, your dry goods actually stay fresher in airtight containers.
Step 4: Use Baskets Strategically
Woven baskets are your friends. Under-sink storage? Basket. Deep pantry shelves? Baskets. Messy snack drawer? You guessed it — basket. Choose natural woven baskets, wire baskets, or fabric-lined baskets depending on your aesthetic. The key is consistency — if you use three different basket styles, it looks chaotic. Stick with one or two styles maximum.
Baskets hide the visual chaos while keeping everything accessible. It's the best way to store things you use regularly but don't want to display.
Step 5: Create Vertical Storage
Don't just think about shelf space — think about walls. Command hooks for frequently-used utensils, hanging rails for mugs, open shelving above counters. Vertical storage adds storage capacity without eating up cabinet real estate, and when done right, it's genuinely beautiful.
I installed simple floating shelves above my kitchen window for about $40 in materials, and it completely changed how I use that space. Now my favorite cookbooks and serving pieces are both stored and displayed.
Step 6: Add Backing or Paint Interiors
Here's a sneaky trick: if you have open shelving or glass-front cabinets, add a simple wallpaper or paint the interior backing. This instantly elevates the look. A peel-and-stick wallpaper in a subtle pattern costs about $15-25 and transforms everything behind your glassware or cookbooks.
I used a cream linen-textured peel-and-stick wallpaper, and suddenly my open shelves looked intentional rather than just... open.
Pro Tips
- Shop Your Own Cabinets First — Before buying organizing systems, raid what you already own. Vintage tins, old jars, even pretty bowls can become part of your storage solution. This is free aesthetic right there.
- Odd Numbers Look Better — When arranging items on open shelves, group in odd numbers (three jars, five books, seven plates). It's a design principle that makes everything look more intentional. Honestly, I can't explain why, but it works.
- Mix Heights and Textures — Vary the height of items on shelves. Stack some books, stand others upright. Put tall items next to short ones. Mix glass, wood, ceramic, and woven textures. This prevents the dreaded "flat, staged" feeling.
- Label Everything (Even Baskets) — A simple label maker is like $15 and makes your storage look professionally organized. Label the baskets, label the jars, label drawer dividers. It's a tiny detail that makes a huge impact.
- Use the Rule of Three — Display items in groups of three for visual balance. Three matching canisters, three cookbooks, three decorative items. This creates rhythm in your space.
- Keep Frequently Used Items Visible — Store your everyday coffee mugs, everyday dishes, and daily-use utensils where you can see and reach them easily. Reserve deep cabinets for occasional-use items.
- Thrift Store Hunting is Your Secret Weapon — Seriously, spend a Saturday hitting up thrift stores and estate sales. You can find gorgeous vintage canisters, beautiful serving pieces, and unique storage solutions for a fraction of retail price. This is how I got my aesthetic without the budget.
Cost Breakdown
← Scroll to see full table →
| Item | Quantity | Unit Price | Total Cost |
|---|---|---|---|
| Glass Jars (bulk set) | 1 set (4-6 jars) | $12-25 | $18 |
| Woven Baskets | 3 baskets | $8-15 each | $35 |
| Floating Shelves & Brackets | 2 shelves | $35-45 | $45 |
| Shelf Liners | 2 rolls | $8-15 | $12 |
| Label Maker | 1 | $15-20 | $18 |
| Matching Canisters | 1 set (3-4) | $20-40 | $30 |
| Peel-and-Stick Wallpaper (optional) | 1 roll | $15-25 05of 5 Related DIY Projects
🔗 You Might Also Like📷 Photo by Jivitharsan Suresh on Unsplash |


