Designer Balcony Upgrade for Beginners: Transform Your Outdoor Space Without Breaking the Bank
Look, I get it. You've been staring at that sad little balcony for months — maybe even years — telling yourself you'll do something about it eventually. And then one day you see someone's Instagram photo of this gorgeous outdoor oasis and think, "Why can't mine look like that?" Here's the thing: it totally can. You don't need a design degree, a massive budget, or even that much time to completely transform your balcony into something genuinely beautiful.
I've helped dozens of people upgrade their balconies, and honestly, the most common mistake I see is people overthinking it. They assume designer balconies require hiring professionals or spending thousands of dollars. Not true. With some smart planning, a few key pieces, and a willingness to get your hands a little dirty, you can create a space that feels like it belongs in a magazine — and you'll actually use it.
This guide walks you through everything you need to know to pull off a designer balcony upgrade as a complete beginner. We're talking real, achievable steps that won't leave you confused or broke.
What You'll Need
Before we dive into the actual transformation, let's talk materials. I'm going to keep this list focused on the essentials that'll actually move the needle on your balcony's look.
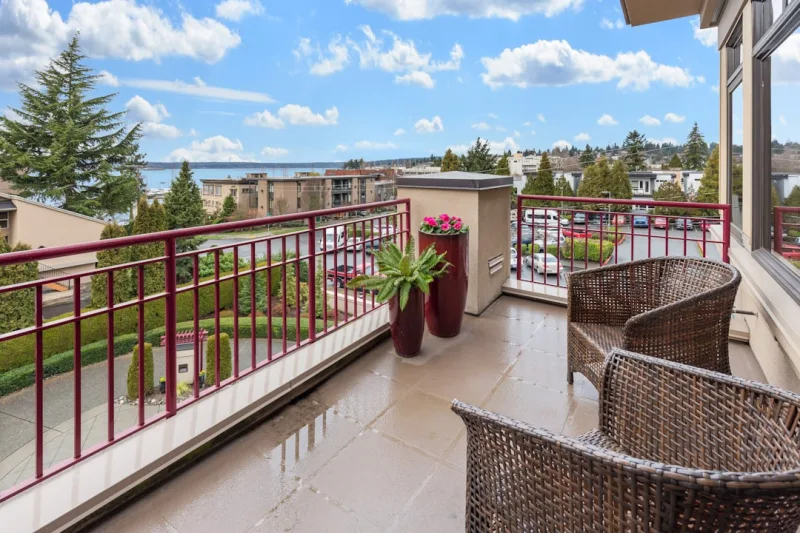
- Outdoor Rug (5x8 feet) — $80–150 — This is non-negotiable. A good outdoor rug anchors your space and defines the area. Check The The Home Depot for weather-resistant options.
- Outdoor Seating (2-piece conversation set) — $200–400 — You need somewhere to sit. Look for pieces that can handle your climate.
- Throw Pillows (4-pack) — $40–80 — These add personality and color without a huge investment.
- Planters and Greenery — $60–120 — Mix large statement planters with smaller ones. Include both live plants and quality soil.
- String Lights or Lanterns — $30–70 — Lighting changes everything. Even simple solar options work great.
- Small Side Table — $50–100 — Functional and stylish. A place for drinks, books, or decor.
- Outdoor Cushions — $40–60 — Makes seating actually comfortable.
- Paint or Stain (if needed) — $25–40 — For railing refresh if yours looks tired.
- Decorative Accessories (mirrors, wall hangings, lanterns) — $50–100 — The finishing touches that make it feel designed.
Step-by-Step Guide
Step 1: Assess Your Space and Plan Your Layout
Spend actual time on your balcony. I know that sounds weird, but seriously — sit out there at different times of day. Notice where the sun hits, what the wind patterns are, and how you naturally want to use the space. Are you a morning coffee person or an evening relaxer? This matters because it'll inform everything else you do.
Take measurements of your balcony — length, width, and height. Note any structural elements like railings, existing fixtures, or problem areas. You're building a mental map here, and it's going to make decisions way easier.
Step 2: Clean and Prep Your Foundation
Before you add anything, deep clean. Pressure wash if you can (or borrow someone's power washer), or just use a good outdoor brush and cleaner. Remove any debris, old plant remnants, or rust. This single step makes a shocking difference — you'd be amazed what a clean surface does for your perception of the space.
If your railing or existing furniture looks tired, consider a fresh coat of paint. This doesn't have to be a huge project. Even a couple hours with outdoor paint can breathe new life into old pieces.
Step 3: Establish Your Color Palette
Here's where design thinking comes in. Pick 2–3 colors maximum. Honestly, I usually recommend a neutral base (think warm whites, soft grays, or muted taupes) with one or two accent colors that you love. This doesn't have to match your interior — balconies are their own thing. Browse Better Homes & Gardens & Gardens or HGTV for inspiration, but don't try to copy everything you see.
Your rug and throw pillows are going to anchor this palette. Choose them first, then let everything else follow.
Step 4: Lay Your Rug and Arrange Seating
This is the foundation of your balcony layout. Place your rug first — it should feel intentional, not an afterthought. Arrange your seating on top. Whether you have a 100-square-foot balcony or 200 square feet, the rug defines the "living" area and makes things feel cohesive.
Your conversation set should face out toward the view or toward each other — not toward your apartment or away from the railing. Functionality meets design here.
Step 5: Add Greenery and Planters
Plants are honestly the secret weapon of balcony design. They soften hard surfaces, add color, and make the space feel alive. But don't overload — go for quality over quantity.
 Boho DIY Room Makeover: Full Revamp Under $200
Cluster planters in odd numbers (3 or 5) along edges or corners. Vary heights and sizes. Include at least one tall planter that adds vertical interest. Mix greenery with trailing plants and maybe one flowering option for pops of color. If you don't have a green thumb, choose low-maintenance options like pothos, snake plants, or ornamental grasses.
Step 6: Install Lighting
Lighting transforms your balcony from a daytime-only space to somewhere genuinely magical at night. String lights create ambiance without being complicated. Solar options from The Home Depot mean zero installation hassle.
Hang them overhead if you can (ask your landlord first if you're renting), or drape them along railings. The goal is warm, soft light — think café vibes, not interrogation room.
Step 7: Layer in Accessories and Personal Touches
Now comes the fun part. Add a side table for function and visual interest. Throw down some outdoor cushions on your seating. Arrange throw pillows with intention — diagonal angles feel more designed than perfectly perpendicular.
Add decorative elements that feel personal to you: a small wall mirror to bounce light around, outdoor artwork, a lantern or two. These finishing touches are what separate "nice space" from "designed space."
Pro Tips
Consider Your Climate: Not all outdoor furniture is created equal. If you're in a harsh climate, invest in quality pieces or storage solutions. Cheap furniture that falls apart after one winter isn't a bargain.
Go Vertical: Balconies are usually light on floor space, so think up. Hanging planters, wall-mounted shelves, and tall statement pieces maximize square footage without crowding.
Layer Your Lighting: Don't rely on one light source. Combine string lights with solar lanterns or a table lamp. This creates depth and ambiance.
Commit to the Details: The difference between an okay balcony and a designed one is usually the small stuff — perfectly arranged pillows, intentional plant groupings, quality hardware. These details take the same amount of time but feel exponentially more polished.
Test Before You Commit: If you're renting or just uncertain, buy smaller pieces first. A few good items you love beats a balcony full of stuff you're lukewarm about.
Maintain a Flexible Layout: Your balcony will change with seasons and with how you're using it. Don't be precious about the setup. Move things around. Swap out plants. Let your space evolve.
Cost Breakdown
← Scroll to see full table →
| Item | Low Cost | High Cost | Average |
|---|---|---|---|
| Outdoor Rug | $80 | $150 | $115 |
| Seating Set | $200 | $400 | $300 |
| Throw Pillows (4-pack) | $40 | $80 | $60 |
| Planters & Greenery | $60 | $120 | $90 |
| Lighting | $30 | $70 | $50 |
| Side Table | $50 | $100 | $75 |
| Outdoor Cushions | $40 |


